Labvolution

Community Browser
cancel
Showing results for 
Search instead for 
Did you mean: 
GregPayne
14533 Views
0 Comments

Knowing how to include C# libraries into a LabVIEW project can be a very useful tool. There are many reasons why you would want to include C# dll’s into a LabVIEW project but the two that come up most often for me is reusing legacy code that was initially written in C# and writing a C# wrapper when wanting to use a third party driver or library.

Sometimes it’s easier to write the wrapper in C# and then implement the library directly in LabVIEW. When interfacing directly to a third party driver/library, the LabVIEW code to accomplish a relatively simple task can be very messy and cumbersome to read; hence the C# wrapper with simple implementation in LabVIEW is my preferred method. This is how I made my LabSSH and LabSFTP libraries.

This post is going to cover the process of creating a C# Class Library, creating a C# Form Application to test the library and then finally how to bring it in to LabVIEW. The example that I have used is a very simple counter class. This class will either count up or count down between an upper and a lower limit. The delay between counts can also be set.

When the counter increments or decrements, the current value will be passed to the calling application (Form Application or later LabVIEW Application) using a callback event.

For each section I have created a walk through video instead of a formal tutorial. I find videos easier to follow and you can see the steps to follow a bit easier.

Creating the C# class library

First we need to cover some definitions:

  • Delegate - A delegate is a type that represents references to methods with a particular parameter list and return type. (Read the full definition here)
  • Event - Events enable a class or object to notify other classes or objects when something of interest occurs. (Read the full definition here)

Creating a C# Form Application to test the library

Adding a form application to your solution allows you to test the library in the environment that it was written. I prefer this to testing directly in LabVIEW as each time a new version of the dll is compiled, LabVIEW needs to be restarted.

By testing the dll in C#, you can get immediate feedback to your dll development. If there are problems with the dll when you move to LabVIEW, you know that the functionality is working so the problem is more than likely in the LabVIEW implementation.

C# LabVIEW Form Application

Implementing the library in LabVIEW

The .NET objects can be found in the Connectivity section of the functions palette.

LabVIEW .NET methods

C# LabVIEW Form Application 2

A common bug in LabVIEW is that the callback vi remains reserved for execution even once the references are closed, the event has been unregistered and the application has been stopped.

C# LabVIEW Callback Event Remains Reserved

A way to get around this is to include an invoke node once all the references have been closed. Right click on the invoke node and select the following: Select Class >> .NET >> Browse >> mscorlib (4.0.0.0) >> System >> GC >> Collect()

As soon as this method is placed on the block diagram, the callback event vi will no longer be reserved for execution.

C# LabVIEW Callback Event Cleared Reserve

In summary, this is a very simple implementation of creating a C# Class Library, testing it using a C# Form Application and then using the Class Library in a LabVIEW project.

You can download the C# and LabVIEW source below and as always if you have any questions, please get in touch.

http://www.labvolution.com/adding-c-class-libraries-labview-applications/

Greg

GregPayne
6519 Views
0 Comments

Leading on from the LabSSH Library that I shared a while back, I have also created a LabSFTP LabVIEW library.


From Wikipedia, SFTP can be described as follows:

In computing, the SSH File Transfer Protocol (also Secure File Transfer Protocol, or SFTP) is a network protocol that provides file access, file transfer, and file management over any reliable data stream.

As with LabSSH, LabSFTP uses a custom .net class that incorporates some of the features of the RENCI SSH library.

LabSFTP offers the following features:

  • Password authentication to a remote host
  • Private/Public key authentication using the openssh key format
  • The ability to get a list of files or folders from a specified location on a remote host
  • The ability to upload files
  • The ability to download files
  • A public method to check the connection status
  • A public method that will send a stay-awake signal at a specified interval


The video below shows the library being used in an application. The LabVIEW application is communicating with a LinuxLite installation running on a virtual machine.

To get up and running, open the library and start by running the test vi. This will create a connection, get a list of files from a specified location, upload a file and download a file. Make sure that your paths are correct. It has been left to the developer to make sure that files and paths are correct before executing the the specific methods.


As with all my posts, you can download the LabVIEW code below. If you have any feedback, please feel free to contact me on Google+ or send me an email. The LabVIEW application has been tested using LinuxLite and on the latest Raspbian Jessie image running on a Raspberry Pi3.

http://www.labvolution.com/sftp-file-transfer-labview/

Greg

GregPayne
3443 Views
0 Comments

This week I attended my local LabVIEW User Group (CSLUG). I have been a member for a few years and can't emphasise enough how much you can get out of a two (sometimes three/four) hour discussion once a quarter.

Topics that are discussed can be anything from new and advanced ideas, different ways of documenting code, error handling and anything else that you have an interest in or need help understanding. I am lucky enough to be part of a LabVIEW User Group that has three LabVIEW Champions and a very long list of LabVIEW Architects and Developers who are more than happy to share their knowledge and experience with those willing to learn.

Here are a few reasons to join a LabVIEW User Group in your area, and if there isn't one, maybe get hold of NI and start one.

  • Meeting new developers in your area with common interests
  • Learning from people who work on bigger/smaller/different types of projects
  • Getting some advice before starting a project
  • Teaching others if you have done something interesting/different, no matter how big or small
  • Seeing how other people solve problems and write code
  • Being part of a community where you can help others and get assistance when needed is invaluable
  • If you don't have experience presenting in front of an audience, this is a great place to learn

What I got out of CSLUG this week:

  • A good idea on how to do error handling. Thanks to Steve Watts and James McNally
  • A very cool way to display chart data. Thanks James Powell
  • Creating scalable buttons using vector graphics. Thanks again to Steve
  • A brief introduction to Database Triggers. This is something I never knew about but will definietly be looking in to. Thanks to John White

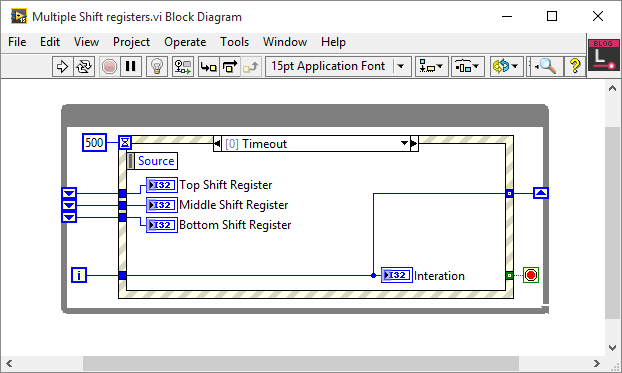
The biggest idea I got from this weeks LabVIEW User Group was from a chat once most people had gone home. Late on the night before CSLUG I was working on a calibration process and was wondering how to get a value from the previous three states in a while loop. It was late, the code was working but could have been better so I left it for the night.

Then after CSLUG, someone mentioned something about multiple shift registers and something just clicked. I went home and immediately wrote a simple vi to test what I thought he meant and it was exactly what I was looking for.

The idea is that adding a shift register to a while loop gives you access to the value of the previous state. This I always knew and use often. What I didn't know is that you can add multiple input terminals to a single output terminal. This means that the top input terminal is the data from the previous state, the terminal below is the data from the state before the previous state and so forth.

Labvolution - CSLUG.png


Here is a video of it in action.


Without attending the User Group I might never have come across this. It also wasn't something on the agenda so you never know what you are going to learn, but you can be assured that you will learn something. Another invaluable tool I use (learnt from a LabVIEW User Group) is the vi property that suspends a vi when called. Have a look this blog post by Chris Roebuck, it will change the way you debug.

My hope for the new year is to try and get to some other LabVIEW User Groups in the area, to meet new people, learn something new and hopefully teach someone else something new.

Have a great Christmas, New Year and happy coding.

Greg

GregPayne
3661 Views
0 Comments

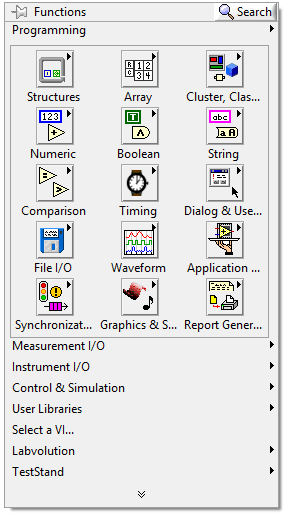
I have been using LabVIEW Quick Drop for the last few years and find it really useful. I almost never open the functions palette anymore. The one problem I find with Quick Drop, not really a problem with Quick Drop, is that I end up using the same functions over and over again, without discovering new, different or more efficient methods of doing things. By opening the functions palette every now and then, you can quite quickly and easily notice new or unused functions.

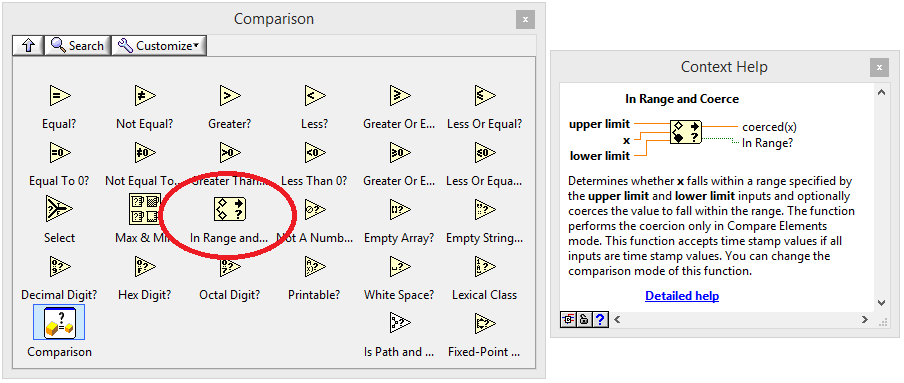
This happened to me a few months ago when I stumbled upon the In Range and Coerce function.

LabVIEW In Range and Coerce Comparison pallette.png

With writing a lot of test software, I am always comparing measured values to target values. When there is an upper and lower limit, I used to use greater than, AND and less than function. This works but I always thought it looked a bit clumsy.

LabVIEW In Greater AND Less than target.png

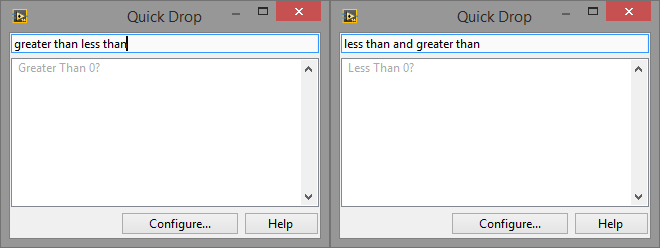
Using Quick Drop and what I thought to be a good search term to find the function that does this in one step proved unsuccessful.

LabVIEW Quick Drop greater and less.png

Then one day I decided to go looking through the Comparison functions palette and came across the In Range and Coerce function. This did everything I needed and more and I have used it ever since.

LabVIEW Quick Drop In Range and Coerce block diagram.png

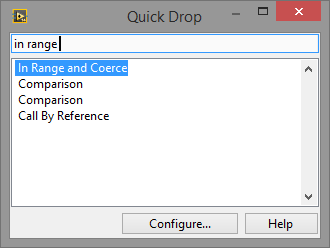
Knowing what the function does and how it works, it’s obvious why it has the name that it does. This does however make it a bit tricky to look for functions without knowing the name of something and just knowing what you want it to do.

LabVIEW Quick Drop In Range and Coerce.png

With the In Range and Coerce function, you can also very easily include or exclude the limits from the comparison.

LabVIEW Quick Drop In Range and Coerce block diagram include limits.png

I think Quick Drop is brilliant and significantly increases productivity; however I also think it’s a good idea to every now and then just browse through the functions palette to see the many, sometimes unused functions that are available.

LabVIEW Functions palette.png

Happy programming and enjoy looking for and using those sometimes unused, new or forgotten functions.

Greg

GregPayne
9909 Views
4 Comments

I have had a National Instruments myRIO for a few months but have not had a chance to use it yet. I bought it so that I can get some experience working in LabVIEW Real Time and with the LabVIEW FPGA.

I started off using the default FPGA build and express vi's but quickly ran into a problem when I tried to use the SPI express vi. Each time I tried to configure the express vi, LabVIEW crashed. After a while this got extremely irritating so I started looking at the myRIO Custom FPGA Project.

myRIO Custom FPGA Project

To use digital IO this project worked really well. Again the problem came when I wanted to interface to an SPI device. I have used SPI a lot in previous projects so understand the concept and how it works. Despite being a project template, with a documentation folder, nowhere does it explain how to use and implement the custom FPGA build. If there is further documentation, please let me know so I can go through it to get a better understanding of the project.

One more small rant before I get on to a solution you can use, is the SPI naming used in the myRIO Custom FPGA Project does not conform to the norm. Again, if I have read and understood it incorrectly, please let  me know.

myRIO SPI Naming Convention

While looking for some documentation on the myRIO project, I came across this example which explains a bit about how to write an SPI driver and also has an example. This example is written for the sbRIO but can be very easily modified to run on the myRIO and also has a nice, simple API. The last section of the NI article outlines in a few lines how to recompile for a different FPGA target. Here is a more detailed description with a few extras that I have added. Firstly, download the example project here.

myRIO SPI Sample project

These are the steps that I followed to to get it working on a myRIO. I'm sure the steps will be very similar when moving to any other FPGA target.

Add your target to the project.

myRIO SPI Add new FPGA target

myRIO SPI Add new FPGA target 2

Once you have the myRIO target added to the project, copy the FIFO's and Example_Host SPI Dual Port.vi from the sbRIO FPGA Target to the myRIO FPGA Target. Make sure to copy them to the FPGA Target and not the RT Target. Then copy Example_Host SPI Dual Port.vi and FPGA Reference.ctl from the sbRIO RT Target to the myRIO RT Target.

For my project I decided to use Connector B. Rename the IO that you are going to use for the SPI communications. Your project should now look like this.

myRIO SPI new FPGA Target

Next we have to edit the FPGA code to work with the new references set on the myRIO FPGA. Open Example_Host SPI Dual Port.vi. I have deleted one of the SPI ports as I only need one.

Open FPGA SPI_SPI Port.vi and change the references in the FPGA IO cluster to point to the IO we configured in the previous step. Right click on each reference and select Conifigure IO Type...

myRIO SPI configure new IO references

Select the corresponding reference and then Replace All.

myRIO SPI configure new IO references 2

Do this for each reference. You will notice that when you change the CS reference, the vi breaks. We will fix this next. The reason the vi breaks is that the CS line on the original sbRIO FPGA code was set to a line and not a port. When changing form a line to a port, the element is now boolean and not U8.

The two changes that need to be made to FPGA SPI_SPI Port.vi are removing the Index Array in the Reset CS case and add a Number to Boolean Array and Index Array to the Set CS case. This will test the state of the LSB which will be the CS state.

myRIO SPI configure FPGA CS

myRIO SPI configure FPGA CS 2

Save and close the vi. In Example_Host SPI Dual Port.vi delete the FPGA IO cluster and then add it again by adding a constant to the subvi. This will update the references that have been changed. Save and close all open vi's. Remove the original sbRIO Target and save the project.

myRIO SPI Removing sbRIO Target

You are now ready to compile your myRIO SPI project. Right click on FPGA SPI_FPGA Top Level.vi and select Create Build Specification. When compiling there are a few choices for where you want to compilation to take place. To compile this locally it took me around 50 min, compared to compiling on the NI Cloud Portal which took less than 10 min.

myRIO SPI NI Cloud Compiler

To access the NI Cloud Portal, you need to register an account as your normal community account does not work here. Once registered you will need to verify your account through an email confirmation. You also need to enter a Product Activation Code. This is not the code that you use as your LabVIEW license. I had to call NI and get them to generate a 20 character code that I entered. You will need an active SSP to get a code generated. The time it takes to call NI and get the code is less than one compilation so is totally worth it.

Once the FPGA compilation is complete, open Example_Host SPI Dual Port.vi. You will notice that the run arrow is broken. To fix this we need to link Open FPGA VI Reference to the correct bitfile. Right click on Open FPGA VI Reference and select Configure Open FPGA VI Reference...

myRIO SPI Configure FPGA VI Reference

Select the Build Specification and then select Overwrite in the dialog that pops up. The vi should now be executable.

Run the vi, select your slave device SPI settings and mode and then press the Write button. You will notice data will be read back.I have a LM74 temperature sensor connected which uses 16 bits SPI mode 0.

myRIO SPI RT Running

There you have it. SPI running on a myRIO FPGA with an API which can be used on an RT host.

As usual, if you have an questions or advice, please feel free to get in touch. You can also download the modified project here.

Greg

GregPayne
20953 Views
1 Comment

Please note that this project is no longer being supported and does not support some of the newer connection methods.


I was asked last week if there was a way to interactively communicate with a remote Linux client. The only way that I knew of was to create a temporary file with the commands and then use Plink (a part of PuTTY) to execute the file of commands on the remote machine.


LabVIEW SSH plink PuTTY


This works well when you want to execute a list of commands and are not interested in the response from each command. If you want the response from each command, then you will need to call this method for each command. This is not very efficient as each time this method runs, it will log in to a different session before executing the command.


This method will also not work if you need to run custom applications on the remote client where the session needs to stay in memory.


I did a bit of searching and didn't come across any LabVIEW solutions that suited my needs. I did find a really good C# library that looked like it would work. It is still actively supported and the latest version is only a few months old. (All good so far)


As the library is massive, my plan of action was to use the library to write my own C# dll that would do what I wanted it to do. All that I needed my library to do was connect to a remote client, execute commands and return the response and then disconnect when finished.


C# class


I decided to put everything into a class so that I can add to it in the future. There are still a few features that I want to add but will leave them for another time.


connect()


You need to create the following objects that will be used by the various parts of the application.


  • SshClient - used to connect and disconnect from the client
  • StreamReader - this will be used to read what is returned from the client
  • StreamWriter - use this object to write to the remote client


public void connect()
{
sshClient = new SshClient(remote, user, password);
sshClient.Connect(); //connect to the client
stream = sshClient.CreateShellStream("dumb", 80, 24, 800, 600, 1024);
reader = new StreamReader(stream);
writer = new StreamWriter(stream);
writer.AutoFlush = true;
}


Once these references are created, they are stored in public properties.


executeCommand()


The execute command methods writes a string to the StreamWriter object.


public void executeCommand(string command)
{
writer.WriteLine(command);
writer.AutoFlush = true;
}


Once the string has been written, the buffer is flushed.


disconnect()


The disconnect() method closes the session and disconnects from the client.


public void disconnect()
{
sshClient.Disconnect();
}


The class only contains these three methods. There is one more step that needs to be taken and that is to read the StreamReader object for responses from the client. I have left this out of the class and leave it up to the application to do the reading.


readReader()


private void readReader()

{
try
{
int i;
for (i = 0; i < 3; i++)
{
Thread.Sleep(500);
if (ssh.stream.DataAvailable)
{
tbOutput.AppendText(ssh.reader.ReadToEnd());
tbOutput.ScrollToCaret();
Thread.Sleep(50);
}
tbDebug.AppendText(i.ToString());
}
}
catch(Exception ex)
{
MessageBox.Show(ex.Message.ToString());
}
}


In the readReader() method, I monitor the DataAvailable flag. I have had to play around with the number of iterations of the for loop as different tasks take different amounts of time. Some examples that I came across only call this method once, but I found that some data is then missed. Setting the iteration too high causes unnecessary delays and setting it too low does not allow all the data to be read. There are other methods that can be used, but I still need to give those a try.


Implementation in LabVIEW


My main aim was to get a LabVIEW application working so once I had my class written, I moved into LabVIEW mode and connected everything up.


Using the .NET palette, I was able to call the constructor, read/write properties and execute methods on the class.


LabVIEW .NET pallette


I wrote a simple state machine application to test the class. All the references are stored in a typedef cluster which is shifted around each state. On the front panel there are buttons that generate events to call each case.


Constructor and connect to client


LabVIEW SSH constructor


LabVIEW SSH connect


Execute commands on the remote client


LabVIEW SSH Execute Command


Disconnect from the client


LabVIEW SSH Disconnect


Read the StreamReader object


LabVIEW SSH readStream


LabVIEW SSH readStream 2


With this application, I am able to connect to a remote client, execute commands as I would in PuTTY and then disconnect when I am done.


There are a few things that I still need to sort out. The main one is that terminal characters are being returned. These are not seen in PuTTY as PuTTY removes them from the string that is shown. The other is that the prompt is being written twice. From what I have read this is caused by the client echoing what it receives. I still need to look at this too.


In future versions, I also want to add SFTP functionality. Being able to upload and download a file will be quite a nice feature. I also want to add different login options. Being able to login using private keys will also be useful.


As with all my posts, you can download the LabVIEW and C# code. If you have any feedback, please feel free to contact me on Google+ or send me an email. Both the C# and LabVIEW application have been tested on the default Raspbian image running on a Raspberry Pi B.


Greg

www.labvolution.com

GregPayne
9396 Views
0 Comments

The project that I am currently working on requires Perl scripts to be executed through a LabVIEW application which configures the UUT. As Perl is not natively supported by Windows and LabVIEW (I might be wrong here), other tools are needed in order to execute the scripts correctly.

As the scripts were developed on Linux, there was never an issue running them before developing the LabVIEW application.

Running Perl scripts on Windows

First we need to be able to execute the Perl scripts on Windows, then we can move on to LabVIEW.

The tool I am using is called Cygwin.

Cygwin is:

  • a large collection of GNU and Open Source tools which provide functionality similar to a Linux distribution on Windows.
  • a DLL (cygwin1.dll) which provides substantial POSIX API functionality.

To install Cygwin, these are the steps I took:

  • Download and install the your require for your PC
  • Select the Root Directory (C:\Users\gpayne)
  • Select the Local Package directory (C:\cygwin)
  • Select Available Download Sites: http://cygwin.mirror.constant.com
  • When selecting packages make sure you select perl(under Interpreters Group) and ssh (under Net Group) packages.
  • Ensure to add the shortcut to the desktop (We will use this later)

Once installed, running the shortcut on the desktop will open a terminal.

Cygwin Mintty terminal

The pwd command will give you the location and should be the same as set by the Root Directory above.

Create a Perl script in that directory. As an example I have created a Perl script that just prints a number for 5 seconds and then exits. To run the script, enter ./Test_Script.pl in the command line and watch as it runs.

#!/usr/bin/perl -s  my $number = 5; while($number--) { print "$number\n"; sleep 1; } exit 0;

Cygwin Mintty terminal running Perl script

Running Perl scripts in LabVIEW

To execute an external application from LabVIEW, one way is to use the System Exec vi. This covers executing the application/script, however Windows is still not able to run a Perl script if it is just called.

The first thought that popped in my mind was to use a batch file.

Using Windows batch (*.bat) files

After doing a bit of research, I found a simple way of calling the Perl script, using bash.exe from a batch file.

@echo off  C: chdir C:\Users\gpayne\bin  bash --login -c "./Test_Script.pl" exit 0

This batch file, navigates to the bin directory that was installed by Cygwin and executes the Perl script using bash. The batch file then exits when the script completes.

To accomplish this in LabVIEW is really simple. Just pass the path of the batch file into the command input of System Exec and run the vi. The file runs and the output is reported.

LabVIEW system exec batch file Perl script

LabVIEW system exec batch file Perl script output

This is great because now we can run a Perl script on Windows through LabVIEW and get the Standard Output and Return Code once the script is complete.

This worked well until I started seeing times when the batch file would not exit. I tried all the escape codes that you can call on exit but nothing worked consistently.

The Perl script would execute perfectly every time when run in the terminal, but when run from the batch file and LabVIEW, it would not.

This was not acceptable so I had to look for another way to execute the script successfully every time.

Using Cygwin and Mintty.exe

As the Perl script worked perfectly when run in the terminal, I started looking at ways of replicating it from within LabVIEW. First was to look at what was run when you double click the desktop shortcut. The target points to C:\Users\gpayne\bin\mintty.exe -i /Cygwin-Terminal.ico - and this is what got me started.

I noticed that the application that is run is called Mintty.exe so I took a look at the help file. To get the help file, just type mintty --help at the terminal.

Cygwin Mintty terminal help

I was not interested in the --icon option, but the --exec option looked promising. This got me thinking of what I wanted to execute using Mintty.exe. I needed to execute my Perl script using bash.

So I started to build up my string that I would write to System Exec in LabVIEW. After some trial and error, I was successful in executing the Perl script. This is what I came up with.

C:\Users\gpayne\bin\mintty.exe -e /bin/bash -c '/home/gpayne/Test_Script.pl'

The bash help files are also helpful so from the terminal type bash --help or bash -c "help set".

This would execute the Perl script with bash running in Mintty. This was all good until I noticed that the standard output was not being reported back to LabVIEW. I needed the standard output as this is what I parse to determine if the script was successful or not.

This is very easily solved by piping the standard output from the script to a file and then get LabVIEW to read the file once the script exits. This does add an extra step, but by executing the script in this way, it runs and exits cleanly every time, being much more reliable than using the batch file.

This is my final string that was used.

C:\Users\gpayne\bin\mintty.exe -e /bin/bash -c '/home/gpayne/Test_Script.pl > StandardOutput.txt'

LabVIEW system Mintty bash Perl script output

After trying both methods, I settled on using Mintty instead of Windows batch files. They seemed a lot more reliable over many executions.

This method can surely be expanded to running Python scripts too, which I will leave for another day.

As usual, please direct any questions, comments or tips to my email or on Google+.

Greg

GregPayne
4063 Views
0 Comments

A LabVIEW project that I have previously worked on had many different components, each with there own version numbering. A global variable was used to READ the version numbers when the application was run.

This worked well, but became rather cumbersome when we had to manually change the global variable each time we modified or built the application. This became apparent and very frustrating when a build would be run, which could easily take an hour or two to complete, and only when running the application did we realise that we forgot to update the global or save its default value.

I thought there must be an alternative so went about exploring the application properties and methods. As it turned out, it is really quick and easy to pull the application version number from the built executable in LabVIEW.

LabVIEW Application Version main

LabVIEW Application Version subvi block diagram

Only two property nodes and one method are needed to get the version number from the built application. First you need to get the type of application that is being run. An enumerated type is returned and if this vi is run from within an application, the App.Kind property will be "Run TIme System". In this case, pass in the path to the executable, and then get a reference to the FileVersionInfo. The FileVersion property can then be read. This will be the same value as set in the Version Information setting of the Application Properties.

Application Version Information properties

The App.Kind property can be used in a number of ways when you want specific settings to be applied only when running in certain environments.

I hope you find this useful and as usual the project used in the post can be downloaded here.

Greg

GregPayne
10788 Views
4 Comments

Following on from the LabVIEW Actor Framework Basics post, I wanted to continue the project showing how to use a Linked Network Actor. The Linked Network Actor (LNA) library uses network streams to communicate between Actors across a network connection. You can download the library and read all about the details over on the community page.

Either start at the beginning of the previous post, or just download the project here.

Once you have the project open, start by creating a new class, Remote Actor, and setting its inheritance to Actor.

LabVIEW Actor Framework Remote Actor Inheritance

Next you need to add the Linked Network Actor library to your project. If you used VIPM to install the library, you can find the lvlib in the following location. C:\Program Files (x86)\National Instruments\LabVIEW 2013\vi.lib\NI\Actors\Linked Network Actor

LabVIEW Actor Framework Linked Network Actor.lvlib

For your newly created Remote Actor, follow the steps in the previous post for overriding 'Pre Launch Actor.vi', 'Actor Core.vi' and 'Stop Core.vi'. You will also need to create a launcher VI to start the Remote Actor. All these steps have been covered before and you will be left with four VIs that look as follows.

LabVIEW Actor Framework Pre Launch Init

LabVIEW Actor Framework Actor Core

LabVIEW Actor Framework Stop Core

LabVIEW Actor Framework Remote Launcher

You will now have a normal Actor that can be run from the launcher and will stop cleanly when the front panel of the Actor Core is closed.

Adding the Linked Network Actor - Remote Actor

Create a global VI which is used to define the Remote Actor identity, Local Actor identity and the IP Address of the Remote Actor. I have used a global VI in this example to keep these settings in one place, but in a proper application, these values should be saved in some sort of config file and then added in using the constructors.

Actor Framework LNA names

Now we need to create the Launch LNA VI and the Kill LNA VI. The Launch LNA VI will be run from the Remote Actor Core and the Kill LNA VI will be run from the Remote Stop Core.

In the Launch LNA VI, you need to launch an instance of 'Linked Network Actor.lvclass'. However, before the Actor is launched, a few properties need set. Using the global VI from above, set the name to be RemoteActor, set a buffer size and a timeout. Once these properties are set, the Actor can be launched using the Remote Actor as the enquerer. Make sure to set the front panel to FALSE and wire the Remote LNA Enqueuer into the private data of Remote Actor. This enqueuer will be needed later when we want to send messages.

LabVIEW Actor Framework Remote Actor Launch LNA

Next we need to create the Remote Kill LNA VI which wraps the Send Normal Stop VI and is called from the Remote Stop Core. This will stop the Remote LNA when the Remote Actor is stopped.

LabVIEW Actor Framework Remote Kill LNA

Local Actor

Once we have the Remote LNA running, we need a local LNA that is going to connect to it. Once this connection is made, messages can be sent between Actors across a network.

Again we need to create a Launch LNA and Kill LNA VI which will be launched by the Parent (local) Actor Core and stopped by the Parent (local) Stop Core respectively. Both VIs are similar to the Remote version, except for a few additions to the Launch LNA VI.

In the Parent Launch LNA VI, we need to specify connection URL which consists of the Remote Name and Remote IP Address. Once this URL has been constructed, we can run the 'Send Connect.vi' which is part of the LNA library.

LabVIEW Actor Framework Parent Launch LNA

The Parent Kill LNA VI also uses the Send Normal Stop VI and is run from the Parent Stop Core.

Sending a Message

Once you have the Remote LNA and Parent LNA set up, all you need to do is create a method to run and build a message using the Actor Framework Message Maker tool. Then when you want to send a message, unbundle the LNA enqueuer and wire the message into the 'Send Transmit Network Message.vi'. This will execute the remote method referenced in the message Do.vi.

LabVIEW Actor Framework Send LNA Message

If you need to send data as part of the message, you will be able to add the data to the message using property nodes.

Messages can now be sent across a network with ease.

As usual the working project can be found here and if you have any comments or advice, please send me an email or alternatively leave a comment on Google+. When running the program, make sure you start Remote Actor first, and then Launch the Parent Actor. It must be done this way as the Parent connects to the Remote.

Greg

GregPayne
41776 Views
23 Comments

I have tried a number of times over the last year or so to get my head around the Actor Framework in LabVIEW. I started by reading the recommended starting point and went through all the examples, templates and hands-on. After trying a number of times, unsuccessfully, I put it to one side for another day.

My two main stumbling points, I felt, was not having a project to implement the framework in and not really knowing where to start. All the examples that I worked through started with a relatively large project and I could not find an example that starts with an empty project and builds up from there.

Last week a colleague explained the basics to me and over the last two weeks I have been working on a large project using the Actor Framework. I am finally getting an understanding of it and seeing the potential power in using the framework. Below is an example/tutorial on how to start from an empty project.

Recommended reading

Now for my example

Start off with an empty project and add three virtual folders named, Launcher, Parent Actor and Child Actor.

LabVIEW Actor Framework empty project

  • Launcher: Main vi which is used to start the program. Launches Parent Actor
  • Parent Actor: Main Actor which will launch Child Actor
  • Child Actor: Another Actor that can do things

The Parent Actor and Child(ren) Actor(s) will be created in a similar way. The main differences are the way in which they are started. I will explain how to create the Child Actor and then only show the differences in creating the Parent Actor.

You need to add Actor Framework.lvlib to your project. This is needed so that the classes we are going to create can inherit from Actor.lvclass. Actor Framework.lvlib can be found in C:\Program Files (x86)\National Instruments\LabVIEW 2013\vi.lib\ActorFramework\.

Child(ren) Actor

Create a new Class inside the Child Actor folder and save it.

LabVIEW Actor Framework Child Class

Create virtual folders called Messages and Framework Overrides.

LabVIEW Actor Framework Child Class 2

Change the inheritance of Child Actor.lvclass to inherit from Actor.lvclass.

LabVIEW Actor Framework Child Class Inheritance

Create three vi’s that override the Actor Core, Pre Launch Init and Stop Core. Pre Launch Init will be used to create a string notifier and Stop Core will be used to clean up the notifier. These vi’s are called before and after Actor Core is launched and stopped respectively. Actor Core will be the main vi that is run. This is where your Actor’s functionality happens. Save these vi’s and add them to the Framework Overrides folder in the project.

LabVIEW Actor Framework Override

Follow the following steps to be able to stop the Child Actor when Actor Core is closed.

Child Actor.lvclass:Pre Launch Init.vi

  • Create a notifier with an empty string for the data type
  • Use the notifier out terminal to create a control, rename it stop notifier and then move it into Child Actor.lvclass private data cluster.
  • Bundle the notifier out into the Child Actor object

LabVIEW Actor Framework Pre Launch Init

LabVIEW Actor Framework Private Data

Child Actor.lvclass:Stop Core.vi

  • Unbundle the stop notifier from the Child Actor object
  • Release the notifier

LabVIEW Actor Framework Child Class Stop Core

Child Actor.lvclass:Actor Core.vi

  • Create a while loop and an event structure inside with a 20ms timeout
  • On timeout, add a Get Notifier Status and wire the error cluster to the while loop stop terminal
  • Unbundle stop notifier from the Child Actor object and wire the notifier into the Get Notifier Status vi
  • This monitors the notifier every 20ms and when it is released in Stop Core, it will stop Actor Core. This is one of many ways that can be used to stop the Actor.
  • Add an event for Panel Close?
  • From the Actor Framework functions palette, place the Read Self Enqueuer outside the while loop and the Stop Actor inside the Panel Close? event.
  • Wire the Child Actor object to the Read Seld Enqueuer and the Self Enqueuer to the Stop Actor.

LabVIEW Actor Framework Child Class Actor Core

The Read Self Enqueuer vi gets the queue for itself. So what is happening here is the Stop Actor vi is being run on the Actors own queue which will call Stop Core, release the notifier and then stop the entire Actor.Next, create the Parent Actor using the same steps. Once complete, add the following modifications.

Parent Actor.lvclass:Actor Core.vi

The Parent Actor will be responsible for launching the Child Actor. To do this we need to:

  • Add the Launch Actor vi with the Read Self Enqueuer defining which queue to execute on.
  • Add a control of the Actor’s enqueuer to the Parent Actors private data and bundle it into the Parent Actor object.
  • Drag the Child Actor.lvclass from the project window onto the Parent Actor Core block diagram and wire it into the Launch Actor vi.

This will now launch the Child Actor before running the Parent Actor core. Make sure that if you want to show the front panel of the Actor being launched, you need to set the Open Actor Core front Panel? To TRUE as the default is false.

LabVIEW Actor Framework Parent Class Actor Core

Creating the Launcher to start the Parent Actor

  • Create a new vi in the Launcher folder and name it Launcher.vi
  • You first need to create a queue for the Actor Core to be launched on.
  • Then Launch the Actor by wiring in which class you want to launch. In this case we wire in the Parent Actor class
  • Then release the queue and close the front panel. You can make fancy launchers with splash screens, but this one is just a plain vi with an empty front panel

LabVIEW Actor Framework Launcher

You should now be able to run the launcher which will start the Parent Actor. The parent Actor will then start the Child Actor. When you close the two Actors, they should stop cleanly. If this works then we can carry on. If not, go back and make sure that you are releasing all the notifiers and queues.

LabVIEW Actor Framework Cores running

Communication between Actors

Add a Boolean control and indicator to the Parent and Child Actor Core. Setting the control in the one Actor will set the indicator in the other Actor. This will show the basics of sending messages between Actors.

Parent to Child Actor

You need to add references to both Actors for their respective indicators. We will use these references to get and update their state from other vi’s with the class. You also need to add a reference control to the Parent and Child class private data.

LabVIEW Actor Framework Parent Class Actor Core_2

LabVIEW Actor Framework Parent Class Actor Control

Make sure you add references to both the Parent and Child Classes.We now need to create a method (vi) in the Child Class that is going to change the Child indicator when told to do so. Create a new VI from Static Dispatch Template in the Child Class. Save it with the name Get state from Parent.vi.Add a Boolean control to the front panel and connect it to the connector pane. In the block diagram, unbundle the indicator reference, wire it into a property node and then write the Boolean state to the value property.

LabVIEW Actor Framework Child Class method

This vi is the method that does the work of changing the Child Actor front panel indicator. We now need a way to be able to run this vi from the Parent Actor. There are some tools that allow us to create these messages really easily.From the project window, select Tools and then Actor Framework Message Maker. This will open a window and allow you to create messages for methods that are in your project. Select the method that we just created and click Build Selected.A Get state from Parent Msg.lvclass is created with two vi’s. Close the vi’s and move the class to the Messages folder within the Child Actor.

LabVIEW Actor Framework Project with Child Actor message

The Send Get state from Parent vi is used to add the data to a queue and the Do vi calls the method that we created a step back. I am not going to go into the details of these vi’s but feel free to open them and see what is going on.Now that we have our Message and our method, we need to go back to the Parent Actor and to define when to execute this message.In the Parent Actor Core, add an event case to handle a value change from the Boolean control. This is where we will send the state to the Child Actor message. Add the Set Get state from Parent vi to the event case. This will put the Boolean control state onto the queue of the Child Actor. The Do vi will then be called which will then run the method from within the Child Actor Class. This will then update the front panel indicator of the Child Actor.

LabVIEW Actor Framework Parent Class Actor Core_3

Save your project and run the Launcher vi. Notice that changing the control on the Parent Actor, changes the indicator of the Child Actor.

LabVIEW Actor Framework Cores running_2

Child to Parent Actor

Now repeat the process to send the state from the Child Actor up to the Parent Actor.


  • Add a method to the Parent Actor Class writing the state to the indicator reference
  • Create the messages using the Actor Framework Message Maker tool
  • Add an event case to the Child Actor to handle the state change
  • Wire the control into the Send Get state from Child vi
  • Wire in the queue. You now need to get the caller enqueuer and wire that queue in.
  • Save the project and it should now work

LabVIEW Actor Framework Cores running_3

The final project should like something like this.

Actor Framework Final Project

You are now able to send states both ways between the Parent and Child Actor.I used these points to get a better understanding on how the Actor Framework works:

  • The main program of an Actor is the Actor Core that is overridden from the base class
  • Each Actor has its own queue
  • Use the Actor Framework Message Maker tool to create messages to communicate between Actors
  • Use the Read Self Enqueuer vi to get an Actors own queue
  • Use Read Callers Enqueuer vi to get the queue of the Actor that Launched it
  • Think of each Actor as its own process with a queue. To speak to a specific Actor, create a message and tell it which queue to execute on

It took me a week or so to get my head around what goes on. I still have a way to go but am getting there and the more I use it, the more confident I am getting. This is a very basic example but I feel it’s good to get going and to understand the framework without starting with a large project.

I have gone into detail with some of the above steps and breezed over others. I hope I have made the most important steps clear enough. If you are stuck with anything, please leave a comment and I will try help as much as I can. You can get a copy of the entire working project here. It has been written in LV2013 SP1.

Thanks for reading and I hope that I have been able to clear the fog over Actor Framework for some people.

Greg

(Originally found at http://www.labvolution.com/labview-actor-framework-basics/)

GregPayne
4642 Views
0 Comments

I have been playing with LabVIEW Vision Development Module a bit over the last few months. I have an idea for a project that tracks the movement and vibrations of an object. Using a standard 24 bit RGB colour works, however if the same x;y coordinate is passed over more than once, visually it is difficult to see what is happening.

While making drawings in Inkscape, I am able to change the opacity/alpha level of a colour. This adds an extra 8 bits onto the colour, making it a 32 bit RGBA colour. According to Wikipedia:

The alpha channel is normally used as an opacity channel. If a pixel has a value of 0% in its alpha channel, it is fully transparent (and, thus, invisible), whereas a value of 100% in the alpha channel gives a fully opaque pixel (traditional digital images). Values between 0% and 100% make it possible for pixels to show through a background like a glass (translucency), an effect not possible with simple binary (transparent or opaque) transparency. It allows easy image compositing.

RGBA Colour Palatte

The above image, made in Inkscape, indicates how many dots with an alpha level of 0x2D, gets a more intense colour the more layers are added on top of each other. My project idea will then use this concept to show a type of intensity map.

I ran into my first problem when using the standard LabVIEW 2D Picture. From what I have seen, this is the only indicator in the standard LabVIEW package where you can display and draw pictures. This works well, and I have used it before, but only 24 bit RGB colours can be drawn. Even if you import a png image with alpha colours, they will be lost when displaying the image in a 2D Picture.

This led me to look at other ways that images can be displayed and drawn in LabVIEW. I decided to try using a .NET container with a System.Windows.Forms PictureBox.

LabVIEW .NET container - picturebox

I have used Windows dll’s before and they have generally worked quite well, obviously only on Windows machines. The main problem that I find is getting the versions correct and also finding the methods and properties that you want to use, as the libraries are usually very large. To get around this I turned to some C# and VB examples to see where to get started.

My aim was to get the concept working so that I can use it in a bigger project. I used my mouse cursor position to to draw many filled circles that follow the mouse. These were the steps that I followed:

Add the .NET Container to the front panel and insert a PictureBox control:

I made the container fill the pane so that it was easier to get the mouse position relative to the panel. The PictureBox can be found in the System.Windows.Forms class.

Create a new bitmap the same size as the PictureBox:

It is good practice to create a bitmap inside the PictureBox and then do all your drawing onto the bitmap. This makes saving and clearing the image a lot easier. Once the bitmap is created, add it to the PictureBox as an image. The bitmap can be found in the System.Drawing class.

Create the SolidBrush that we will use to draw the filled circles:

This is where we can define the colour (RGB) as well as the alpha level. Color and SolidBrush are both from the System.Drawing class.

One top tip to remember, when looking for the colour property and method, remember to spell it color and not colour. Windows is American so the spelling can catch you out.

Once you have defined the brush, you can start to draw onto the bitmap using the System.Drawing.Graphics class. In this case, I chose to draw a FillElipse (filled circle), but you can choose one or more of many different drawing tools.

I ran this in a while loop so that I could draw many circles and then when I stopped the application, I called the Bitmap.Save method and saved the bitmap as a png image. By saving it as a png image, you will keep all the alpha colours. The slower you move the mouse, the close the circles are together which implies that the circles are darker, more layered on top of each other.

LabVIEW alpha opacity colours

You can see that I also added a date and path to the image. This is what the image will look like in the .NET PictureBox. If you import the same image into LabVIEW using the Read PNG File function, you get this:

PNG in LabVIEW 2D Picture

As you can see, all the alpha colours have been lost. You can set the alpha level threshold so that anything above that level is set to its equivalent solid colour.

So although it is a bit more work to get the PictureBox working and set up, it is much better to display 32 bit images.

If you want to have a look at the code, please feel free do download it from here. As I mentioned earlier, versions might play a role in the vi working properly so I have developed this using LabVIEW 2013 on a Windows 8 machine.

If you need any assistance or have any tips, please leave a comment and I will get back to you.

Greg

(Originally posted at http://www.labvolution.com/using-alpha-colours-labview/)

GregPayne
7207 Views
0 Comments

The last few days I have been playing around with the Web Services feature in LabVIEW 2013.

I have written a blog on my initial progress which can be seen here. http://etchingpathways.blogspot.hu/2014/01/labview-web-services-with-twitter.html

The plan is to write more parts as I progress the project.

Greg

GregPayne
6692 Views
0 Comments

I have been trying to get a handle on LVOOP for many months now but have been battling to get the concept into my head. I understand the concept of OOP, or at least I think I do, but really battling to convert that into the LabVIEW world.

See the rest of the post over on my blog.

http://etchingpathways.blogspot.co.uk/2013/12/labview-getting-started-with-lvoop.html

All comments and further tips would really be appreciated.

Greg

GregPayne
6536 Views
0 Comments
GregPayne
2986 Views
0 Comments

I have started listening to the LabVIEW podcast by VI Shots and am finding them really interesting. The last one I listened to was Five Tips to improve your LabVIEW Application with Fabiola De La Cueva. After listening to the podcast, I could relate to most of the tips and see where I was going wrong.


Then earlier this week I attended NI Days where I went to a presentation by LabVIEW Champion, Steve Watts and he spoke about the same subject. This triggered in my head that I should start to make an effort to create a set of rules for myself to stick to in all my applications.


So today I started by looking at constants differently.


This is from Fabiola’s presentation where she asks what is a constant?

As can be seen from the slide above, PI is a constant, the number of seconds in a minute is a constant but the number of flux capacitors in the DeLorean might change so is therefore not a constant.


This means that using ‘constants’ in a program should be limited to ‘True Constants’ and ‘Variable Constants’ should either be wrapped in a vi or loaded from a configuration file.


Wrapping a constant in a vi and adding all your applications’ constants to the project makes them easy to manage and change if needed.

I have created a library which I will add to all my projects. This library will then be used as a template for the most common constants used in an application. I then make copies of each as needed, name them ‘xxx_constant.vi’ and use a comment in the application to indicate what the constant does.


I have tried to keep the icon colour the same as the default wire colour for each type making reading the application easier. You can get a copy of my library here if you want to have a look at it or use it.


The other method mentioned in the presentation is reading variable constants in from a configuration file. I have also tried this using an XML file which works well and is quick to implement. I will do another post with my vi’s I used some other time.


I hope this post has been able to help someone use better style. If I have done something wrong or not understood the concept properly, please leave a comment and let me know so that I can correct it and learn better style.

Original artical posted at http://etchingpathways.blogspot.co.uk/2013/11/labview-looking-at-constants-differently.html


Greg

GregPayne
7051 Views
0 Comments

Please view my blog over at http://etchingpathways.blogspot.co.uk

I will also be adding my LabVIEW content here.

Thanks,

Greg