- Subscribe to RSS Feed
- Mark Topic as New
- Mark Topic as Read
- Float this Topic for Current User
- Bookmark
- Subscribe
- Mute
- Printer Friendly Page
Darren's Weekly Nugget 10/30/2006
10-30-2006
11:50 AM
- last edited on
05-04-2025
05:57 PM
by
![]() Content Cleaner
Content Cleaner
- Mark as New
- Bookmark
- Subscribe
- Mute
- Subscribe to RSS Feed
- Permalink
- Report to a Moderator
- One of the first things I noticed was that my picture updates much more quickly and smoothly when I have "Erase First" deselected on the Picture Control's right-click menu. If I need to change something on the picture, I try to only redraw the necessary portion of the picture, leaving the rest unchanged. So if you have a big grid of objects, and you have Erase First deselected, you can draw individual cells of the grid when they need changing, as opposed to redrawing the entire grid.
- If you do need to redraw your entire picture, you will need to erase it first (otherwise the new drawing will overlap the old drawing). Thankfully, you can simply use the Erase First property of the picture control with a "1" wired in...this basically will erase the picture one time, without changing the actual "Erase First" setting.
- In my project, I'm doing a lot of dragging and dropping on my Picture Control. One slick thing I've been able to do is actually mimic "move" behavior, where when you click and drag an "object" in the picture, it will actually appear to "move" with the mouse cursor until I "drop" the object. There are two ways to approach this problem...one way would be to actually redraw the image in the main picture control as you're moving the object. There is another way which seems to perform a lot faster...specifically, you can have a second picture control...it's a transparent picture control whose borders are also transparent. In this case, you draw the "object" you want to move in this second picture control. Then, you change the position of the second picture control to be "under" the mouse cursor. Then, as Mouse Move events fire, you simply change the position of the transparent picture to stay with the mouse cursor. It turns out that this approach is *much* faster than redrawing the main picture on every Mouse Move. Oh, and it looks really, really cool. 🙂
- There are a ton of functions in the Picture Functions palette to draw objects in a picture control...Draw Point, Draw Line, Draw Rect, etc. I rarely use these VIs. Instead, I use a program like Microsoft Paint to draw bitmaps of the objects I'll be using in my Picture Control. In many cases, I'll use the Read from BMP File VI to read the bitmap into LabVIEW, then I'll convert it to a 2D array using the Unflatten Pixmap VI. At this point, I have a 2D array constant that I can use on my diagram with the Draw Unflattened Pixmap VI. Now, instead of a bunch of complicated drawing VIs, I just have one 2D array constant that I have to update only if my object image changes.
- One exception to the above rule is that I have been using the Get Text Rect and Draw Text in Rect VIs extensively. These VIs make it very easy to add text to my picture, and to define the regions of my picture that have text. This allows me to do very cool things like keep track of the regions of my picture that are text, such that when they get clicked on, I can show a previously-hidden Combo Box, that, in essence, allows the user to edit the text "within" the picture control.
Ok, that was rather stream-of-consciousness, but I hope it serves at least as a starting point for people wanting to make sophisticated LabVIEW UIs by utilizing the Picture Control. Before I worked on this project, somebody once told me that you can pretty much make *any* kind of UI in LabVIEW with the Picture Control. And you know what? I think they're right!
10-30-2006 12:02 PM
- Mark as New
- Bookmark
- Subscribe
- Mute
- Subscribe to RSS Feed
- Permalink
- Report to a Moderator
Nice Nugget Darren!
Your suggestion for speeding up the dragging operation is a real gem.
I have generally avioded the drag-n-drop in my applications due to the performance hit.
Thank you!
Ben
10-30-2006 12:32 PM - edited 10-30-2006 12:32 PM
- Mark as New
- Bookmark
- Subscribe
- Mute
- Subscribe to RSS Feed
- Permalink
- Report to a Moderator
...and to help sell the versitility of the picture control, here is a collection of just some of the GUI I've developed using the picture control.
Annotated graph (in LV 6.1)

Derivative of a bear (one of my wifes favorites)

Reconfigurable fume hood image 1

fume hood image 2

Protocol analyzer display
Rotating graph (projected behind band while playing)

And my first serious attempt at using the picture control, my model railroad

Ben
Message Edited by Ben on 10-30-2006 12:32 PM
10-30-2006 02:57 PM
- Mark as New
- Bookmark
- Subscribe
- Mute
- Subscribe to RSS Feed
- Permalink
- Report to a Moderator
Or you can feed an array of pictures into Concatenate strings to concatenate the pictures.

10-30-2006 04:14 PM
- Mark as New
- Bookmark
- Subscribe
- Mute
- Subscribe to RSS Feed
- Permalink
- Report to a Moderator
10-31-2006 10:49 AM
- Mark as New
- Bookmark
- Subscribe
- Mute
- Subscribe to RSS Feed
- Permalink
- Report to a Moderator
is warning or alarm, X is fault, I is inactive.
Matt
10-31-2006 11:10 AM
- Mark as New
- Bookmark
- Subscribe
- Mute
- Subscribe to RSS Feed
- Permalink
- Report to a Moderator
Thank you for sharing that Matt!
I will embed the image here.
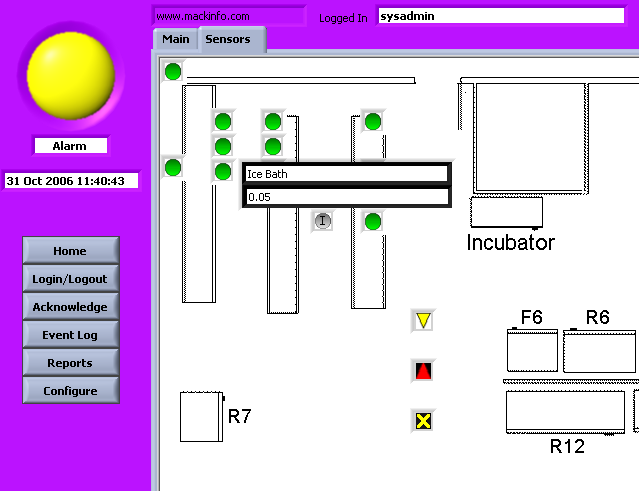
The above image shows part of the UI that is available in a 21-CFR-11 complient Environmental monitoring system that is commercially available and allows the end users to import a set of map of their facility. They can define the position of icons assocated with the physical location of sensors that are integrated using networks of cFP nodes.
Mouse-ver an icon gives you the name of the sensor (Ice Bath) and the current reading.
Right-click on the icon gives you a plot of the variable vs time.
Left-Click (by an authorized user) allows access to the configuration of the sensor.
Note:
Due to the high channel count of this application, the picture control allowed us to by-pass the " max 550 controls on FP" limitation that existed in earlier version of LV.
Ben
11-01-2006 01:06 PM - edited 11-01-2006 01:06 PM
- Mark as New
- Bookmark
- Subscribe
- Mute
- Subscribe to RSS Feed
- Permalink
- Report to a Moderator
Although I may not have a flashy FP to show at this moment, I think I have you all topped out for working w/ the picture control.
I'll try to keep this short but I'm really excited to talk about it so we'll see how it goes.
It all started w/ needing to stream a picture from a frame grabber to the front panel on a really crappy PC.
Taking the data as an array of u8 and doing the conversion w/ the LV VIs and redrawing for each frame was really slow, about 8fps.
I couldn't use the vision toolkit as it needed to be platform independent.
Solution: Totally disect framework of the picutre control on a byte level (flatten to string), do a repace on the existing string w/ the new data from the camera(inplace function(no new memory)), and then do a concantenate string w/ a blank picture and redraw to the picture control
Result: over 45fps
All that disection....wait let me explain what disection meant
Disection(verb): Opening up every LV picture VI, seeing how the data is structured within each picture type and its appropriate opCode, and then keeping track of each element that was drawn on a picture control so thatt if I needed to modify, say the color of a line amidst 200 lines. I didn't need to redraw all 200 lines w/ 1 haveing the new color, I would just recall the location in the byte stream of where the the line is and the color for that specific line was stored and then change it to the appropriate value.
ex: Picture control framework [32 bits defining total size of following data for entire control][16 bits: opCode(picture part)][32bits: size of data for specific opCode][data of opCode]REPEAT last 3 for every part in control
opCode:NAME
4: set pixel
5: Pen move
6: Pen Move to
7: Line
8: Line to
16: Poly-Line
17: Fill Poly
41: Select Pen
10: Rect Fill
9: Rect Frame
15: Gray out Rect
25: Round Rect Fill
24: Round Rect Frame
12: Oval Fill
11: Oval Frame
14: Arc Fill
13: Arc Frame
18: Text Box
31: New Font
29: Copy Pixmap
40: Copy PIxmap w/ mask
The long and the short of it, is that because NI has left the structure of the picture control open, we are free to create our own tools to push the control to the limits. If I was ever able to create a tool that showed handles on individual items that were drawn already, using these techniques you could do a 'free transform' on something like a triangle poly, and move individual joints aoround.
I've got way more to say but I've gone on too long alreday.
oooh Wait I've got Pictures too


~,~ The Captain Was Here
Norm Kirchner
CLD (Certified LV Dancer)
Message Edited by NJKirchner on 11-01-2006 01:10 PM
11-01-2006 01:25 PM
- Mark as New
- Bookmark
- Subscribe
- Mute
- Subscribe to RSS Feed
- Permalink
- Report to a Moderator
It is an honour to be trumped by the Captain*!
I saved your posting off-line for further study.
Thank you Norm. Please feel free to tump me any day!
Ben
* For those of you who are not familiar with "The Captain", Norm Kirchner was the first (to the best of my knowledge) person to teach the world how to write a VI using a VI aka "scripting", is very active on the LAVA forum, and demonstrated his dancing at NI-Week 2006.
http://forums.lavag.org/LabVIEW-VI-Scripting-f29.html
11-01-2006 01:40 PM
- Mark as New
- Bookmark
- Subscribe
- Mute
- Subscribe to RSS Feed
- Permalink
- Report to a Moderator
@NJKirchner wrote:
I've got way more to say but I've gone on too long alreday.
No you haven't.
You haven't even began to scratch the surface.
I dare you I double dare you - take your time, write a good paper about this. Upload some VIs to nicely demonstrate this and we will all be very happy.
The only thing I am afraid of about this is that NI might finally reach the conclusion one day that the picture control format is not efficient enough and change its internal implementation. Then, all these VIs using internal Opcodes will have to be rewritten, at the very least. On the other hand, I don't see that happening real soon.
CLD (Certified LV Dancer)
___________________
Try to take over the world!
