- Document History
- Subscribe to RSS Feed
- Mark as New
- Mark as Read
- Bookmark
- Subscribe
- Printer Friendly Page
- Report to a Moderator
- Subscribe to RSS Feed
- Mark as New
- Mark as Read
- Bookmark
- Subscribe
- Printer Friendly Page
- Report to a Moderator
Tutorial: License a LabVIEW Library Using Advanced Mode
Chapter 1: Introduction and Prerequisites
Overview
This tutorial walks you through the entire process of adding licensing and activation to a LabVIEW Add-on. From creating the license file to adding the licensing information to actually activating the Add-on as an end user.
You do not need to buy any software to go through this tutorial – all the steps assume that you are using trial licenses of Concept Software’s SoftwareKey solution – Protection PLUS 4 SDK and SOLO Server.
If you decide to use this licensing solution in your product, you will have to buy a license for Protection PLUS 4 SDK. National Instruments has negotiated a special pricing for NI LabVIEW Partners. See the pricing section for details.
For more getting-started resources using SoftwareKey with LabVIEW visit:
Prerequisites:
- LabVIEW 2010 or later
www.ni.com/trylabview - Third Party Licensing & Activation Toolkit
https://www.ni.com/en/support/downloads/tools-network/download.third-party-licensing-and-activation-... - Protection PLUS 4 SDK Trial (Only needed if creating licensing file or performing manual activation)
Need to contact SoftwareKey to request this download since the website has Version 5 SDK - SOLO Server Trial (Only needed if allowing automated on-line activation)
https://secure.softwarekey.com/solo/authors/signup.aspx
Chapter 2: Creating a License File with LFEdit
Overview
In order to add licensing to a product, we first need a license file. LFEdit is a utility that ships with Concept Software’s Protection PLUS 4 SDK that allows us to create a custom license file.
Creating a license file is a two-step process: first we create a “Product Definition” which is basically information about how we want to license the product (software/hardware binding, evaluation periods, etc). Once we have a product definition, we can create a license file from it.
Step by Step Instructions
- Download and install Protection PLUS 4 SDK trial: This trial is no longer available through the trial request page. Please contact SoftwareKey directly and include "Protection PLUS 4 SDK trial to license a LabVIEW Library" in your message.
- Launch LFEdit
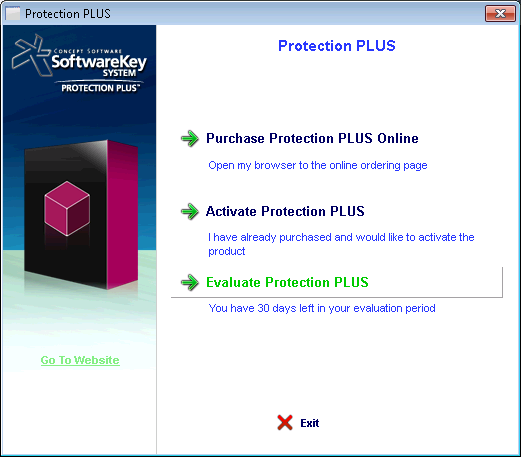
Start » Programs » SoftwareKey Licensing System » PLUS » LFEdit - If you get an activation dialog, select “Evaluate Protection PLUS”
- Once LFEdit loads, select Product Definition » Setup… from the menu bar

- From the Product Definition Setup dialog, select EZTrial1 and click Properties…
(With the full version of Protection PLUS, you can add new product definitions as well, the trial is restricted to editing predefined product definitions).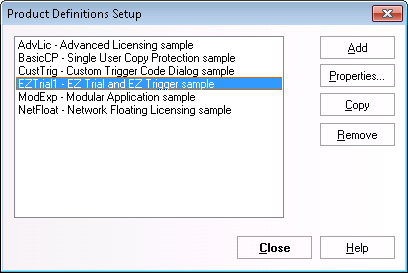
This will open up the EZTrial1 Product Definition properties dialog. - The general tab contains the basic product information. This information is not used by LabVIEW so you don’t have to change it.
However, giving it a descriptive name will help keep the product definitions easy to maintain in LFEdit.
- Switch to the License File Tab.
The License File tab contains the license file location as well as the license file password.
The password in the trial version of Protection PLUS is hardcoded as “password”. With the full version, you can set your own password. - Click Browse and change the File Name to:
C:\Temp\SimpleMathAPI.lf
(Make sure that you create the folder C:\Temp if it doesn’t already exist)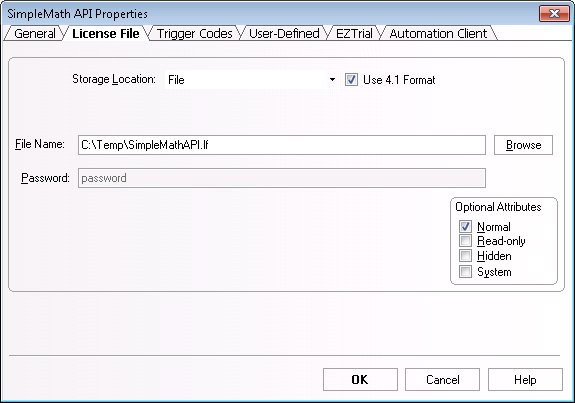
- Switch to the Trigger Codes tab.
The Trigger Codes tab contains the codes used for the product activation. - Note down the Trigger Code Seed (400) and the Reg Key Seed (123). We will need this for both licensing our product as well as for setting up the automated online activation.
IMPORTANT NOTE: These are the default seed values that should only be used during the evaluation. With the full version, you can set your own random seed values, which can be a positive integer for the Trigger Code Seed, and 0-255 for the Reg Key Seed. This helps to ensure the activation requests are routed to the correct product definitions on SOLO server.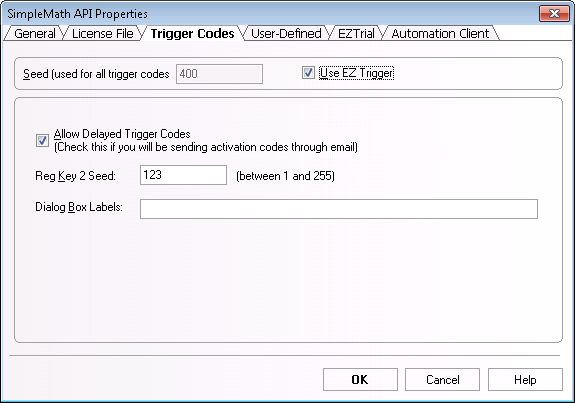
- Switch to the EZTrial tab.
The EZTrial tab contains information on how the product will be licensed. - (Optional) Uncheck Software Binding Aliases.
IMPORTANT NOTE: For demo purposes only, it is easier to disable software binding because software binding adds several aliases to the windows registry and OS. For a real licensed add-on, it is important to enable software binding as it provides more security to the licensing.
Also, we recommend using a Days to Run expiration of 30 days, and unlimited Times to Run, however this can be changed depending on the product needs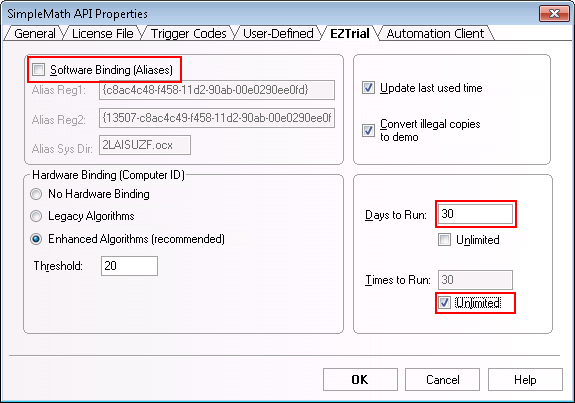
- Click OK to close out of the Product Definition Properties and return to LFEdit.
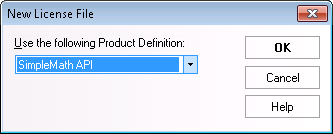
- Click on File » New License File on the menu bar

- Select SimpleMath API in the dropdown (or EZTrial1 if you didn’t change the Product Name), and click OK
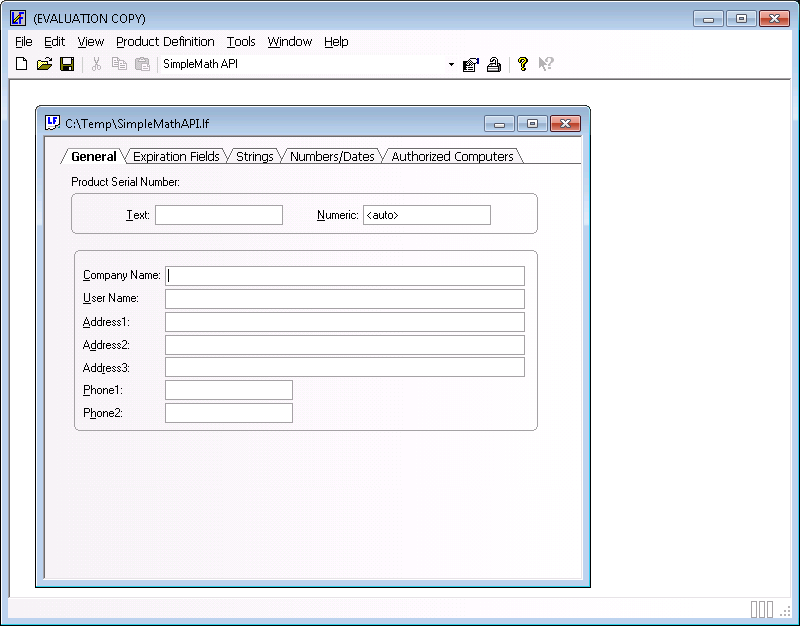
- This will open up the license file editor where you can add additional information to the license file. LabVIEW does not use any of these fields so you do not have to modify anything here.
- Click File » Save License File to save the license file to C:\Temp\SimpleMathAPI.lf

Note: If you get an error message “Cannot Create License File”, make sure that the directory C:\Temp exists on your computer.
Conclusion
You just created a license file using LFEdit that contains the information about how you want to license your product. You can now use this license file to add licensing to your LabVIEW Add-on. But first, set up the license server (SOLO server) to enable online activation.
Chapter 3: Setting up the License Server
Overview
In order to allow users to automatically activate the Add-on automatically over the web, you first need to set up SOLO Server with the information about the product and how you want users to activate it.
In addition, from here, you can set up the E-Commerce for your Add-on.
Step by Step Instructions
- Create a trial account with SoftwareKey’s SOLO Server at
https://secure.softwarekey.com/solo/authors/signup.aspx - Browse to the SoftwareKey SOLO Server
https://secure.softwarekey.com/solo/authors/login.asp - Log into SOLO Server using your account information that you receive via email after you sign up.
- Now we’ll add our product to SOLO Server.
On the SOLO Server Author homepage, use the menu Configure / Products, then use the dropdown Actions / Add (Advanced) - The Add Product page allows us to customize our product information. For the purposes of this demo we only need to set the Product Name.
Product Name: SimpleMathAPI - Click the Submit button at the very bottom to add the product to the SOLO Server.
- This will bring you to the Product List page.
- Next, we will add a Product Option to the product. When a user buys or activates a product, they are really buying or activating a specific Option of the product.
Click on the SimpleMathAPI link of the Product List, and then scroll down to the bottom of the page and click the Add New Product Option button. - The Product Option defines the cost of the product and how you want to license it.
- Fill out the form with the following information, and leave the other fields with their default values.
- Option Name: Singe Seat License
- Trigger Code #: 31
(This refers to “Activation Hardware Binding: Authorize this Computer ID Only, set Exp Type to ‘N’. For different types of activation mechanisms, use the appropriate trigger code from LFEdit.) - Trigger Code Seed: 400
(or the Trigger Code Seed you used in LFEdit while creating the Product Definition) - RegKey 2 Seed: 123
(or the RegKey 2 Seed you used in LFEdit while creating the Product Definition)
- Click Submit at the bottom to add the Product Option.
- This takes you back to the SimpleMathAPI Product Page
- To verify that the option was added correctly, use the menu Configure / Products to return to the Product List and click on Show Options... on the SimpleMathAPI line.
You should see the option we just added.


Conclusion
You have just successfully added the product information to the SOLO Server. This will enable your users to automatically activate the Add-on over the web once they buy the add-on.
Using the SOLO Server, we can also generate test licenses to verify that our licensing works correctly in-product.
Next, we will add the licensing information to our Add-on in LabVIEW.
Chapter 4: Adding Licensing to LabVIEW Code Library
Overview
In order to add licensing to a LabVIEW Code library, we have to package our library as a .lvlib file and then embed the licensing information directly to the .lvlib file using a wizard that installs with the Third Party Licensing & Activation Toolkit.
The licensing information here includes information about how to activate the product as well as activation modes (online, manual, etc).
Note: Once we add the licensing information, we would typically create an installer or package to distribute the library. We will skip this step in this tutorial.
Step by Step Instructions
- Install the Third Party Licensing & Activation Toolkit from
https://www.ni.com/en/support/downloads/tools-network/download.third-party-licensing-and-activation-... - Download the sample toolkit and extract it to:
C:\Temp - Create a license file in LFEdit (See Creating a License File with LFEdit) or download the pre-built license file and extract it to:
C:\Temp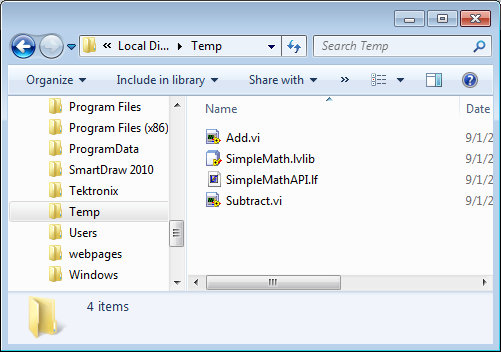
- Open LabVIEW 2010
- Click Tools » Add-on Licensing Tool…

- This will open up the Add-on Licensing Wizard which will walk you through the steps of adding licensing to a LabVIEW Code Library.
- On Step 1 of the wizard, browse to the library located at:
C:\Temp\SimpleMath.lvlib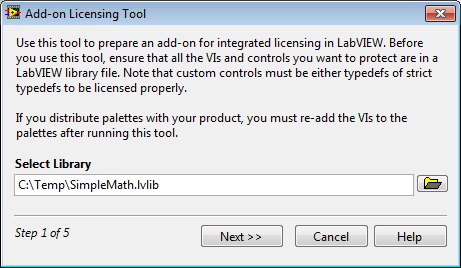
Click Next. - Fill out Step 2 as follows:
- Company Name: JervinSoft
(or replace with your company name. This is used later for the location of the license file) - Product Name: SimpleMath API
(This will be the product name that shows up on the activation dialogs) - Product Version: 1.0
- Purchase URL:
(Enter the url where users can purchase the product. You can use the SOLO server to set up your e-commerce)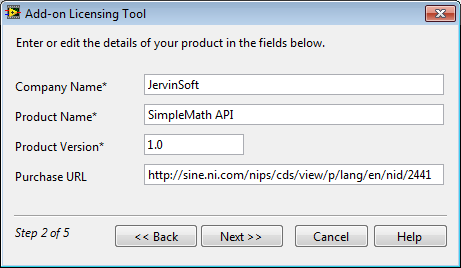
- Company Name: JervinSoft
- Fill out Step 3 with the license file info as follows:
- License File Path: C:\Temp\SimpleMathAPI.lf
- License File Password: password
(or the password you used in LFEdit)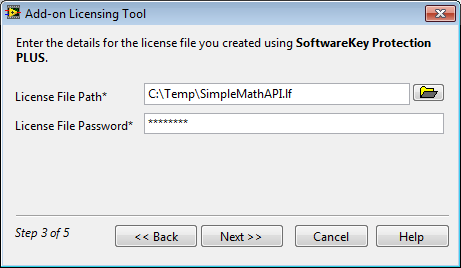
- Fill out step 4 with the Activation information as follows:
- Web Activation: https://secure.softwarekey.com/solo/unlock/
- Phone Activation: 111-111-1111
- Automated Online Activation: https://secure.softwarekey.com/solo/unlock/
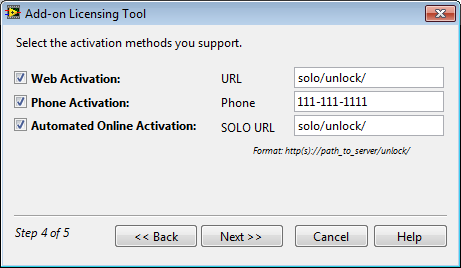
Note: If the Automated Online Activation is checked, the Enable Deactivation checkbox appears.

For deactivating a toolkit the required Key ID, Secure Key, Client Key can be found on the SOLO account.
Refer to Configure > Products

For the next step, please, go to Actions > View Encryption Key Data

The three values are highlighted below, as the Encryption Key ID, Server Key (XML), and Client Key (XML)

- On Step 11, fill in a password to lock the LabVIEW Library.
- New Password: test
- Confirm Password: test
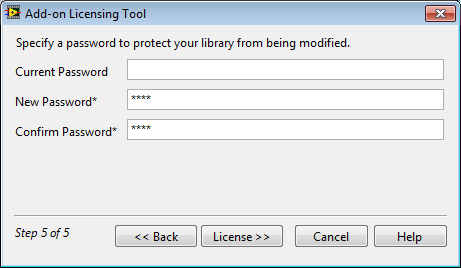
- Click License
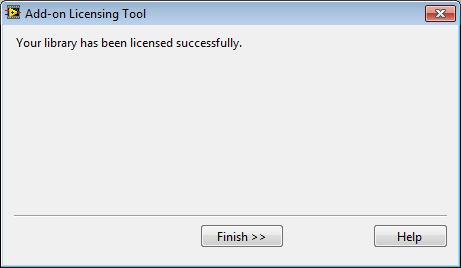
- You should get a confirmation page. Click Finish.
- LabVIEW looks for license files in a specific location:
<App Data>\ National Instruments\Partners\<Company Name>\Licenses
The license file should be deployed there by the installer of the product. For this demo, simply
Copy the license file to:- Windows XP: C:\Documents and Settings\All Users\Application Data\National Instruments\Partners\JervinSoft\Licenses\
- Windows Vista/7: C:\ProgramData\National Instruments\Partners\JervinSoft\Licenses\
(Replace ‘JervinSoft’ with the Company Name from Step 2 of the Licensing Wizard)
- Exit LabVIEW
- Re-launch LabVIEW
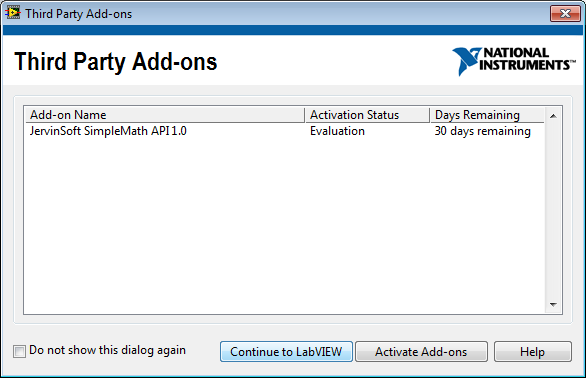
On start-up, you should see an activation dialog for 3rd party Add-ons, including our product – SimpleMath API
- Click Continue to LabVIEW
- Open C:\Temp\SimpleMath.lvlib
Notice that the library is now locked (the lock glyph)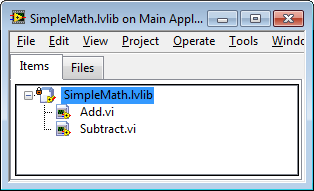
- Open Add.vi
Notice that you can run the VI (because the license is currently in evaluation mode), but cannot look at the block diagram. - To see what happens when the license expires, we will replace the license file with an expired license.
- Close out of LabVIEW
- Download the expired license file and extract it to the license file location:
The license file should be deployed there by the installer of the product. For this demo, simply copy the license file to:- Windows XP: C:\Documents and Settings\All Users\Application Data\National Instruments\Partners\JervinSoft\Licenses\
- Windows Vista/7: C:\ProgramData\National Instruments\Partners\JervinSoft\Licenses\
(Replace ‘JervinSoft’ with the Company Name from Step 2 of the Licensing Wizard)
- Re-launch LabVIEW
- Notice on the activation dialog, SimpleMath API now appears as expired

- Click Continue to LabVIEW and open C:\Temp\SimpleMath.lvlib
- Once again, open Add.vi
This time notice that the run arrow is broken. This is because expired libraries will not execute.
Click the broken Run Arrow to see the error: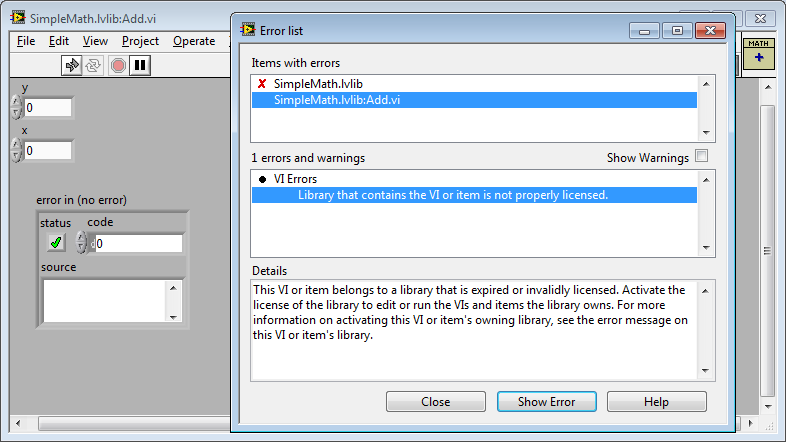
Conclusion
You have successfully added licensing to a LabVIEW Code Library with an evaluation period.
Licensing provides a way to protect your IP while giving you the ability to provide evaluation software. This means that users of this library will only be able to use it for a certain amount of time before they have to activate it. It also prevents users from building installers for applications that uses your library without first activating it.
In case of need, the users can deactivate the product(s).
Now we will look at how an end user would activate the software once they purchase it (manually or automatically over the web).
Chapter 5: Activating a LabVIEW Code Library – Automated Online Activation
Overview
LabVIEW gives user the ability to activate their Add-ons either manually or automatically over the web.
When a user purchases the Add-on, they will receive a License ID and password. The user can activate their add-on directly from LabVIEW using just the License ID and password.
Note: If you do not use the E-Commerce functionality of the SOLO Server, you can still manually generate License IDs and passwords for users.
Step by Step Instructions
- Before you begin, make sure that the Add-on is set up on the license server.
- If you have already activated the product once, copy over a fresh license file to:
<App Data>\ National Instruments\Partners\<Company Name>\Licenses
Copy the license file to:- Windows XP: C:\Documents and Settings\All Users\Application Data\National Instruments\Partners\JervinSoft\Licenses\
- Windows Vista/7: C:\ProgramData\National Instruments\Partners\JervinSoft\Licenses\
(Replace ‘JervinSoft’ with the Company Name from Step 2 of the Licensing Wizard)
- Launch LabVIEW. On start-up, you should see an activation dialog for 3rd party Add-ons, including our product – SimpleMath API
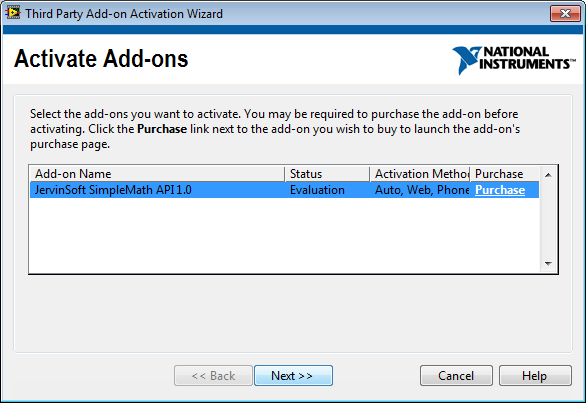
- Click Activate Add-ons
- On the Activate Add-ons Dialog, select SimpleMath API and click Next.
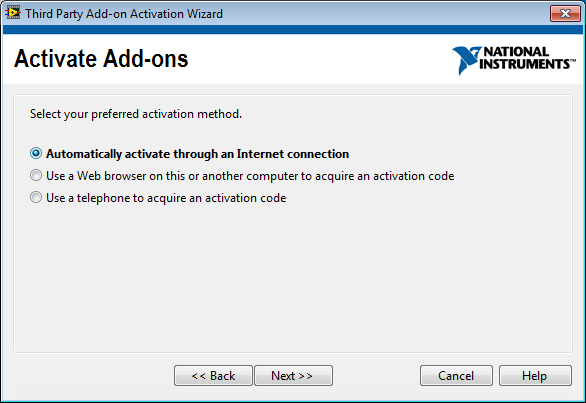
- Select Automatically activate through an Internet connection and click Next.
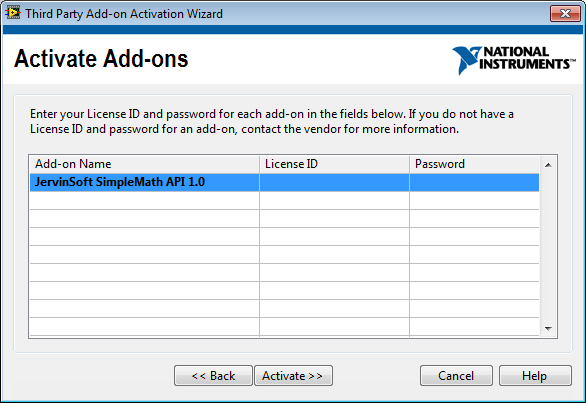
- The Activation Dialog then gives the end user the ability to enter the License ID and password that they received when they bought the software. This is similar to the Serial Number that users get when they buy LabVIEW.
- We will now generate a test license for demo purposes using SOLO Server.
- Browse to SoftwareKey's SOLO Server
https://secure.softwarekey.com/solo/authors/login.asp - Log into the SOLO Server using your account information
- Use the menu Customers / Add a Test License
- On the Add License dialog, select SimpleMathAPI Single Seat License (or the Product Name and Option you created on the SOLO Server from the Setting up the License Server step). Click the Add New Test License button, and click OK for the dialog describing the use of test licenses.
- This should create a test license as shown below. The License ID and Activation Password are the values needed to activate the software.
- Browse to SoftwareKey's SOLO Server
- On the activation dialog, enter in the License ID and Password we just generated.

Click Activate. - You should get an Activation Successful dialog
- Click Finish to go back to LabVIEW
- Now we’ll verify that the library was activated correctly. Click on Help » Activate Add-ons.
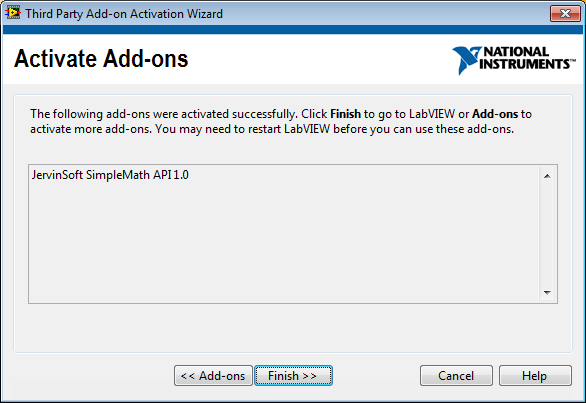
Notice that SimpleMath API now shows a status of Activated.


Conclusion
You’ve now seen how a user can activate a LabVIEW Code Library online using LabVIEW’s activation dialog.
You can also enable manual activation for situations where your users cannot access the internet from their computer.
SoftwareKey provides a special pricing package for NI Partners that want to use this licensing solution.
Chapter 6: Activating a LabVIEW Code Library – Manual Activation
Overview
LabVIEW gives user the ability to activate their Add-ons either manually or automatically over the web.
The manual activation is meant for situations where your uses do not have an internet connection, or for situations where you do not want to use Concept Software’s SOLO Server backend for activation.
Manual activation can be done over the phone, or through a web page that you set up. Basically, the user will give you two unique identifiers and you will use those in LFEdit to generate an activation code for them. The user will then use this activation code to activate the Add-on from LabVIEW.
Step by Step Instructions
- If you have already activated the product once, copy over a fresh license file to:
<App Data>\ National Instruments\Partners\<Company Name>\Licenses
Copy the license file to:- Windows XP: C:\Documents and Settings\All Users\Application Data\National Instruments\Partners\JervinSoft\Licenses\
- Windows Vista/7: C:\ProgramData\National Instruments\Partners\JervinSoft\Licenses\
(Replace ‘JervinSoft’ with the Company Name from Step 2 of the Licensing Wizard)
- Launch LabVIEW. On start-up, you should see an activation dialog for 3rd party Add-ons, including our product – SimpleMath API

- Click Activate Add-ons
- On the Activate Add-ons Dialog, select SimpleMath API and click Next.

- Select Use a telephone to acquire an activation code and click Next.
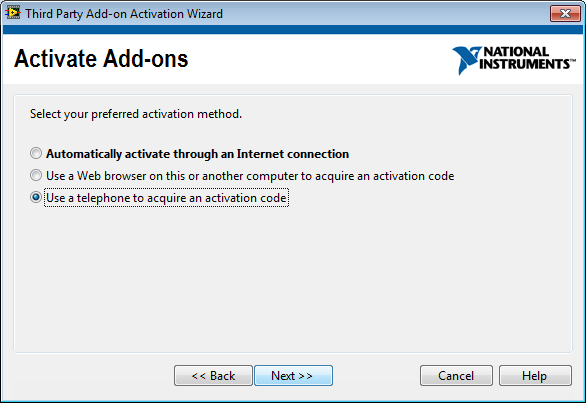
- The Activation Dialog then gives the end user the ability to enter their activation codes that they receive when call / email you. This is similar to the Activation Code that users get when they call NI with their serial number.
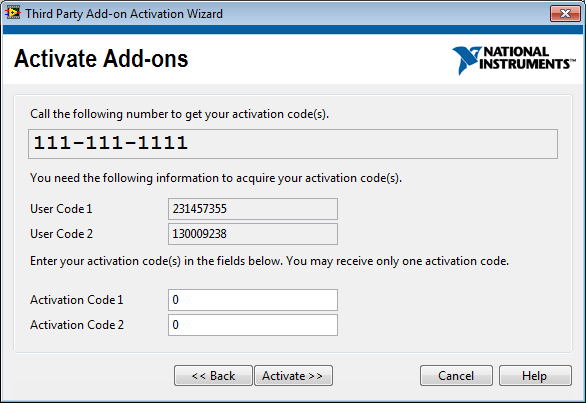
- We will now pretend that the customer has called you (the developer) with their user codes and we will generate an Activation Code for them.
- Open up LFEdit
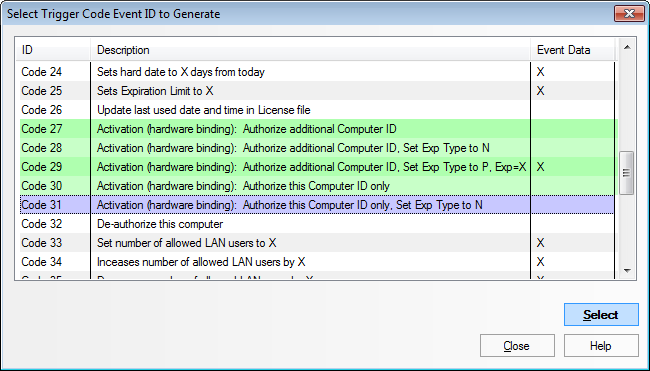
- Click Tools » Trigger Codes

- On the Trigger Code dialog, select Trigger Code 31 (which activates the a hardware bound license on a single machine. If you used a different licensing method, select the appropriate Trigger Code). Click Select
- Fill out User Code 1 and User Code 2 from the LabVIEW Activation Dialog (this is what the end user would give you).
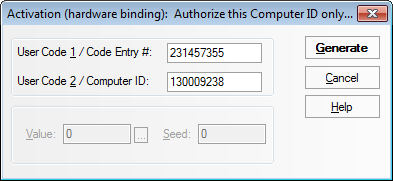
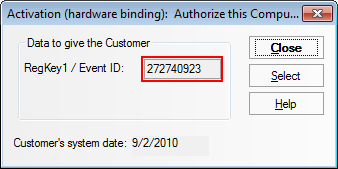
Click Generate - This should generate a RegKey or Activation Code. Make note of this. This is what you would give back to your user.
- On the activation dialog, enter in the License ID and Password we just generated
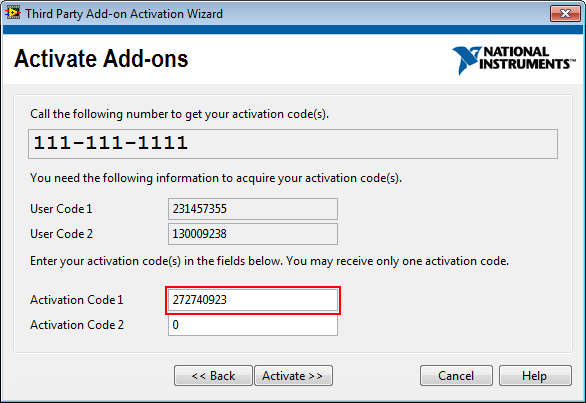 Click Activate.
 - You should get an Activation Successful dialog

- Click Finish to go back to LabVIEW
- Now we’ll verify that the library was activated correctly. Click on Help » Activate Add-ons.
Notice that SimpleMath API now shows a status of Activated.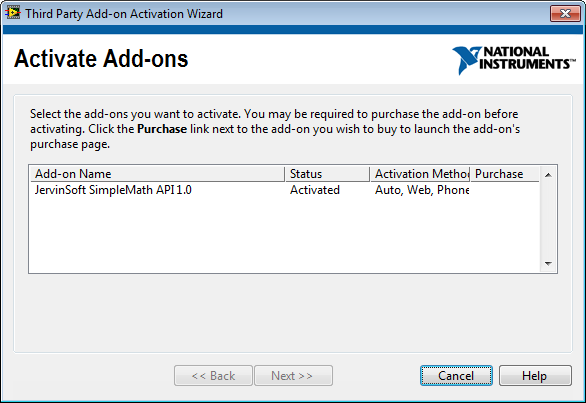
Conclusion
You’ve now seen how a user can activate a LabVIEW Code Library offline manually using LabVIEW’s activation dialog.
You can also enable automated activation via the web if you use the SOLO Server for activations.
SoftwareKey provides a special pricing package for NI Partners that want to use this licensing solution.
Chapter 7: Pricing Details
The two basic components of the SoftwareKey solution are:
- Protection PLUS 4 SDK: Software application used to generate a license file as well as to perform manual activations (for customers that cannot activate online or if you want to use your own e-commerce solution)
- SOLO Server: Server back-end of the licensing solution used for automated activation over the web. Also allows building a shop page with e-Commerce capabilities built into it.
NI Partner Pricing
NI partners can purchase the SoftwareKey Protection + Automation solution starting at only $49/month!
https://www.softwarekey.com/buy-now/
- A site license of Protection PLUS 4 SDK Enterprise Edition (includes LFEdit as described in this tutorial) (normally $699)
- SOLO Server Shared URL account
This gives you the ability to:
- Generate as many licenses for as many products as you want at no extra cost
- Process automated activations for users
- Sell your product online at a 2% commission (through optional integrated eCommerce)
For more information on fees collected for activations and sales, refer to:
https://www.softwarekey.com/buy-now/
Additional Resources
- Choosing the Correct Licensing Method in LabVIEW Third Party Licensing & Activation Toolkit
- LabVIEW Help: Licensing a Development Add-on
- Concept Software SoftwareKey System
- Tutorial: License a LabVIEW Library Using Standard Mode
- Tutorial: License a LabVIEW Executable Using SoftwareKey Instant PLUS
- Add Licensing Checks to an Application's Source Code
NI TestStand Product Manager
- Mark as Read
- Mark as New
- Bookmark
- Permalink
- Report to a Moderator
Looks like a nice tutorial. However, I'd like to see the same tutorial for doing an executable instead of a code library. Is this possible?
- Mark as Read
- Mark as New
- Bookmark
- Permalink
- Report to a Moderator
There isn't a step-by-step tutorial available, but you can try taking a look at this document if you haven't already:
http://decibel.ni.com/content/docs/DOC-13939
Otherwise, there should also be an example that ships as part of the Third Party Licensing & Activation Toolkit that has an example application with licensing. The name of the example in the example finder is "Calculator.vi" (not the most appropriate name, admittedly) and can be found in the [LabVIEW 2010]\examples\addonlicensing\06 Sample Licensed Application directory.
- Mark as Read
- Mark as New
- Bookmark
- Permalink
- Report to a Moderator
For protecting a .exe file you should look at Instant PLUS from SoftwareKEY. It takes only a few minutes to protect your .exe and can be set to use the .lf file system as in the TPLA. No coding, no changes in LabVIEW code. Nice way to protect an executable.
(It also has an API for getting the "days remaining" and others but that requires a bit of LabVIEW coding).
Drawback: License dialogs are in English only but some text and graphics can be modified from the wizard.
CLA, CTA
- Mark as Read
- Mark as New
- Bookmark
- Permalink
- Report to a Moderator
When I look at the LabVIEW Help for Licensing a Development Add-On for Advanced Mode (which is what I'm interested in to take advantage of the extra features), step 5 refers to using the Add-On Licensing Tool to "add licensing to the add-on". What exactly does this do to my VIs, classes, controls etc.? It's always a little disconcerting when a tool claims to 'modify all your code' - that usually means I end up pulling a recent commit from the source code control server to undo the mysteriously invisible changes. Can someone please explain in more detail what will happen so that I don't get hives about running this? Are we talking binary level alterations to the VI files themselves?
- Mark as Read
- Mark as New
- Bookmark
- Permalink
- Report to a Moderator
Alterations are at the LVLIB level. Your lvlib is password protected and special activation magic is added. This means that from that point on, if you want to use your lvlib and associated VIs, you must activate it via LabVIEW>Help>Activate Add-Ons. This means you should not add licensing to the lvlib in source. You can avoid this by using the dynamic License binding at package build time which is a feature in VIPM Pro.
- Mark as Read
- Mark as New
- Bookmark
- Permalink
- Report to a Moderator
Great reply Michael.
If I apply the licensing features within VIPM I can see that I can avoid having to create a clone of my add-on for licensing before creating the package, which is a great advantage. But are there any limitations to licensing this way, or are all the options from NI's tool also available through VIPM? I've take a quick look at the available options, but to be honest I'm still a little confused by all these options so I don't truly get it all yet 
- Mark as Read
- Mark as New
- Bookmark
- Permalink
- Report to a Moderator
Hi Thoric,
All of the licensing options using Advanced mode are added to the license file which is created with the third party tool Protection Plus. After this license file is made, VIPM and Third Party Licensing & Activation Toolkit both do exactly the same thing. They both take in a license file and an lvlib file and output a new lvlib file with licensing added to it.
- Mark as Read
- Mark as New
- Bookmark
- Permalink
- Report to a Moderator
Great, thank you David. I've been plaing with VIPM recently and this is a truly great feature. I was able to apply the licensing features to the library instantly. Very smooth 
- Mark as Read
- Mark as New
- Bookmark
- Permalink
- Report to a Moderator
I try to download
Step by Step Tutorial for Adding Licensing to a LabVIEW Code Library (Complete).pdf
But the webpage return this
"Sorry, but the page that you requested may have been moved or deleted. Search our site or use the links below:"
Where can I download this document?
Thanks,
- Mark as Read
- Mark as New
- Bookmark
- Permalink
- Report to a Moderator
Hello,
I notified our forum administrators, and it seems they have resolved the problem. This PDF should be available now. Let us know if there are any other issues.
Thanks!
David
- Mark as Read
- Mark as New
- Bookmark
- Permalink
- Report to a Moderator
Hi,
I am currently navigating the seemingly endless path that leads towards adding a license to a toolkit and the more questions I ask the more confused I seem to get. My latest hurdle is the difference between using VIPM and TPLAT, which according to the above posts is exactly the same. However a guy from SoftwareKey claims that it is not possible to apply a license created using their software to a toolkit using VIPM, only if I were distributing an executable.
Is this true? If so why would this be the case?
Cheers,
Darren.
- Mark as Read
- Mark as New
- Bookmark
- Permalink
- Report to a Moderator
Hello Darren,
From the last email that we received from you, it sounds like we (SoftwareKey) had helped answer most of your outstanding questions. If not, please reply to your ticket with us and we will work to answer your questions.
It is my understanding the TPLAT is used for the Simple and Advanced licensing modes of protecting libraries/add-ons and VIPM is used to create the installer for the library.
Mike
- Mark as Read
- Mark as New
- Bookmark
- Permalink
- Report to a Moderator
As Mike mentioned, VIPM and TPLAT have two seperate functions and purposes, but they can definitely both be used together. Documentation on doing this can be found at https://decibel.ni.com/content/docs/DOC-22491.
Hope this helps clear things up,
David
- Mark as Read
- Mark as New
- Bookmark
- Permalink
- Report to a Moderator
Hi David, Mike,
Thank you both for your replies, however it is still not much clearer.
When I am licensing a lvlib file using TPLAT the process goes: Source files -> licensed lvlib -> VIPM package (for distribution, assuming I am not using the LabVIEW installer). If I use VIPM and check the little box that says "Bind license to library at build time" then don't I go from Source files to VIPM package in one step? Thus avoiding the extra files, simplifying source code control and avoiding potentially overwriting my source files with the licensed version.
Maybe I am misunderstanding this whole process, or maybe I didn't explain my issue well enough in the first place.
Cheers,
Darren.
- Mark as Read
- Mark as New
- Bookmark
- Permalink
- Report to a Moderator
Darren, this is correct. If you have VIPM Pro, you can use the "Bind license to library at build time" option to add your licensing to your VI Package without having to do the intermediate licensing step. You still need to use either the LFEdit tool or the Standard Mode of the Add-on licensing tool to create the .lf file first, then you just enter the lvlib and lf file information in VIPM to apply the licensing to your packaged toolkit.
Does this help? I think I may be misunderstanding your question, so forgive me for any lack of clarity on my part.
