- Document History
- Subscribe to RSS Feed
- Mark as New
- Mark as Read
- Bookmark
- Subscribe
- Printer Friendly Page
- Report to a Moderator
- Subscribe to RSS Feed
- Mark as New
- Mark as Read
- Bookmark
- Subscribe
- Printer Friendly Page
- Report to a Moderator
This tutorial is going to go through the process of leveraging the Linux ecosystem using LabVIEW. Once you have remote superuser access on your NI Linux Real-Time target you can follow this tutorial for setting up and using a database on the NI Linux Real-Time operating system running on your cRIO-9068.
Install PostgreSQL
Obtain a terminal as the admin user. We will now install PostgreSQL to manage and run the database. To do so, we will use the package manager, opkg, to find and install the necessary software. The package manager, opkg, uses configuration files to specify links to package repositories. On the cRIO-9068 these sources are disabled by default. Navigate to the directory where these configuration files are stored.
# cd /etc/opkg/

The file we will be editing is the “angstrom-base-feed.conf” file highlighted above. Use vi to edit the file so that it looks like the screenshot below to use one popular opkg feed that NI developers have used successfully in the past — you could also modify this line to point to other feeds, for example, your own site's feed if you have one.
# vi angstrom-base-feed.conf

For those less acquainted with vi, after opening the file use the down arrow to move the cursor to the line with the package source listed, then press "x" or “Delete” to remove the leading "#" and space characters to uncomment the line. Then type “:wq” and press enter to save and quit.
Now we can update the package lists for opkg.
# opkg update
We want to install PostgreSQL, so let’s take a look at what packages are available to us.
# opkg list | grep postgresql
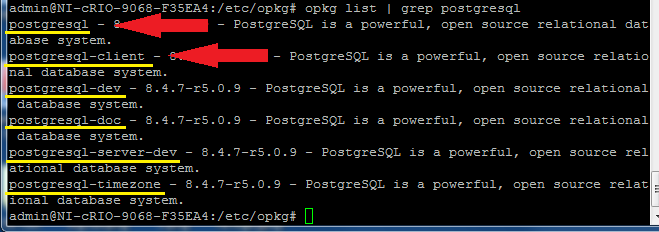
There are multiple PostgreSQL packages available, but we are interested in “postgresql” and “postgresql-client” indicated above. Let's install them.
# opkg install postgresql postgresql-client
The packages will download, but we will run into an error installing them.
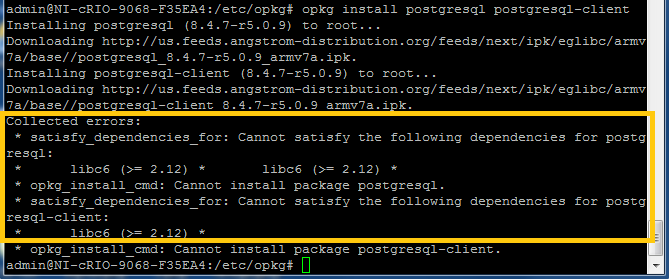
To figure out what is happening here we can pull up the information on libc6:
# opkg status libc6
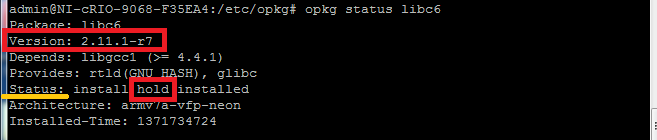
Here we can see the installed version of libc6 is 2.11.1-r7, and postgresql requires a version greater than or equal to 2.12. This could be solved by simply marking libc6 for update, however this is not possible because the libc6 package has a “hold” flag, preventing this package from being updated normally. This is because LabVIEW running on the Real-Time operating system was designed and built for this particular version of libc6. While LabVIEW will likely work as expected on a later version of libc6, it is possible that a later version may cause unexpected behavior with LabVIEW running on the cRIO-9068 target. Giving it a “hold” flag is meant to protect from accidental changes and to require the deliberate removal this flag if one wishes to upgrade libc6. Thus, we must remove the hold flag to install PostgreSQL.
# opkg flag ok libc6
Now let’s try the install again.
# opkg install postgresql postgresql-client
If all went well, the two PostgreSQL packages should now be installed.
Setting up PostgreSQL
Creating the postgres user
For additional reference regarding the set up and usage of PostgreSQL take a look at [Chapter 17](http://www.postgresql.org/docs/8.4/static/runtime.html) of the PostgreSQL 8.4 Manual. This documentation was used as a source and reference for much of this section.
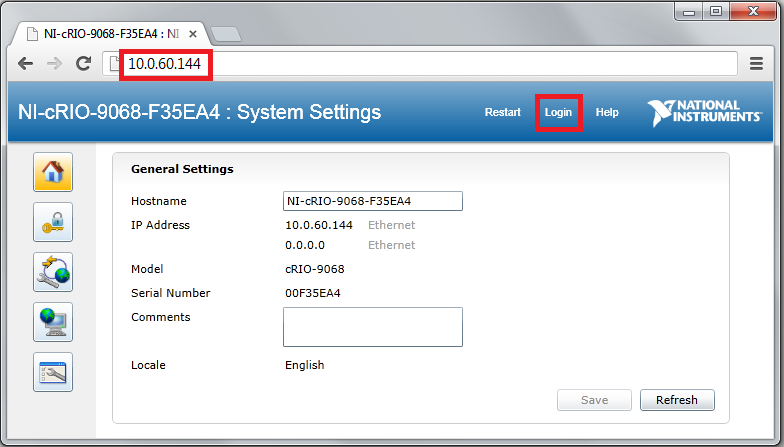
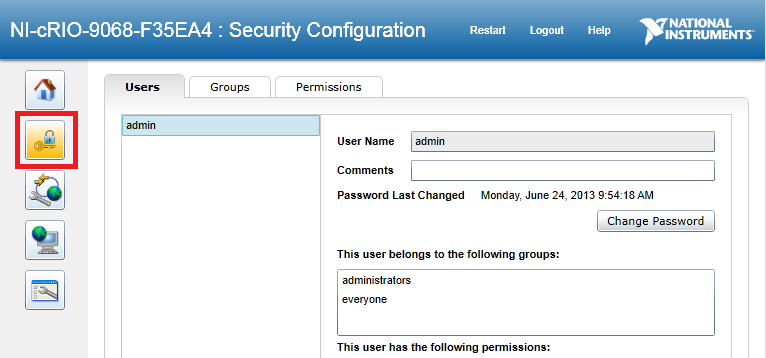
PostgreSQL is now installed and we need to set it up so we can use it. First we must create a new user on the system to run the database. It is convention on Linux systems to run server daemons as a separate non-superuser user an added security measure. Go to the web configuration interface of your cRIO-9068 by using a web browser and connecting to your device’s IP address. Then select the “Login” option at the upper right.
Remember, you may find your device’s IP address using Measurement and Automation Explorer (MAX). See section: "Configure the cRIO-9068" in the Get Superuser access tutorial.
Authenticate with your admin account and password, then choose the “Security Configuration” button on the left.
Press the “+” button under the list of system users. Change User Name to “postgres”.
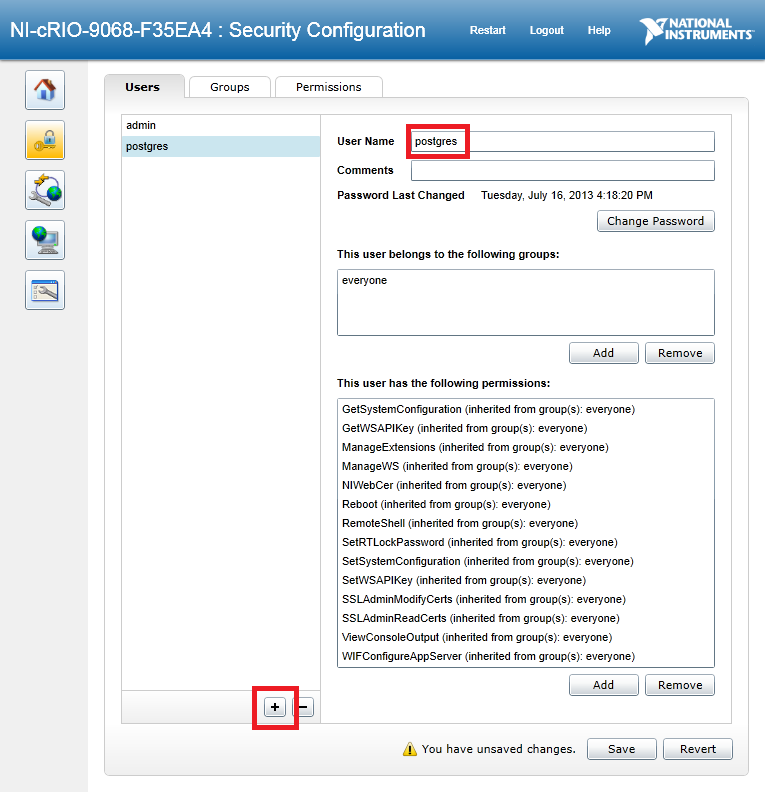
Save the changes to create the new user.
Creating the Database Cluster
Now we must create a database cluster, or a location on the disk where the database information will be stored. Return to your shell on the target you have logged in as the admin user. You will now create the directory where the database information is to be stored. This location largely does not matter as long as it makes sense to you and your application. For this tutorial I will use a directory I create in the home directory of the postgres user we just created. In the shell as admin, create the postgres home directory.
# mkdir /home/postgres
# chown postgres /home/postgres
We may now switch to the postgres user and create a location for the database data.
# su - postgres
$ mkdir /home/postgres/postgresData
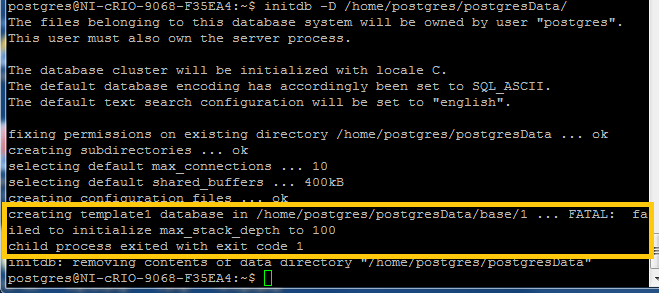
We will try to create the cluster by executing
$ initdb -D /home/postgres/postgresData
But it fails saying
FATAL: failed to initialize max_stack_depth to 100
To fix this we must return to admin and set ulimit to a higher value.
$ logout
# ulimit -s 2048
# su postgres
$ initdb -D /home/postgres/postgresData
Starting and Stopping the PostgreSQL Server
The database server is now initialized and ready. We will start postgres in the background and also specify a logfile.
$ postgres -D /home/postgres/postgresData >logfile 2>&1 &
You may also wish to create a simple shell script to execute this command and start the postgres server.
To stop the postgres server you may send a SIGINT to the postgres server process.
$ kill -INT `head –n 1 /home/postgres/postgresData/postmaster.pid`
Create Database
Make sure the server is running so we can create a database to use. For this tutorial we will create a database called “mydb”.
$ createdb mydb
Create Table
Now we will create a table in the database to interface with. We’ll call this table demo1 and we’ll say its rows will contain a timestamp and a float value. Then we will grant permission on the table to LabVIEW to we can interface with it programmatically. In the shell enter:
$ psql mydb
postgres=# CREATE TABLE demo1 (recordTime timestamp, dataPoint float);
postgres=# CREATE USER lvuser;
postgres=# GRANT ALL PRIVILEGES ON TABLE demo1 TO lvuser;
postgres=# \q
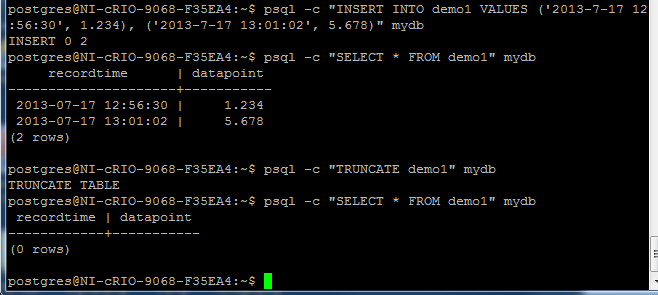
In the above step we created the table from the PostgreSQL interactive prompt. Let’s test adding a couple entries into the table from the command line.
$ psql -c “INSERT INTO demo1 VALUES (‘2013-7-17 12:56:30’, 1.234), (‘2013-7-17 13:01:02’, 5.678)” mydb
$ psql -c “SELECT * FROM demo1” mydb
$ psql -c “TRUNCATE demo1” mydb
$ psql -c “SELECT * FROM demo1” mydb
Constructing the LabVIEW Application
With the database up and running we are now ready to make our application to interact with it. For this tutorial we will create an application which will show the table while providing an option to add new data points or clear the table.
To interface with the database we will use the System Exec VI with the psql command we used above. Another possible method is to use Call Library Function Node VIs and plug into the PostgreSQL C API. We will also use the Format Into String node to create the command string to execute with the parameters we specify. Construct a Block Diagram as shown below, or see the attached code example. Note that both False cases of the case structures are blank.
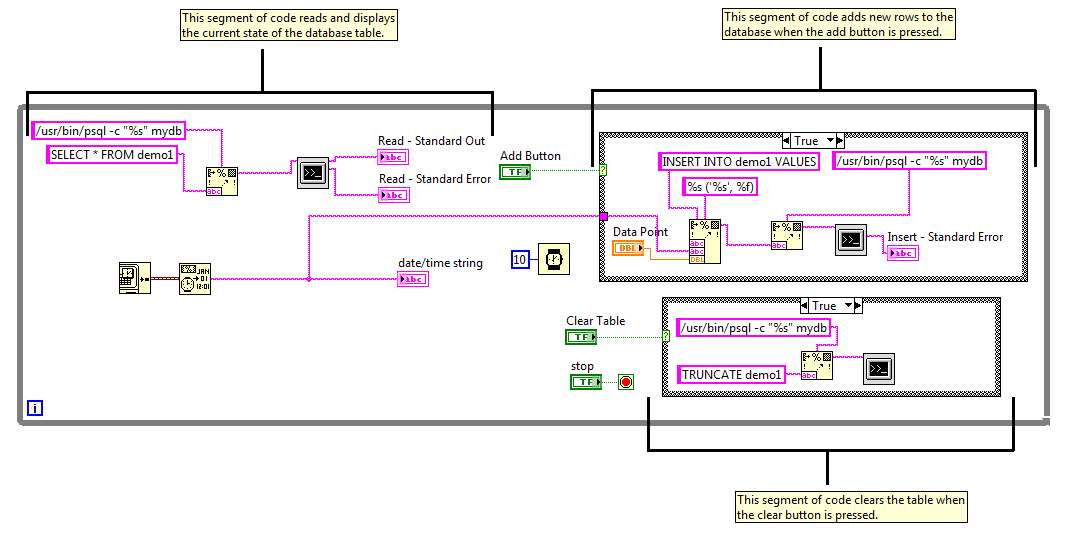
Assemble the Font Panel to resemble the one shown here. The standard error text panes will show if there are any errors connecting or interfacing with your database.
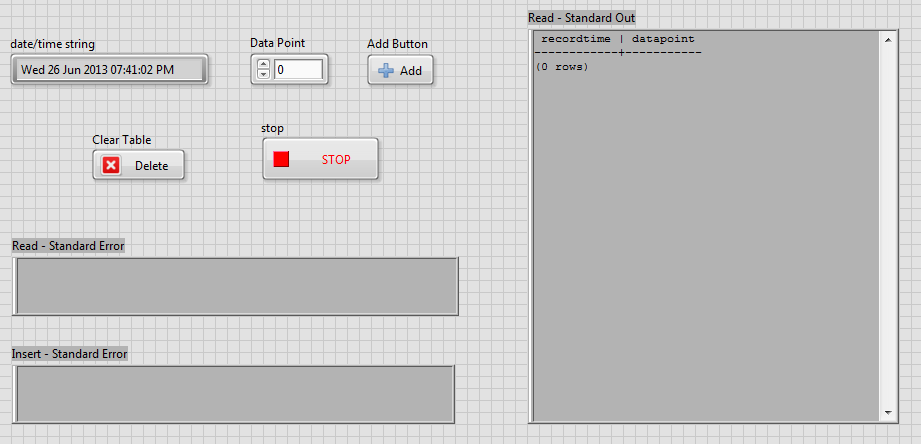
When completed you should be able to press the Add Button to add rows of data to the database, and press the Clear Table button to delete all of the rows from the database.
- Mark as Read
- Mark as New
- Bookmark
- Permalink
- Report to a Moderator
Note that, while marking the libc6 package as OK to update, you could also keep the library at it's current version and rather install all of the dependencies and the postgres/postgres-client with the "--no-deps" flag. This will ensure that the NI software is continuing to use the libraries that have been tested and validated with (NI has already seen some issues with other versions of libraries that are not immediately apparent).
This would look something like
opkg install --nodeps libpq5 libreadline5 postgresql postgresql-client
- Mark as Read
- Mark as New
- Bookmark
- Permalink
- Report to a Moderator
This is a wonderful writeup, thank very much! In the event that I wanted to interface to the postgres server via sockets from LabVIEW, what is the prefered way? Thanks again.
- Mark as Read
- Mark as New
- Bookmark
- Permalink
- Report to a Moderator
It depends on what is important to you and how you will be using the databases. If you are using it to simply store values periodically for logging purposes, the command-line interface through the System Execution primitive is a great way to get something running quickly.
If you will be accessing the database frequently or will have some time-critical code running at the same time (even if it's in another part of your application) it makes sense to investigate using the libpq library interface. Considering the datatypes that are used around the interface and how they are used, it may make sense to write a wrapper in C/C++ using Eclipse (note: you can use whatever compiler/environment you'd like for writting the code, so long as it will compile code for Linux running on the armv7-a architecture, with the softfp floating-point calling convention)
- Mark as Read
- Mark as New
- Bookmark
- Permalink
- Report to a Moderator
To pile on to Brad's reponse, if you are looking for better performance than the command line interface offered by the System Execution VI, PostgreSQL seems to have a C API for standard queries as Brad mentioned:
http://www.postgresql.org/docs/9.3/interactive/libpq.html
...and a stream-style access for handling larger objects:
http://www.postgresql.org/docs/9.3/interactive/largeobjects.html
Now, both the standard queries and large object access seem to rely on libpq, so the alternative to the System Execution VI highlighted in the tutorial would (in all cases) invovle wrapping C calls with the Call Library Function node.
Embedded Software Product Manager| National Instruments
- Mark as Read
- Mark as New
- Bookmark
- Permalink
- Report to a Moderator
Brad,
Thank you so much for your timely reply! After writing my comment I did some digging myself and come up with both those solutions as well. I think for many of our applications using the System Exec.vi method would be jsut fine (actually with mysql you can pass in the -X option and it will spit the answers back out in XML for easy parsing!).
As for the libpq solution, that does make sense. I would be worried that code reuse would be rather low at that point unless a significant effort was put into making it really versital. I will definitely investigate both solutions.
Thank you again for your response!

- Mark as Read
- Mark as New
- Bookmark
- Permalink
- Report to a Moderator
Hello,
I'm behind an HTTP Proxy how do I configure opkg to pass thru it ?
- Mark as Read
- Mark as New
- Bookmark
- Permalink
- Report to a Moderator
It seems that you can get what you need with the environment variable http_proxy, e.g.
(safemode) admin@crispus-attux:~# http_proxy=http://this.proxy.doesnt.exist:1234 opkg update
Downloading http://feeds.angstrom-distribution.org/feeds/next/ipk/eglibc/armv7a/base//Packages.gz.
wget: bad address 'this.proxy.doesnt.exist:1234'
Collected errors:
* opkg_download: Failed to download http://feeds.angstrom-distribution.org/feeds/next/ipk/eglibc/armv7a/base//Packages.gz, wget returned 1.
You can either wrap the opkg command in something or set the variable for all shells (/etc/profile) or for a particular user's login ($HOME/.bashrc works for ash)
- Mark as Read
- Mark as New
- Bookmark
- Permalink
- Report to a Moderator
So, i tried your solution and it doesn't work.
I tried this tutorial designed for the amgstrom distribution : http://hawkboard.wikispot.org/OPKG
I modified my /etc/opkg/arch.conf as expected, my http_proxy is at IP 191.6.0.2:3128 so with my login and password, in fact i added this line :
option http_poxy http://login:password@191.6.0.2:3128
then i do an opkg update and it retuns to me the following error :
Downloading http://us.feeds.angstrom-distribution.org/feeds/next/ipk/eglibc/armv7a/base//Packages.gz.
wget: server returned error: HTTP/1.0 504 Gateway Time-out
Collected errors:
* opkg_download: Failed to download http://us.feeds.angstrom-distribution.org/feeds/next/ipk/eglibc/armv7a/base//Packages.gz, wget returned 1.
Is there somewhere at NI who tried their system with an http_proxy ith authentification ?
I can affirm that my proxy is accessible because I've a Debian machine on thesame network and apt is using this proxy without any problem.
Thank you NI for your support !!
- Mark as Read
- Mark as New
- Bookmark
- Permalink
- Report to a Moderator
OK I found the solution to this error :
Thanks to is post: https://decibel.ni.com/content/message/62464?tstart=0
So I change the url of the repository to
src/gz angstrom-base http://feeds.angstrom-distribution.org/feeds/next/ipk/eglibc/armv7a/base/
in the /etc/opkg/angstrom-base-feed.conf
And to support the http proxy this is my /etc/opkg/arch.conf content :
arch any 6
arch noarch 11
arch arm 16
arch armv4 21
arch armv5 26
arch armv5-vfp 31
arch armv5e 36
arch armv5e-vfp 41
arch armv6-vfp 46
arch armv7a 51
arch armv7a-vfp 56
arch armv7a-vfp-neon 61
arch xilinx_zynq 66
option http_proxy http://login:password@191.6.0.2:3128/
And it works fine. NI AE's you should do a KB on these subjects
- Mark as Read
- Mark as New
- Bookmark
- Permalink
- Report to a Moderator
SmileBoB
Sorry, I should have explicitly called out that the feed configuration that we shipped with no longer works since the Ångström feed server that we used is down. Considering that this is not officially-supported NI software, I don't know that it calls for a KB. That's what this forum is for.
- Mark as Read
- Mark as New
- Bookmark
- Permalink
- Report to a Moderator
I follow this post https://decibel.ni.com/content/docs/DOC-35053 to install python on myRIO, when I execute ,/configure, the log tells me "checking whether the C compiler works... no""checking for --without-gcc... no" “checking for --enable-universalsdk... no" What's the problem?
- Mark as Read
- Mark as New
- Bookmark
- Permalink
- Report to a Moderator
Juncao,
You might want to create a thread in the forums so others will see your problem.
You most likely didn't install gcc.
Try running the command "opkg list-installed | grep gcc" to check if gcc is installed. If it doesn't list anything you don't have gcc installed. If it shows up theen check gcc-symlinks. Try compiling a simple hello world example to make sure the compiler works.
Kyle Hartley
Senior Embedded Software Engineer

- Mark as Read
- Mark as New
- Bookmark
- Permalink
- Report to a Moderator
Hello,
I have got some "PANIC"-Errors while running/using postgres.
"PANIC: lock table corrupted"
After that, the Database is in recovery-mode (i don't know how to leave this mode).
"FATAL: the database system is in recovery mode"
May be this Error is caused by inserting too frequently ?
Only a restart of postgres resolves the Error-state, but that is no Solution.
Can anyone help me with this Problem ?
My Installation-process differs a little bit from the Tutorial (may be that this is part of the problem):
By default-configuration I have in /etc/opkg 3 Files
nilrt-2014-arm-all-feed.conf
nilrt-2014-arm-armv7a-feed.conf
nilrt-2014-arm-zynq-feed.conf
with following content (allready out-commented by default)
src/gz nilrt-2014-arm-all http://download.ni.com/ni-linux-rt/feeds/2014/arm/all
src/gz nilrt-2014-arm-armv7a http://download.ni.com/ni-linux-rt/feeds/2014/arm/armv7a-vfp-neon
src/gz nilrt-2014-arm-zynq http://download.ni.com/ni-linux-rt/feeds/2014/arm/xilinx_zynq
#> opkg update
#> opkg list | grep postgresql --> "postgresql - 8.4.7-r8.0"
libc6 is on version 2.17-r4 and didn't caused any Problems while installing.
- Mark as Read
- Mark as New
- Bookmark
- Permalink
- Report to a Moderator
I've not run into this problem, but then again I've not extensively tested postgresql. Can you post your reproducing case?
Note that the libc6 upgrade issue was specifically for the 2013(sp1) release
- Mark as Read
- Mark as New
- Bookmark
- Permalink
- Report to a Moderator
I am having problems with this example and psql password. When I execute the code psql.exe requests for a password, I type the password in and I get no errors but the i get caught in a password loop. I've created a pgpass.conf in %appdata% and even tried changing the authentication settings to local host to "trust" and I still have the same problem. Executing directly through psql.exe works fine. Any ideas?
- Mark as Read
- Mark as New
- Bookmark
- Permalink
- Report to a Moderator
Thanks for wonderful tutorial!
I followed it with myRIO and it worked fine, but had to modify some of tutorials with a little bit of troubleshootings.
1. Thanks for NI Linux RT feed repository, which is default base feed, I could download postgresql-client without modifying angstrom-base-feeed.conf.
2. I could successfully install and initialize DB, but struggled with starting server.
$ postgres -D /home/postgres/postgresData >logfile 2>&1 &
Instead of starting command above, I used command below, which skips logfile.
$ postgres -D /home/postgres/postgresData &
Once again thanks for awesome tutorial, and hope this troubleshooting help you.
FYI, I'm using LabVIEW 2017 with real time module, cRIO driver 17.0 and myRIO for this tutorial.
- Mark as Read
- Mark as New
- Bookmark
- Permalink
- Report to a Moderator
Why can't we use the LabVIEW databse connectivity toolkit with postgres db ?
Why are you using commandline or the c api ?
- Mark as Read
- Mark as New
- Bookmark
- Permalink
- Report to a Moderator
Running with cRIO-9040 LV 2017.
First off, as noted in previous comments, postgresql is now part of Base package, so ignore info about angstrom-base-feed.conf.
Also note, I don't think you need to create the folder '/home/postgres/postgresData'
Do the following and you should have postgresql running as a service at powerup
1) Update the NI package with: opkg update
2) Install with: opkg install postgresql postgresql-client
This will try to create the postgres user, and a default folder structure. you may need to monkey around with this to get the proper folders created
I believe it places the server info in var/lib/postgres/data - I created folders and uninstalled and reinistalled a couple times until it installed relatively happily.
You may get an error saying it couldn't start the server. Ignore that error - step 3 should fix it.
3) As Admin, update /etc/security/limits.conf to add a line to set stack soft limit of 2048 "* soft stack 2048" without the quotes. Reboot to take effect.
4) Create the postgres login on the NI side. Login as postgres. Test in database creation and actions with psql per the rest of the tutorial.
You shouldn't need to run the command 'ulimit -s 2048' or manually start the server or create the scripts to start the server. LabVIEW example should work as is.
- Mark as Read
- Mark as New
- Bookmark
- Permalink
- Report to a Moderator
The latest version available via opkg is PostegreSQL client 9.4, how can I install PostgreSQL client 9.6?
We have two ears and one mouth so that we can listen twice as much as we speak.
Epictetus
