- Subscribe to RSS Feed
- Mark Topic as New
- Mark Topic as Read
- Float this Topic for Current User
- Bookmark
- Subscribe
- Mute
- Printer Friendly Page
How to Program a Button to Turn On a Motor
Solved!02-01-2015 11:04 PM
- Mark as New
- Bookmark
- Subscribe
- Mute
- Subscribe to RSS Feed
- Permalink
- Report to a Moderator
Our team's getting close to finishing the physical robot, but we need some help on the programming side. We tried editing the default code to achieve what we wanted, but we're not sure how to complete our task. Our final product needs to have two extra features in addition to the default driving code. First, we need to control two motors that have a constant speed. One button would turn them on, another would turn them off. Second, we wanted to use two buttons to control a set of motors where one button makes them turn one way while being pressed and then stop when not being pressed, and the other button is the same except inverted.
We don't have a knowledgeable sponsor on this subject, so most of the responsibility falls onto me to get this portion of the robot done. This is what I have so far.
I wanted to start with what seemed easier, so I decided to begin working on the motors that would go one way when a button was held down and inverse of that way when another button was held down. From what I've learned from various posts and powerpoints is that the four VIs I need to worry about are Begin, Teleop, Finish, and Periodic Tasks. I think I at least have the right idea in mind for what I'm supposed to do.
Begin.vi

So, from what I've gathered, this is how you establish a new set of 2 motors. I named them Pull Motors and set them to PWN 0 and 1 so that I could open the simulation to test the motors even when I don't have the robot; like in my room at night.
Teleop
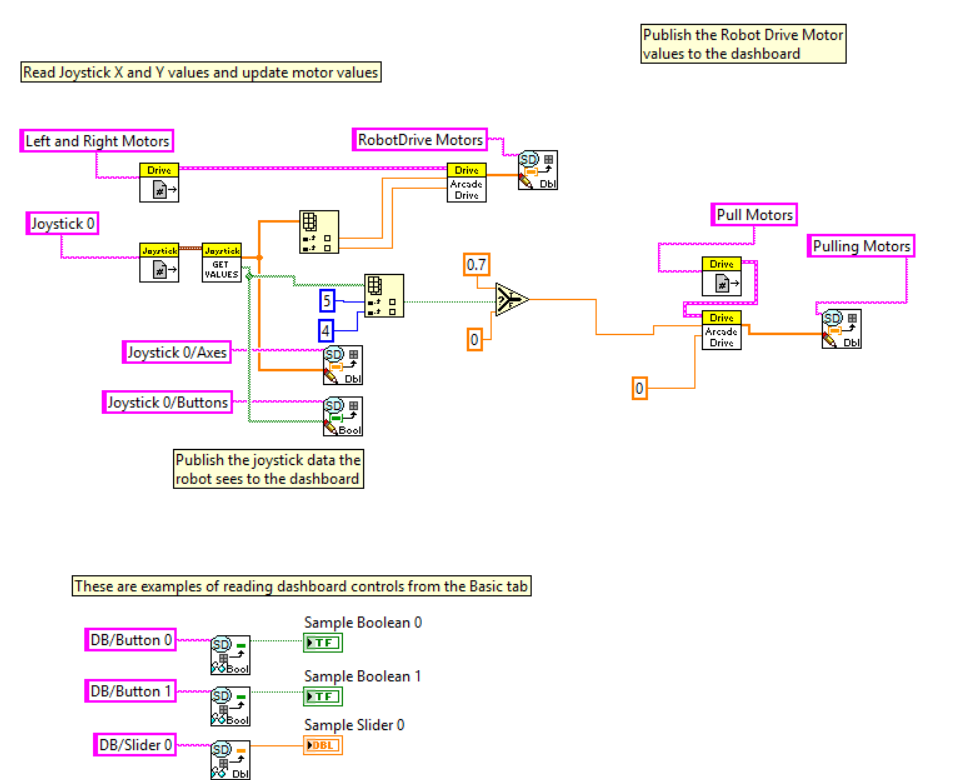
This is where I need help mainly (I think). Running all 4 of these VIs in the robot main program causes the robot to move forward straight when I hold down the right bumper button. 5 is the right bumper button and 4 is the left bumper button. It does half of what I want it do for now. The next step for me is to add that when I press the left bumper button (4) it does the inverse of when pressing button (5). I don't know how to do what I just described. From previous coding experience, I think I need some way to select between values to give to Arcade Drive without conflicting information, but I don't know how to do that in LabVIEW.
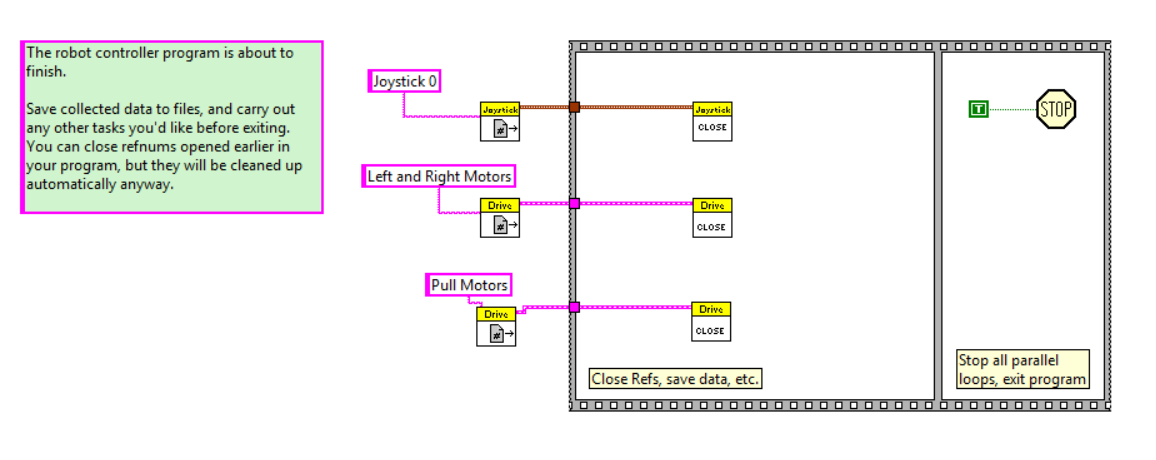
Here's my Finish and Periodic Tasks VIs in case you see something I did wrong.
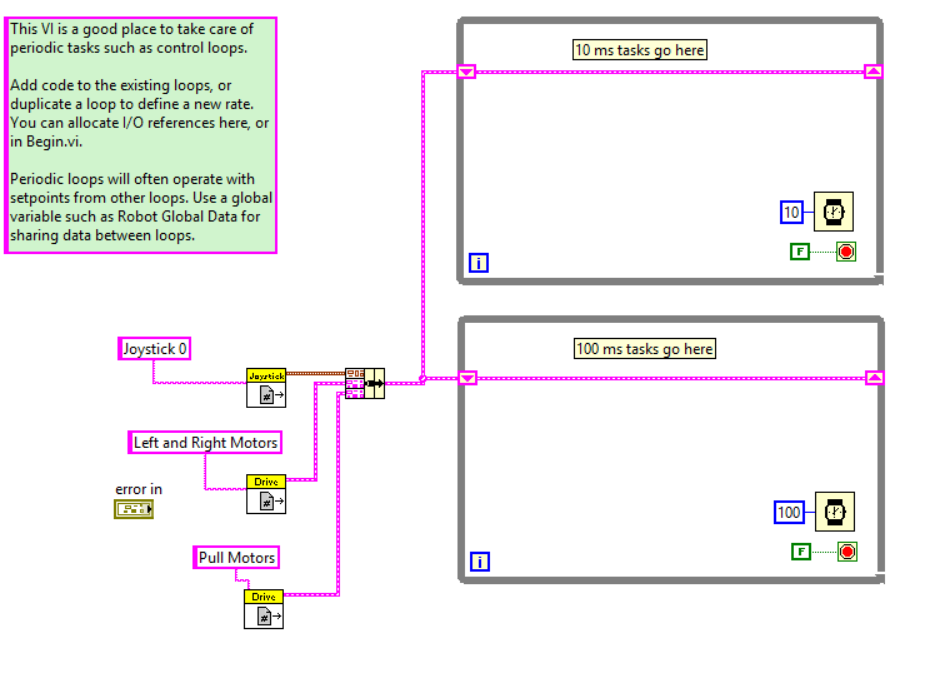
Periodic Tasks
Finish
Thanks for taking the time to read this! Everything that I've accomplished so far has been from trial and error and this awesome helpful community!
Solved! Go to Solution.
- Tags:
- help
02-02-2015 12:45 PM
- Mark as New
- Bookmark
- Subscribe
- Mute
- Subscribe to RSS Feed
- Permalink
- Report to a Moderator
One fairly easy way is to use another Select VI like you have done for Button 5 and put it in between the existing Select and the Arcade Drive VI. On the False side wire the output of your existing Select, on the True side wire -0.7. This yields the following truth table:
| Button 4 | Button 5 | Output |
|---|---|---|
| False | False | 0 |
| False | True | 0.7 |
| True | False | -0.7 |
| True | True | -0.7 |
If you'd prefer the motor go the other way when both are pressed at the same time, reverse the order of the Selects.
Note: The code you have added to Periodic Tasks doesn't do anything and can be removed. The RefNum gets that are populated there are an example and don't actually do anything if you're not adding any code in the loops.
02-03-2015 01:39 PM
- Mark as New
- Bookmark
- Subscribe
- Mute
- Subscribe to RSS Feed
- Permalink
- Report to a Moderator
Hey Kevin, my team is having the same problem. we are trying to control a motor with button 2 in one direction and button 3 in reverse. Have tried what you suggest above, but we must be missing something. Have tried with both a Motor and a Drive Motor. begin.vi:

teleop.vi

With the Lift Motor (drive motor) and Joystick 1, we get rotation in one direction with button 3, nothing with button 2.
We get no movement with Lift Motor C (motor) and Joystick 0.
Any assistance is geratly approciated!
02-04-2015 10:04 AM
- Mark as New
- Bookmark
- Subscribe
- Mute
- Subscribe to RSS Feed
- Permalink
- Report to a Moderator
I just re-created that code and loaded it on a roboRIO and it seems to work perfectly (0.7 output when button 2 is pressed, -0.7 when button 3 is pressed). I would use Probes to make sure the code is doing what you expect (make sure you are using the correct buttons, etc.), then begin examining the electrical system to make sure it is correct and functional.
One thing to note is that the buttons are 0 indexed in LabVIEW because they are an array, this means that they do not match the button numbers that may be printed on the Joystick (such as the Logitech Extreme 3D Pro or Logitech Atk3) which start at 1.
If you are not familiar with using Probes:
Open the Robot Main.vi and run it on the roboRIO using the white run arrow.
Open the Teleop.VI block diagram
Enable the robot in Teleop mode
Hover over the wire you wish to see the value of, you should see the cursor change to a small icon with a P in it. Click on the wire to pull up the probe window.
The Probe window will now allow you to monitor the value of that wire as your program executes.
Add other probes as necessary to observe the execution of your program.
02-04-2015 01:51 PM
- Mark as New
- Bookmark
- Subscribe
- Mute
- Subscribe to RSS Feed
- Permalink
- Report to a Moderator
Thanks for the instructions on the probes. It ended up a wiring issue. We’re back in business. Thanks!!
