Hello World!: A Beginner’s Introduction to Simple Web Hosting Using the LabVIEW NXG Web Module and SystemLink Cloud
- Subscribe to RSS Feed
- Mark as New
- Mark as Read
- Bookmark
- Subscribe
- Printer Friendly Page
- Report to a Moderator
Products and Environment
This section reflects the products and operating system used to create the example.To download NI software, including the products shown below, visit ni.com/downloads.
- LabVIEW
- LabVIEW NXG
- LabVIEW NXG Web Module
Software
- Windows
Operating System
- LabVIEW G
Programming Language
Code and Documents
Attachment
Description
Description-Separate-1In this tutorial, we will be covering the basics of using the LabVIEW NXG Web Module to access your data remotely from anywhere. Using WebVIs, you can easily develop web pages in LabVIEW NXG and publish them to the Internet by hosting on the NI SystemLink Cloud. The LabVIEW NXG Web Module extends to advanced website structures and formatting, including HTML and JavaScript support, but, for the purposes of this tutorial, we will walk through the barebones framework needed to start using your data online. You can think of it as a “Hello World” program for the LabVIEW NXG Web Module. Let’s get started!
Description-Separate-2
How to Use
How-Separate-1A Basic Web Framework
Before diving into the code itself, we’ll begin with a brief primer on websites and demystifying the concepts of frontend, backend, and web hosting. If you have past web experience, feel free to skip this section.
When we talk about the websites you see online, they are often a bit more complicated than they appear to the user, but we can break them down into a few basic pieces. First, there is a code module that manages the webpage you see in the browser. Its responsibility is to display data in a digestible format and respond to user input to request data. However, this data is often being stored or generated somewhere else, for a variety of reasons that we won’t discuss in detail in this article (security is a big one). This code module is called the and runs in your browser. We will build this part of our program using the LabVIEW NXG Web Module.
Now you must be thinking: if the website doesn’t have the data, then where is it coming from? That’s where the backend, or application server, comes in. Typically, there is another code module running somewhere that the user does not have access to, but can request data from via the frontend. This could be a news article library hosted by a newspaper, a bank’s database of user info, or, a DAQ system running in your lab or factory. We will build the backend of this tutorial using LabVIEW 2019 as an example of adapting existing LabVIEW code to include web support so that you can now access that data from anywhere on any device.
The final piece that ties everything together is called the web server, or host. While web hosting on professional websites such as Google or Facebook is much, much more complicated than what you could easily set up in your home or office, you can host your site via the NI SystemLink Cloud to achieve a professional hosting experience without the need to contract a server separately. The easiest way to think about the host is as a computer that stores your frontend code and acts as a mediator between the user (anywhere with Internet access) and the backend (a computer running LabVIEW code at your test site).
Part 1: The Backend
The first important part of any website is deciding what data you want to put out on the web. This could be anything from monitoring temperatures on a pump or checking vibration of an asset to sending large data files from tests for remote analysis. For this tutorial, we will be simulating temperature monitoring and sending that data to the SystemLink Cloud a few times per second. Perfect for your first web application.
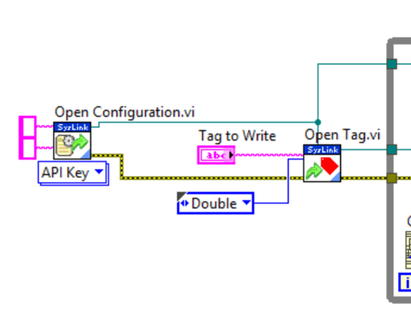
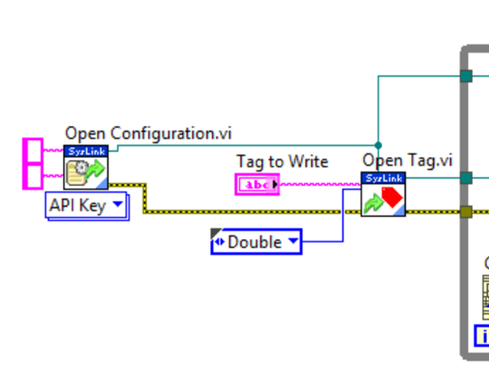
1. Add an Open Configuration VI and Open Tag VI in the setup code before your data-producing loop in an existing LabVIEW or LabVIEW NXG VI. We will cover how to wire the inputs to these VIs in Part 3, when we discuss the SystemLink Cloud.
The LabVIEW NXG Web Module supports backend code developed in either LabVIEW 2014+ or LabVIEW NXG so you are free to use code developed in either environment.
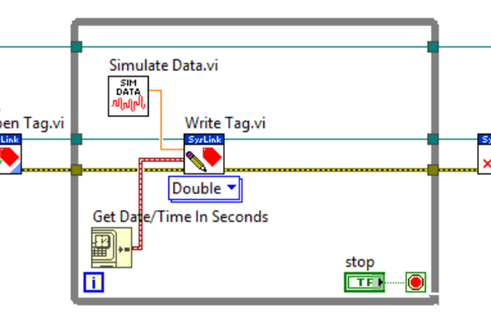
2. Add a Write Tag VI inside of the loop and wire your current data output into the VI.
This tutorial uses a double type, but the VI supports other common data types as well. The data-producing code in this example is a simple random number generator to simulate temperature data. Also, notice that we use the Get Date/Time In Seconds VI to write a timestamp with the data. Using this timestamp, we can know when the measurement occurred, even if there is a bit of delay in receiving the data over the web.
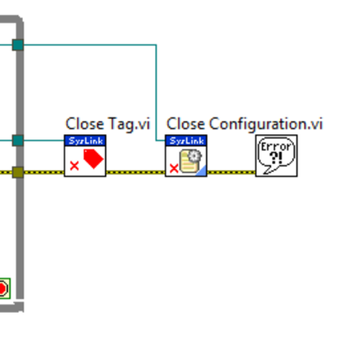
3. Add Close Tag and Close Configuration VIs after your loop to clean up your references. While this is not technically mandatory, it is always good practice to close your open resources!
Reference: SystemLink VIs API Reference
Part 2: The Frontend
Now, let’s build the LabVIEW NXG Web Module code that will act as the user interface (UI) for our web application. This is the piece that will retrieve the data being produced by our backend code and display it in your web browser. (LabVIEW and LabVIEW NXG are licensed together so you have access to both with the purchase of one or the other. You will just need to purchase the LabVIEW NXG Web Module add-on separately or use it's free 45-day trial.)
1. Add the same Open Configuration and Open Tag VIs that we used in the backend code. The images will look different in LabVIEW NXG, but the function names are the same. Once again, we will cover the inputs to these VIs in Part 3.
2. Add a Read Tag function and wire that to an indicator to be placed on the VI’s front panel.
3. Add the same Close Tag and Close Configuration VIs that we used on the backend after the loop.
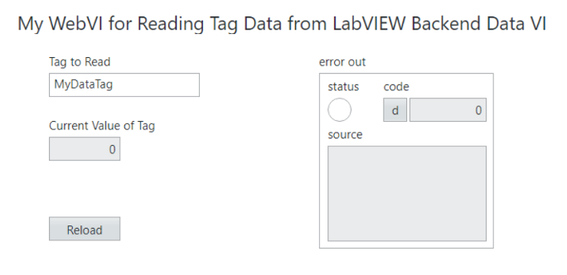
4. Build your WebVI’s front panel, including the indicator we created for the Read Tag function.
You can use the LabVIEW NXG front panel to build a professional-looking webpage without needing to dive into HTML code. Optionally, you can still edit the HTML, in order to embed more complex web code and further customize your webpage.
Part 3: Hosting the Frontend on NI SystemLink Cloud
Now, let’s tie our VIs together. We’ll take the frontend LabVIEW NXG WebVI and upload it to the SystemLink Cloud so that it can be accessed via the Internet.
The example code in this series uses a SystemLink Cloud Tag for data transfer to the WebVI, but there are other options for data transfer, such as SystemLink Cloud messages and WebSockets. When we run our WebVI for the first time, a new tag will be automatically created on the SystemLink Cloud. You can also create/view your Tags from the Tags page on the SystemLink Cloud webpage.
1. Enter the server and tag information into the Open Configuration and Open Tag functions in both the backend code and frontend code. Enter “https://api.systemlinkcloud.com/“ as the server url input to Open Configuration and generate an API key by following the directions from the SystemLink Cloud manual.
At this point, you should be able to run both VIs simultaneously and see your input from the backend LabVIEW VI reflected in the Tag output of the LabVIEW NXG WebVI. Make sure to resolve any errors or bugs before proceeding.
2. Once your code is functioning correctly, empty these fields in the LabVIEW NXG WebVI once again. When the WebVI is hosted on the SystemLink Cloud, the server information is implied so we can leave it. This is important as a security measure as the end-user will be could view your code running on the frontend through their browser. Remember to leave these lines in place for your backend code though. Alternatively, you could include code in your backend VI that reads these parameters from a configuration file stored on the server.
3. Build your WebVI into a compiled package that can be hosted by the SystemLink Cloud. To build, right-click on your Web App container and select “Create Package/Installer with item” from the drop-down menu.
This will automatically create a new package file in the LabVIEW NXG project folder (this is the .lvdist file pictured above). You’ll see many customization options for including additional files, tracking versions, etc. in the package window. These are all great tools for keeping your code organized and we recommend learning about these details, but we will not be covering them in this tutorial.
4. Save all files in the project and click the “Build” button on the package window. This will create a .pkg file in the project’s Builds directory that can be uploaded to the cloud. Your .pkg file may have a cryptic name at first from the default build settings, but this can be adjusted in the package information section of the package file.
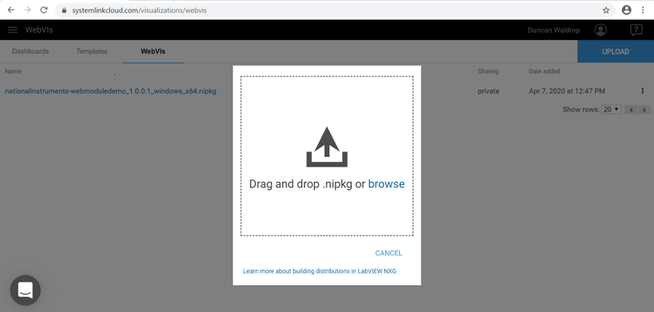
5. Upload the WebVI .pkg file to the SystemLink Cloud website. On the site, navigate to the WebVIs tab under Visualizations. Click “Upload” in the top-right corner and drag your .pkg file to the window that appears on your screen.
Congratulations! You have just uploaded your first WebVI to the cloud and can now access the VI’s front panel from anywhere by logging in to the SystemLink Cloud and navigating to the WebVIs tab.
To see your WebVI in action, run the data simulation LabVIEW NXG code we developed earlier in the series and you should see your data update online. Remember a great perk of web hosting is that this WebVI is now available 24/7 and will update as data is sent from the backend DAQ system. This idea can be extended to DAQ systems of any size to allow for constant access to all of your data whenever and wherever it is needed.
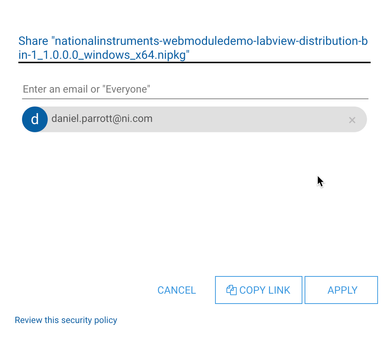
You can also share the link to your new WebVI via email by clicking on the 3 vertical dots to the right of the page, selecting “Share” and then entering email addresses. In the share menu, you’ll also see a “Copy Link” button as well, which allows you to copy the link to the WebVI to distribute yourself.
How-Separate-2
Related Links
Related-Separate-1Part 4: Next Steps in LabVIEW NXG Web Module Learning
- Developing LabVIEW NXG Web Module User Interfaces
- Updating Existing LabVIEW Applications to Include Web Support
- LabVIEW NXG 5.0 Web Module Manual
- NI Extends Free Trial of SystemLink Cloud to 6-Months
- More LabVIEW NXG Web Module Demos and Examples
Related-Separate-2
Software Product Marketing - Data Management & LabVIEW
National Instruments
Example code from the Example Code Exchange in the NI Community is licensed with the MIT license.
- Mark as Read
- Mark as New
- Bookmark
- Permalink
- Report to a Moderator
日本語のトレーニング資料はこちらで公開しています。
LabVIEW NXG トレーニングスライド - NI Community - National Instruments
Web Moduleについてはページ下部にあります。

