- Subscribe to RSS Feed
- Mark Topic as New
- Mark Topic as Read
- Float this Topic for Current User
- Bookmark
- Subscribe
- Mute
- Printer Friendly Page
Standard Engine Documentation
10-07-2016
05:28 PM
- last edited on
07-20-2018
04:54 PM
by
cool_ranch_doRI
- Mark as New
- Bookmark
- Subscribe
- Mute
- Subscribe to RSS Feed
- Permalink
- Report to a Moderator
Note: This documentation is kept most up-to-date on our GitHub page. See https://github.com/LabVIEW-DCAF/StandardEngine for more details.
Overview
The Standard Engine is an implementation of the Engine Execution Interface intalled as part of DCAF.
As described in Understanding the Different Components of DCAF, the Engine Execution Interface provides a data mapping API for connecting Channels with Tags, and defines an API and state machine that an engine must implement. However it does not define any other details on how an engine must be implemented. Users of the framework are therefore free to build their own engines with a unique implementation and feature set. The Standard Engine was created to provide a default implementation that can serve the majority of DCAF target application use-cases.
This document will first outline the features of the Standard Engine and how to take advantage of them. Then it will discuss the design principles for the engine and provide a high-level overview of that design.
Feature Description and Configuration
The Standard Engine can run on both Windows and LabVIEW Real-Time targets. It also supports the instantiation of multiple instances on one target. This can be helpful when different plug-ins need to execute on the same target with different timing sources or when developing an engine as a self-contained grouping of behavior that is independent of behavior achieved by other engines.
Primary Configuration Page
The following features are configurable from the 'Primary Configuration' page of the Standard Engine Editor Node.

Engine Name
This field allows a user to change the name of the engine. This field will not impact how the engine executes.
Timing Source Type
The 'Timing Source Type' field allows a user to choose between one of three pre-built timing sources, 1 MHz, 1 kHz, and Scan Engine, or a timing source implemented by one of the plug-in modules. Once chosen, a user can enter a 'dt' to run the engine at a period that is an integer multiple slower than the selected timing source. For example, a dt of 5000 with a 1 MHz timing source would result in an execution period of 5 ms.
If 'Use Module Timing Source' is selected, then a list of modules will be displayed to allow the selection of a specific module to provide the timing source to time the loop. Keep in mind that not all modules will provide a timing source.
Timing Reporting
Timing reporting is enabled by selecting 'Create Timing Report Tags?'. This will automatically generate four engine tags that will contain information regarding if the engine was ever late, how many times it was late, the timing source dt, and the last iteration's execution time in nanoseconds.
Processor Assignment
The 'Processor Assignment' field is used to specify which CPU core the engine will execute on. 'Automatic' is the default behavior and allows LabVIEW and the OS to choose the ideal execution behavior. This option should generally not be changed without good reason.
If 'Manual' is selected, the engine will automatically reserve the specified core for execution on Real-Time targets. This can greatly reduce the execution jitter of the engine, but prevents execution of any other tasks on that core.
Module Configuration Page
The following features are configurable on a per-module basis from the 'Module Configuration' page of the Standard Engine Editor Node.
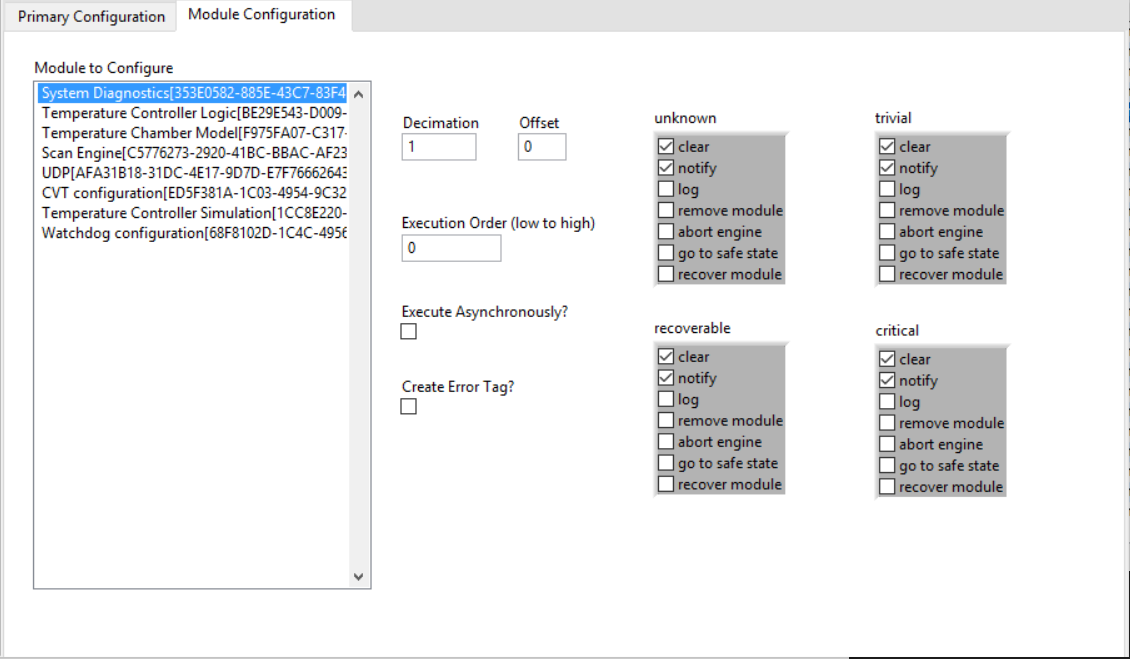 Decimation and Offset
In addition to a timing source and dt, the standard engine also allows users to configure a decimated execution rate for each of its plug-in modules. For example, a 'Decimation' value of 2 will cause the engine to call that module every other cycle. The 'Offset' value is used to specify when the module is called for the first time if it is decimated. As another example, if there are two modules, each with a decimation value of 2, and one module has an offset of 1 while the other is left at 0, the engine will alternate the execution of the modules on each iteration.
Execution Order
Specifies the priority with which to call each of that module's methods relative to the others in order from low to high. Any numbers can be entered and the engine will sort them at runtime to decide the execution order. If modules have the same priority then assume execution is chosen at random.
Asynchronous Execution
Be default the Standard Engine executes all plug-ins within its main thread. While this offers the best possible performance, it also means a module that is blocking or poorly-developed can slow down the execution of the entire engine and every other module within it. To resolve this, the Standard Engine allows users to select 'Execute Asynchronously?' from the configuration page which tells the engine to call that module in its own thread. The Standard Engine will automatically create the thread and the communication pathways for this to work properly. The engine will also still trigger the execution of this thread based on the configured timing source. However if that thread blocks, the execution of the main engine thread will remain unaffected.
Create Error Tag
This feature allows the engine to create an I32 error tag for that module. Each module can be given its own error tag, and these errors can be mapped to other channels to pass error information between modules. For example if module A needs to know when module B has an error, create an error tag for module B and map that tag to a parameter or output channel on module A.
Error Handling Actions
Perhaps one of the most important features of the Standard Engine is its ability to automatically take action based on errors that get reported by the modules it is executing. A module is responsible for classifying any errors that it generates. The Standard Engine can then be configured to take a variety of pre-built actions based on both the module that threw the error and that error's classification.
The Standard Engine currently provides seven selectable error actions. 'Clear' discards the error once all of the other selected error actions have occurred. 'Notify' places the error in the engine's fault buffer so that it can be received by the main application. 'Log' writes the error to Syslog. 'Remove Module' removes that module from the engine's execution schedule until the engine is reconfigured, all other engine operation will continue as normal. 'Abort Engine' transitions the engine to a safe-state and then unitializes and closes itself. 'Go to Safe State' simply transitions the engine to a safe state but does not unitialize. 'Recover Module' sends the module to a worker pool where the module is closed, reinitialized, and then placed back into the engine's execution schedule assuming the recovery was successful.
Source Code Design
This section will explain the main principles driving the design of the Standard Engine and then cover important aspects of the implementation.
Design Principles
The Standard Engine was designed and optimized for execution on real-time operating systems. The main execution loop of the engine initializes all of its memory before executing, does not allocate any new memory during execution, and serially executes all code within it. However with inline execution the engine is only as deterministic as the plug-in modules it is calling. Therefore the Standard Engine also provides a way to automatically launch plug-in modules in their own thread and deterministically exchange data with them on each loop iteration. The implementation has also been verified using the Real-Time Execution Trace (RTET) toolkit to ensure the main loop maintains determinism.
Design Overview
From a high-level, the Standard Engine is comprised of four seperate pieces of software that can all execute in parallel: the Engine Execution Interface API, the Main Engine Process, one or more Asynchronous Execution Engines, and a Worker Pool. This section will provide an overview of the purpose of each of these pieces and how they interact. The Standard Engine's source code can be examined for lower-level implementation details.

The Engine Execution Interface API is what is used in an end user's application. It is responsible for creating communication pathways and for launching the Main Engine Process. It also handles much of the engine's initialization tasks. Once initialized, the API primarily sends commands to the Main Engine Process for state changes and to accesses status information.
The Main Engine Process is the central element of this implementation. It is responsible for communicating with the other elements and executes the main business logic for the engine. That main business logic is very straightforward. First it waits for the selected timing source to fire. Then it sequentially gathers inputs from each required plug-in module and copies that data into its main tag bus table using the information from the mapping API. This is then repeated for all process functions, and for all output functions. Finally the Main Engine Process executes all of its error handling, scheduling, and other bookkeeping tasks. The block diagram for the loop of the Main Engine Process is shown below.
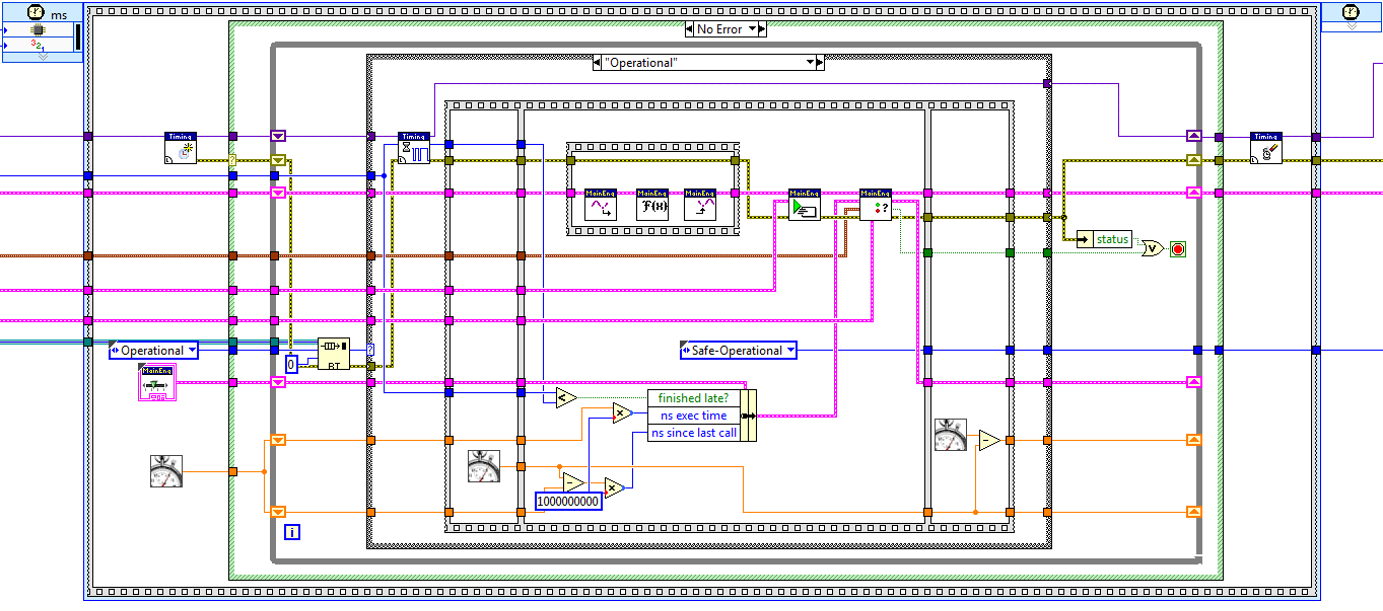 The Asynchronous Execution Engines get launched by the Main Engine Process. There is one of these engines for each plug-in module configured to run asynchronously. The Main Engine Process automatically creates deterministic communication pathways for each asynchronous process it launches. The Main Engine Process also sends commands to these processes telling them when to execute. As a result, timing for each Asynchronous Execution Engine is taken care of automatically. They will run as fast as the engine tells them, or as fast as possible in the case where they can't keep up.
The Worker Pool is used to run various bookkeeping tasks for the engine that would otherwise slow down the engine's execution. This is similar to a producer/consumer pattern, but with multiple consumers. Each worker, or consumer, is capable of handling time-consuming tasks like reinitializing a module. In this use-case, the Main Engine Process would catch an error from a module, and attempt to recover from that error by reinitializing that module. However the Main Engine Process can't do that without slowing down its execution, so it instead hands this task over to the worker pool. A worker would then close the module that threw the error, attempt to reinitialize it, and then send it back to the Main Engine Process where it gets readded to the engine's execution schedule.
Software Requirements
- LabVIEW 2014 or newer
Installation
The DCAF Standard Engine is automatically installed by the DCAF Core package. It can also be installed individually from VI Package Manager by searching 'DCAF Standard Engine'.
Support
Questions or issues regarding the Standard Engine can be posted in the comments below or directly on the GitHub repository. Please check the known issues on the repo before posting.
Visit Collaborating on the Development of DCAF to learn how to contribute your own improvements to the source code.
