cRIO Modbus Slave Reference Library
- Subscribe to RSS Feed
- Mark as New
- Mark as Read
- Bookmark
- Subscribe
- Printer Friendly Page
- Report to a Moderator
Products and Environment
This section reflects the products and operating system used to create the example.To download NI software, including the products shown below, visit ni.com/downloads.
- modbus
Other
Code and Documents
Attachment
Description
Description-Separate-1Overview
This reference library was developed so that a cRIO could quickly and easily act as a Modbus slave. It is designed so that a developer can choose specific C-Series modules in scan mode, and have data from those modules immediately mapped to modbus registers for communication with a Modbus master. The API accepts an array of module references as an input, outputs the corresponding Modbus mapping, and provides a mechanism for linking the IO to Modbus behind the scenes.
An example application is included with the installed files which will dynamically discover all scan mode C-Series modules in a cRIO chassis, map all of the IO to specific modbus registers, present that mapping to the user in table format, and update the modbus registers and output values every scan cycle.
API Description
For more detail on the modbus protocol, see an Introduction to MODBUS.
The reference library consists of the following VIs:
Initialize
This VI initializes the session. It accepts an array of modules and user channels, as well as the name of the deployed Modbus library and IO server. This information is then used to create a Modbus mapping and link the IO and user channels to specific modbus registers.

Update
Call this VI to force the mobus registers and IO channels to reflect each other's current state. The user has control of the update rate by determining the rate at which this VI gets called.

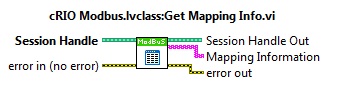
Get Mapping Info
This VI returns the resulting modbus mapping information determined from when this session was initialized. This information is returned in the form of a 2D array with three columns: Channel Location, Channel Name, and Mapped Modbus Register
Write User Channel
This function is used to update the value of a specific user channel defined when the session was initialized. Only Single and Boolean values are supported. The specified channel is not updated until the Update vi is called.

Close
This function will destroy the session if it is the last remaining session reference. All variable references are closed if the session is destroyed.

Implementation
This API is implemented using features of the Modbus Slave IO Server installed with LabVIEW Real-Time, as well as features for retrieving module properties, and communicating with modules and the IO Server dynamically. The majority of the API functionality is performed within the Initialize VI. This VI programmatically discovers the number of channels, data type, and channel direction (input/output) for each module and uses this information to map each channel on the module to a specific modbus register. It then opens up a Shared Variable connection to each module as well as a Datasocket connection to each corresponding modbus address in the IO Server. Block reads and writes are used for the C-Series modules (a LabVIEW 2010 feature), and are also used to update the modbus IO server. This is done to greatly improve efficiency. For more information, refer to Read and Writing IO Variable Containers.
Each module is given its own section of the modbus address space so that both the module and the modbus access can be streamlined using block reads and writes. The modbus mapping follows the conventions described in Using Modbus IO Servers. This is a good resource for learning more about the NI Modbus IO Server in general. The modbus mapping algorithm used is described below. This formula is not necessary to learn as the API also returns the mapping information.
- Digital outputs begin with 00.
- Digital inputs begin with 10.
- Analog inputs begin with F30.
- Analog outputs begin with F40.
- The module slot number takes the thousand's place.
- The channel number is multiplied by 2 if it is an analog channel.
- The channel number is then incremented and added to the existing address.
- User Defined Channels always begin at the first Digital or Analog Input address.
For example, an analog input located in slot 4, channel 5, would be mapped to F304011. A digital input located in slot 1, channel 0, would be mapped to 101001. Again, the best way to get this mapping information is to read it from the 'Get Mapping Info' VI in the API.
After the connections have been opened and linked, the Update VI is used to synchronize the IO values with the modbus register values. When the Update VI is called, values are read from input modules and written to their corresponding modbus registers, while the output modules get updated with the value contained in their specific modbus registers. A modbus master is therefore able to read the value of each channel of each input module, as well as specificy the output value for each output channel.
It is often useful to have access to additional information regarding the state of the controller via modbus. For example, the slave may want to report whether or not a fault or error has occurred, or share its current CPU usage. This functionality is implemented through User Channels. The API allows the developer to create specific User Channels that get their own unique space in the modbus mapping. The values for these channels are stored in a variant array. Each time an update occurs, the values from this array are read, formatted into their appropriate data type, and then written to their corresponding modbus address. The programmer can update the values in this variant array using the 'Update User Channels' VI and therefore write to the desired modbus register during the next update. This provides a straightforward method of communicating additional modbus information like CPU load, program state, error conditions, etc.
Finally, the cRIO Modbus Reference Library was built using the 'Extensible Session Framework'. This framework allows the API to be session-based such that separate parallel VIs or threads can interact with the same session simultaneously. Also, a new session of the API can be created so that so that each session can work with its own specific IO modules and update at its own rate independent of the other sessions. For more information about the Extensible Session Framework, see the Framework for Creating Session-Based APIs.
An Example Block Diagram

API Limitations and Pointers:
1. Only modules configured for Scan Mode can be accessed directly by the API.
2. Modules containing both Input and Output channels are not supported. All channels on a module must be the same direction and datatype.
3. The API does not provide access to the data from module reads. If you want access this data, you must read the channels a second time separately.
4. All channels for a specific session are updated at the same time. To update registers at various rates you must create multiple sessions.
5. No Modbus master code is included with the download. To test that updates are actually occurring, consider using the NI Distributed Systems Manager or third-party Modbus Master software like ModScan32.
6. User Defined Channels can only be created by one session. Multiple sessions attempting to use User Defined Channels will end up mapping them to the same registers as a previous session.
7. The API only allows the use of Singles and Booleans for User Defined Channels and only provides a mechanism for updating a single User Defined Channel at a time.
8. Error checking for the User Defined Channels is not robust. The developer should make sure that all channels have a unique name and that only supported data types are ever written to these channels.
Requirements
Software Requirements:
Extensible Session Framework version 1.1.0.5 or higher
LabVIEW 2010 or higher - This API utilizes new features in LabVIEW 2010 and cannot be saved to an earlier version.
LabVIEW Real-Time 2010
Appropriate NI RIO Driver for LabVIEW 2010 or higher
Hardware Requirements:
cRIO controller and chassis that support the NI Scan Engine
One or more C-Series modules with Scan Engine support.
Instructions for Use
1. Install VI Package Manager from JKI, a free download, if it isn't already in order to install the attached package.
2. Install the Extensible Session Framework package, a cRIO Modbus Slave Reference Library dependency.
3. Install the attached package file.
4. Open the installed example project: C:\Program Files\National Instruments\LabVIEW 2010\examples\cRIO Modbus Reference Library
5. Change the controller IP address in the project to match your cRIO.
6. Deploy the Modbus Library in the project.
7. Run the cRIO Modbus Example VI.
8. Use the returned mapping information to interact with the module data using the Modbus master of your choosing.
Note: It is not necessary to discover or deploy settings for your C-Series modules.
Feedback
All feedback is welcome. Please feel free to post what you like, what you don't like, and any problems that you run into.
Description-Separate-2Example code from the Example Code Exchange in the NI Community is licensed with the MIT license.
