The myEEG Project
- Subscribe to RSS Feed
- Mark as New
- Mark as Read
- Bookmark
- Subscribe
- Printer Friendly Page
- Report to a Moderator
Products and Environment
This section reflects the products and operating system used to create the example.To download NI software, including the products shown below, visit ni.com/downloads.
- LabVIEW
- Other
Software
- Other
Driver
Code and Documents
Attachment
Description
Description-Separate-1Introduction to the myEEG Project
The myDAQ Project is an individual project for Applications Engineers (AEs) at National Instruments UK & Ireland. Each year, AEs throughout the department undertake their own myDAQ Projects to demonstrate to students how accessible and user-friendly NI products are. Coming from a Medical Engineering background, I chose to build a device that could measure brain waves. In medicine, these brain waves are know as the Electroencephalogram (EEG). I have also programmed a LabVIEW tutorial application which teaches students the basics of EEG and how to acquire accurate EEG measurements.
The myEEG Design
The design was based on a DIY EEG tutorial posted on the "instructables" website. It was then adapted so that it could exchange data with an NI myDAQ rather than the sound card of a PC. The myDAQ could then be easily programmed in LabVIEW 2012 using the Biomedical Toolkit. The original design also needed to be modified to remove certain stages that were not performing as specified. The modifications made are outlined in the following schematic taken from the DIY EEG tutorial (I have included a downloadable copy of the schematic at the end of this document):
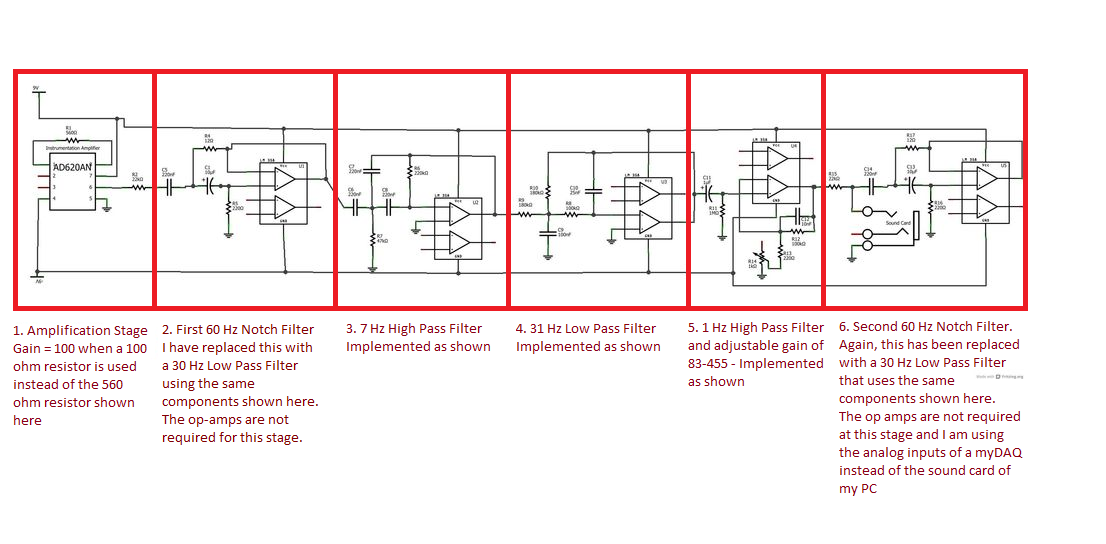
Due to my modifications, the components used in the myEEG differ slightly from those outlined on the instructables website.
In order to test the DIY EEG circuitry, I ran Multisim simulations of each individual section of the circuit. It was through this testing that I noticed the poor performance of the 60 Hz notch filters (50 Hz for European power supplies) and was able to design two 30 Hz low pass filters that made use of the same components. In actual fact, these changes meant that I used 2 less amplifiers in my design and that the 270 kΩ resistors were no longer required. The low pass filter used was therefore a passive RC filter with each of the two resistors in series and each of the two capacitors in series.
The myEEG Circuitry
There were only a few changes made to the DIY EEG parts list. The full list of components used in the myEEG are as follows.
Chips
1x Instrumentation Amplifier AD620AN
Capacitors
- 3 x 10 nF (ceramic)
- 1 x 20 nF (ceramic)
- 1 x 100nF (tantalum)
- 5 x 220nF (tantalum)
- 1 x 1uF (electrolytic)
- 2 x 10uF (electrolytic)
Resistors
- 1 x 1 kΩ Potentiometer
- 2 x 12 Ω
- 1 x 220 Ω
- 1 x 100 Ω
- 2 x 22 kΩ
- 1 x 47 kΩ
- 2 x 100 kΩ
- 2 x 180 kΩ
- 1 x 220 kΩ
- 1 x 1 MΩ
Connectors
- Protoboard Kit
- Wires
- 2 x 9V batteries for power.
Electrode Supplies
- UniMed Disp-EEG15 Electrodes
Steps 3 to 8 of the DIY EEG tutorial takes you through each of the steps necessary to build your own EEG device. When you come to step 8, ignore any references to the sound card of your PC and wire the output of the final stage to your analog input channel of the protoboard kit/myDAQ.
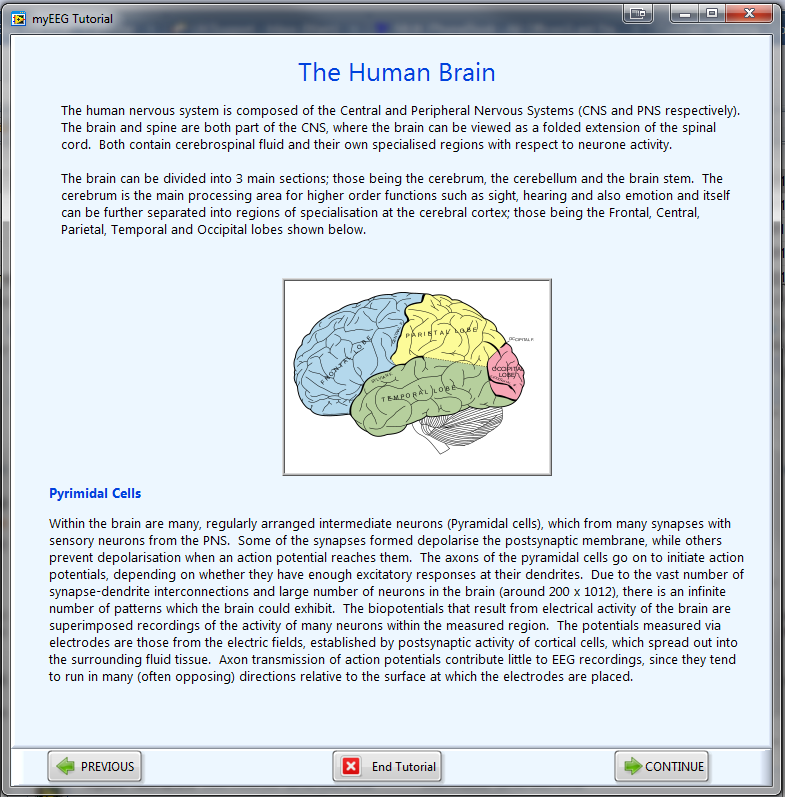
The myEEG Tutorial
The myEEG tutorial is aimed at University students studying Medical Engineering but could be of equal use to anyone interested in learning about the EEG and the human brain. The tutorial takes students through the basics of EEG; from the cells that produce the EEG waveform and the anatomy of the human brain, through to how to take accurate EEG measurements and their use in medical diagnosis. The tutorial also takes a brief look into the types of functions used in LabVIEW to code both the tutorial side of the application and also the underlying EEG acquisition.
I have attached downloadable copies of the myEEG Tutorial at the end of this document. If you already have LabVIEW 2012 and DAQmx 9.6 installed on your PC, you will be able to run the myEEG Tutorial without the need for any further downloads. If you are interested in further developing medical applications, I would strongly advise downloading the LabVIEW Biomedical Toolkit. I discuss the uses of this toolkit in the myEEG Tutorial. Please note that you will need to unzip the downloaded folder before using the tutorial.
The myEEG LabVIEW Project
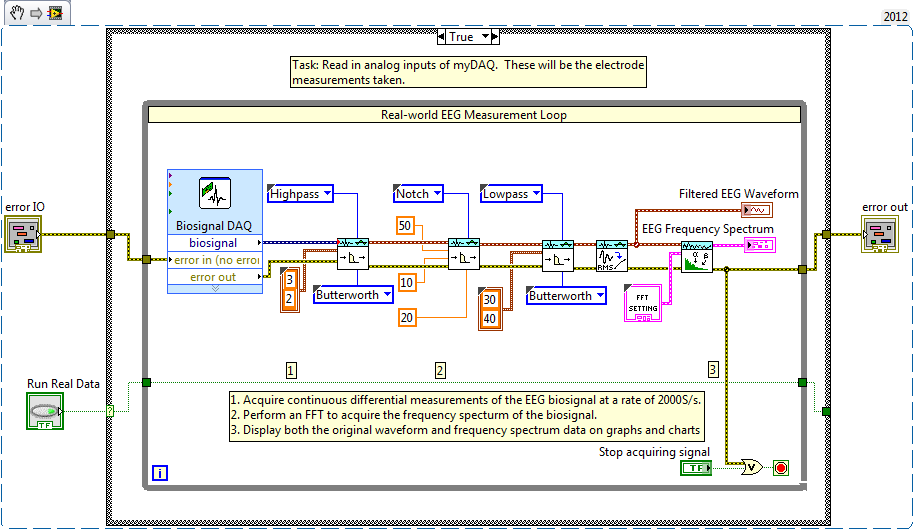
For those of you who are interested in looking further at the underlying code behind the myEEG Tutorial and in particular who want to understand how I have processed the raw EEG data to acquire accurate results, I am including the full LabVIEW project within the attachments of this document. Please note that you will need to unzip the downloaded folder before using the project.
For those of you who do not wish to wait until then, a snippet of the block diagram for acquiring real world data follows:
The myEEG Science Fair Poster
Finally, I have also produced a science fair style poster to introduce the myEEG to the community. This is included in the attached files.
Requirements
Software
LabVIEW 2012 or compatible
Biomedical Toolkit 2012
**This document has been updated to meet the current required format for the NI Code Exchange.**
Description-Separate-2Applications Engineer
National Instruments UK & Ireland
Example code from the Example Code Exchange in the NI Community is licensed with the MIT license.
- Mark as Read
- Mark as New
- Bookmark
- Permalink
- Report to a Moderator
This is a very well developed application that uses correct programming practices. The complexity of the system is made easy to understand and the depth of the content within the tutorial makes this a very worth while laboratory.
- Mark as Read
- Mark as New
- Bookmark
- Permalink
- Report to a Moderator
can i get those vi's please i want to try implementing them pls do share those vi's
- Mark as Read
- Mark as New
- Bookmark
- Permalink
- Report to a Moderator
if we process eeg signals through the bread board circuit for generating alpha signals out of the eeg signal, then also we have to use the vi diagram(highpass filter, notch filter and highpass filter, excluding FFT portion) described on this page before going for fft of the genearted signal.
- Mark as Read
- Mark as New
- Bookmark
- Permalink
- Report to a Moderator
Really thank you!!
