How to Set Aperture Time in NI-DMM
- Subscribe to RSS Feed
- Mark as New
- Mark as Read
- Bookmark
- Subscribe
- Printer Friendly Page
- Report to a Moderator
Products and Environment
This section reflects the products and operating system used to create the example.To download NI software, including the products shown below, visit ni.com/downloads.
- Modular Instrumentation
Hardware
- LabVIEW
Software
Code and Documents
Attachment
Overview
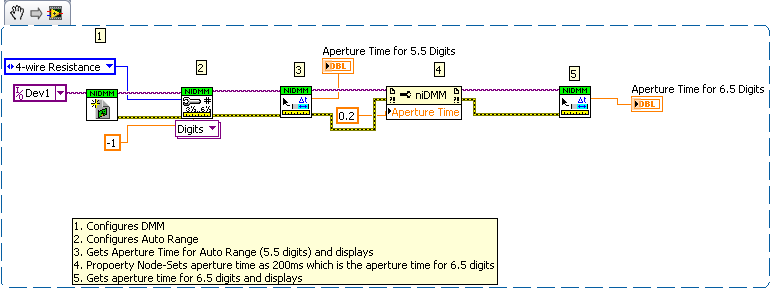
This example shows how to manually control aperture time for a DMM in LabVIEW.
Description
When a DMM is set to Auto-Range, it may not take advantage of all of its digits of resolution. For instance, the 4065 is a 6.5 digit DMM; however, when the DMM is used in Auto-Range mode, only 5.5 digits are used. The Aperture Time Property Node can be used to increase the aperture time to the match the aperture time for 6.5 digits so that Auto-Range can be used but a 6.5 digit measurement can be obtained.
Requirements
Software
LabVIEW 2012(or compatible)
NI-DMM driver which is compatible with your hardware and version of LabVIEW
Hardware
NI DMM Device
Steps to Implement or Execute Code
1. Download and open the example VI
2. Configure the following settings in the block diagram:
- The Instrument Descriptor (Which DMM you are using)
- Which type of measurement you are performing
- The new aperture time, constant is currently 0.2 for this example
3. Run the VI
4. Observe on the front panel the aperture time for 5.5 and 6.5 digits
Additional Information or References
Block Diagram

**This document has been updated to meet the current required format for the NI Code Exchange.**
Margaret Barrett
National Instruments
Applications Engineer
Digital Multimeters and LCR Meters
Example code from the Example Code Exchange in the NI Community is licensed with the MIT license.
