- Document History
- Subscribe to RSS Feed
- Mark as New
- Mark as Read
- Bookmark
- Subscribe
- Printer Friendly Page
- Report to a Moderator
- Subscribe to RSS Feed
- Mark as New
- Mark as Read
- Bookmark
- Subscribe
- Printer Friendly Page
- Report to a Moderator
________________________________________
Overview
In the previous tutorial, Simple JavaScript and HTML with LabVIEW Web Services, we created a LabVIEW Web Service, added a Web Resource VI that adds two numbers, and created the HTML and JavaScript files to render the user interface in our web browser.
This tutorial will delve further in to writing to and from LabVIEW using a web interface, explore some of the different ways of accomplishing this, and discuss the pros and cons of each.
| Web Interface |
|---|
 |
(click on the picture to see an animated GIF)
________________________________________
Prerequisites
This project picks up where Simple JavaScript and HTML with LabVIEW Web Services leaves off, so start with the completed project you created, or download the completed example here.
Hardware
None
Software
LabVIEW 2014
Notepad (Notepad++ recommended)
________________________________________
Procedure
Update on Button Click
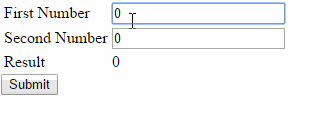
1. Let’s begin by reviewing the project we built in the previous tutorial. In our code, we create a table that contains two text boxes—“firstNumber” and “secondNumber”—that will be used for input and a text field, 'result’, that will be used for output as shown on line 27 and 31 in home.html. We set the default value of each to ‘0’ so that everything is equal to 0 when the page is loaded.
2. We then created a button with the id of “submitButton” as shown on line 40 of home.html.
| Line | home.html |
|---|---|
1 2 3 4 5 6 7 8 9 10 11 12 13 14 15 16 17 18 19 20 21 22 23 24 25 26 27 28 29 30 31 32 33 34 35 36 37 38 39 40 41 42 | <!-- File: home.html Author: National Instruments Project: Add Two With Submit Date: 01/15/2015 Description: This file is the HTML file that accompanies home.js. This file is analogous to the view element of a traditional Model, View, Controller application architecture. --> <!DOCTYPE html> <html> <!--Import javasript library--> <script src="https://ajax.googleapis.com/ajax/libs/jquery/2.1.3/jquery.min.js"></script> <!--Add index.js--> <script src="js/home.js"></script> <!--Add the label to the browser tab--> <head> <title>Add Two With Submit</title> </head> <!--the body tag is used to mark the content of the page.--> <body> <!--we're going to use a table to organize the elements on our page--> <table> <!--tr specifies a new row--> <tr> <td>First Number</td> <td><input type=text id='firstNumber' value='0'></td> </tr> <tr> <td>Second Number</td> <td><input type=text id='secondNumber' value='0'></td> </tr> <tr> <td>Result</td> <!--the currentValue id is used to display the current value of the data returned from our URL request--> <td><div id="result">0</div></td> </tr> </table> <button type=button id='submitButton'>Submit</button> </body> </html> |
3. We then attached the submit button to a JavaScript function called “update” that is run when the button is clicked as shown on line 15 in home.js.
| Line | home.js |
|---|---|
1 2 3 4 5 6 7 8 9 10 11 12 13 14 15 16 17 18 19 20 21 22 23 24 25 26 27 28 29 30 | /** File: home.js Author: National Instruments Project: Add Two With Submit Date: 01/15/2015 Description: This file is the JavaScript file that accompanies home.html. This file is analogous to the controller element of a traditional Model, View, Controller application architecture. */ //Disable async to allow for sequential behavior async: false; //Execute the following code once page is fully loaded $(document).ready(function() { $( "#submitButton" ).click(update); } ) //update gets the data from the URL function update() { URL = "http://127.0.0.1:8001/WebClient/AddTwo?first=" URL = URL + $('#firstNumber').val() + "&second=" + $('#secondNumber').val(); $.getJSON(URL, function(data) { //We use JQuery to update the text inside of //the field with id=result with the sum. $('#result').text(data.sum); } ); } |
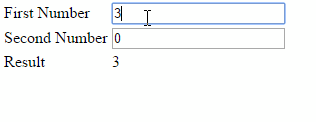
4. Now when the code is run in our web service and user clicks the submit button, it executes the update function which appends the query string to the URL that maps back to our AddTwo LabVIEW function (line 21 and 22). It then performs a "get" operation (line 23), and writes the result to the 'result' field in our html document (line 27). This results in the following behavior (click image to see movement):
| Add Two With Submit |
|---|
 |
Automatic Update - Polling
This accomplishes the goal of adding two numbers and displaying the result to the user, but what if we want the result to update without the user having to hit the submit button each time? There are several ways we can accomplish this, the first of which is polling. We will modify our existing code so that our application checks every half a second to see if new values are available and updates the result.
1. We begin by editing our html. Since we no longer wish for the user to have to hit submit, we no longer need a submit button. Delete line 40 from home.html so that the end of the document now looks like this:
| Line | home.html |
|---|---|
... 39 40 41 | ... </table> </body> </html> |
2. We will now modify our JavaScript file. We change our JavaScript code so that it calls update() every 500 milliseconds. To do this, we replace line 15 of home.js with a call to setInterval(). the $(document).ready() of home.js should now look like this:
| Line | home.js |
|---|---|
... 12 13 14 15 16 17 ... | ... //Execute the following code once page is fully loaded $(document).ready(function() { setInterval('update()', 500); } ) ... |
3. Now when the code is run in our web service the text input is read and the result is written every 500 milliseconds and the user is no longer required to hit submit to see the result. This results in the following behavior (click image to see movement):
| Add Two On Time Interval |
|---|
 |
This behavior is a definite improvement over the user having to click 'Submit' each time they want to update the value of 'result', but if our data is changing at a much slower rate than our update rate then we are reading from and writing to our LabVIEW Web Service and using system resources when there is no new data. To get around this, we will modify our code once more to update when one of the two text boxes has a new value.
Automatic Update - On Value Change Event
This situation between our JavaScript and HTML code is very similar to polling the front panel for value changes in LabVIEW. While it often allows a program to work, it negatively impacts the user experience and performance. The solution we will implement is similar to an Event Structure in LabVIEW, which allows us to respond to a specific value change.
1. From a user perspective our interface is identical to before, so no changes are necessary to home.html. We want to run 'update()' when the value of either text box changes, so we are going to use JQuery's 'on()' function to accomplish this. The function requires us to specify the event type and the function to run when that event occurs, so we alter the $(document).ready() of home.js to look like the following:
| Line | home.js |
|---|---|
... 12 13 14 15 16 17 18 ... | ... //Execute the following code once page is fully loaded $(document).ready(function() { $('#firstNumber').on('input', update); $('#secondNumber').on('input', update); } ) ... |
3. Now when the code is run in our web service the text input is read and the result is written every time a new value is typed in one of the two fields rather than every 500 milliseconds. This results in the following behavior (click image to see movement):
| Add Two On Change |
|---|
 |
4. While we now have the desired behavior, if our application were to grow more complex and require more inputs we would need to add a case for each new element. This approach is not scalable or maintainable, so let's leverage JQuery to change the way that we're accessing elements in home.html and run update whenever ANY specified control value changes. We first edit our two text boxes to be part of the class 'userInput' in home.html:
| Line | home.html |
|---|---|
... 24 25 26 27 28 29 30 31 32 33 ... | ... <!--tr specifies a new row--> <tr> <td>First Number</td> <td><input type=text class=userInput id='firstNumber' value='0'></td> </tr> <tr> <td>Second Number</td> <td><input type=text class=userInput id='secondNumber' value='0'></td> </tr> <tr> ... |
5. We then edit home.js to run 'update()' any time a member of the 'userInput' class changes value. We had been using " $('#id') " to look up individual controls, and we will similarly use " $('.class') " to look up all elements of a given class. Use this to modify home.js as shown below:
| Line | home.js |
|---|---|
... 12 13 14 15 16 17 ... | ... //Execute the following code once page is fully loaded $(document).ready(function() { $('.userInput').on('input', update); } ) ... |
Our code now behaves exactly as before, but now updates any time a control in the 'userInput' class changes value. This will make adding more controls in the future much easier.
________________________________________
Next Steps
Systems R&D Engineer - Aerospace, Defense, and Government
National Instruments
