Waterloo Labs - EyeMario Application Code
- Subscribe to RSS Feed
- Mark as New
- Mark as Read
- Bookmark
- Subscribe
- Printer Friendly Page
- Report to a Moderator
Products and Environment
This section reflects the products and operating system used to create the example.To download NI software, including the products shown below, visit ni.com/downloads.
- LabVIEW
Software
Code and Documents
Attachment
Description
Description-Separate-1Overview
This application was designed by the Waterloo Labs team to allow a user to play an original Nintendo System using only eye movements.
Description
Software
This code requires several pieces of software, listed below. If you do not have this software you can download a 30 day trial.
- LabVIEW 2010
- LabVIEW Real-Time 2010
- LabVIEW FPGA 2010
- NI-RIO 3.5.1
This code uses several new LabVIEW 2010 features, most notably Network Streams, which is critical to the application's opperation; therefore, it cannot be back converted for other users. (Sorry)
Hardware
Feel free to watch the embedded video. It includes a brief description of the hardware used in this project.
Note: This system require custom hardware, so you will not be able to run this application without a compatible singleboad RIO and custom daughter card.
Click Here to watch the original video on YouTube
Steps to Complete
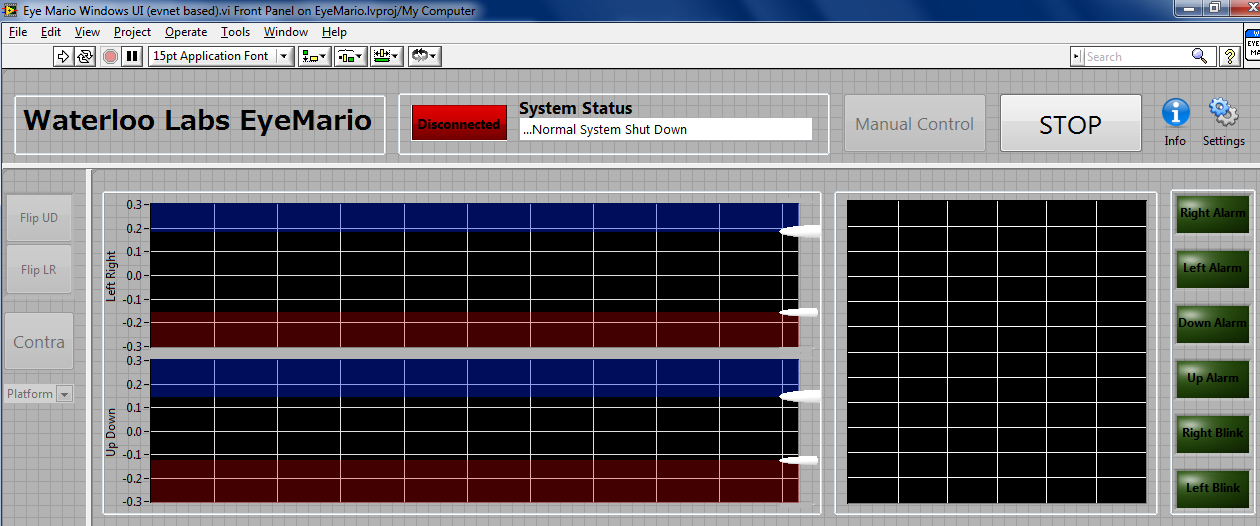
This is the Windows User interface, there are charts that show the Up/Down Data and Left/Right Data. the chart on the right shows the eyes movement over time. We also send the detected alarms from the Real Time system and display them on the LEDs on the far right.
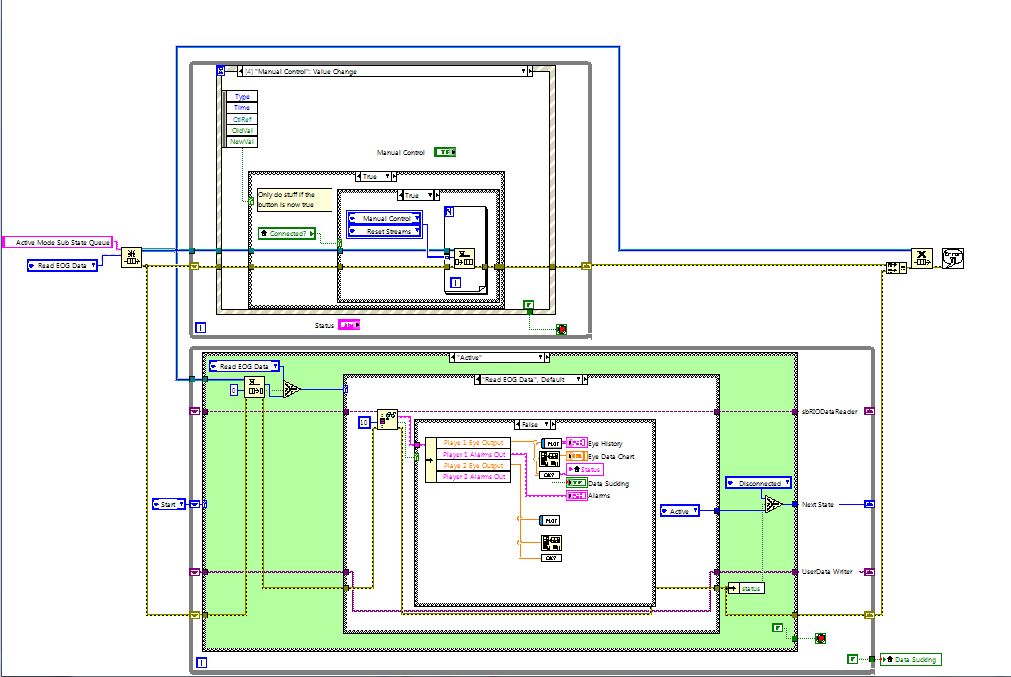
This is the Windows User Interface code. It uses an event based producer consumer architecture to maximize the update rate and handle all user interaction. The main function will be to connect to the real time host then display the eye data on the 3 charts. When the user wants to reset the limit sliders or take manual control they can push the various buttons and temporarily defer updates while it processes the event
This is the Real Time Front Panel. I made it blue to remind me that it is like a console app and should not be used for elaborate user interfaces. I originally prototyped the User interface in real time but ran into limitations as my data rate increased and I was trying to squeeze to much through the network. For the final application I used Network streams (new for LabVIEW 2010) to send the data to Windows and let my real time system do what it does best... crunch numbers.

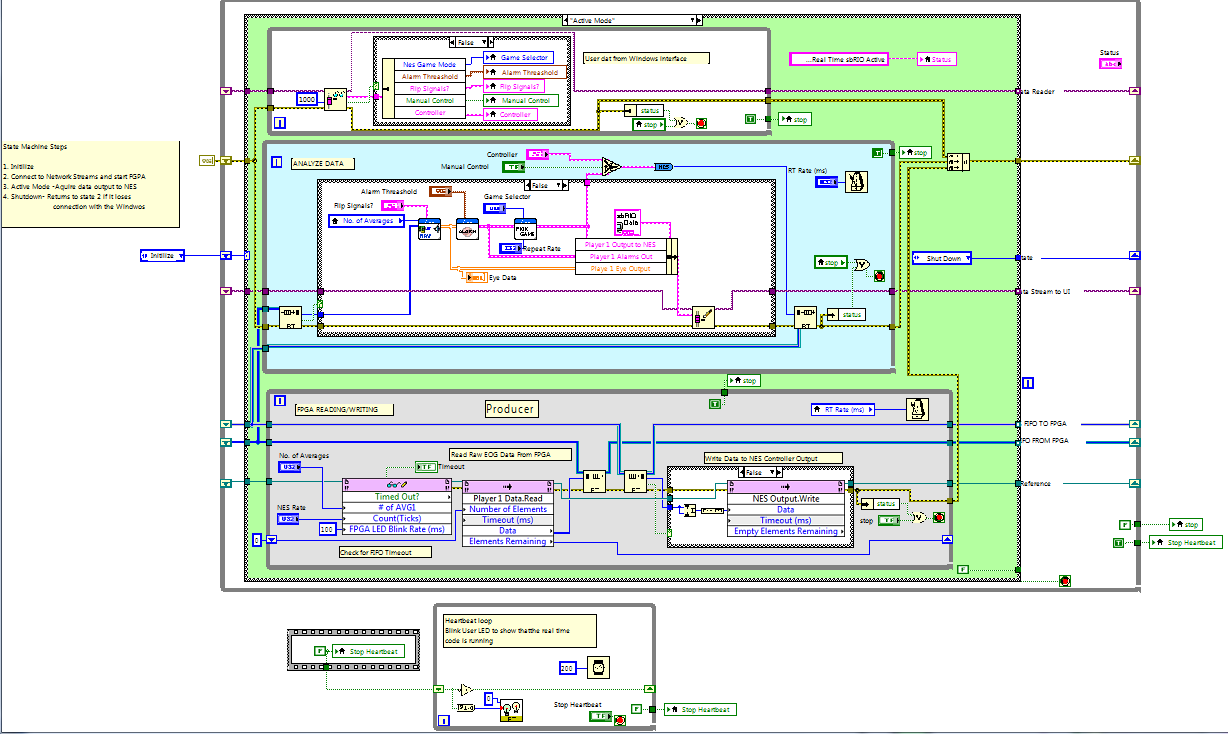
The Real-Time code reads the data from the FGPA, converts it from RAW data, analyzes for limits, converts that to NES output, then sends the NES control signals back to the FPGA. This code uses a LabVIEW state chart architecture so we can easily connect, go active and read data, then if we lose connection, shut down the FPGA and wait to reconnect to the Windows User Interface.
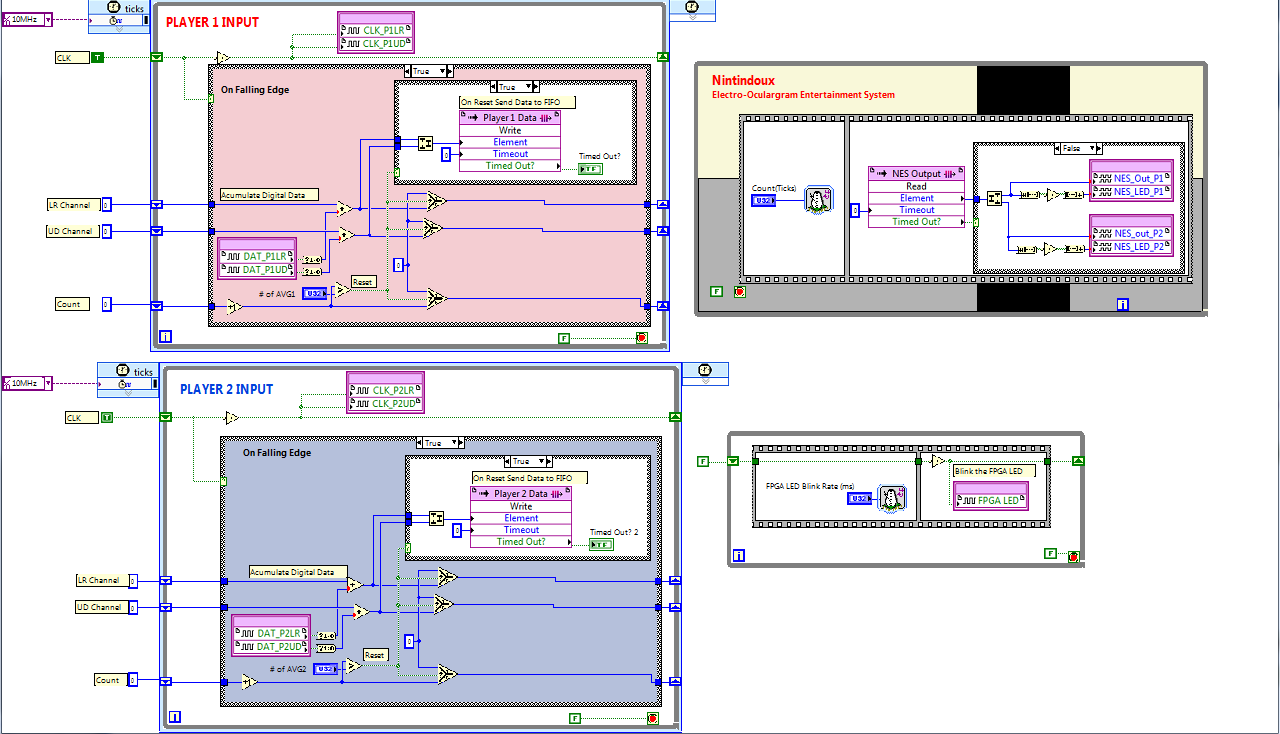
This is the LabVIEW FPGA code deployed to the FPGA on a sbRIO 9602. This code is implemented in the FPGA hardware and that allows it to run very fast. In this case run at 10MHz in two single cycle timed loops (SCTL). These loops both generate a clock and accumulate the digital signals from the ADI 7401 Delta Sigma A to D converter on each channel. Once a cycle is complete, determined by the #of AVG, we send the analog integer value to the RT system with a DMA FIFO. The loop in the top right take data from a FIFO and sends it out to the digital lines the go to the NES. The smallest loop blinks the FGPA LED at a specified rate. I used this in troubleshooting so I would always know when the FPGA is active.
Additional Notes
If anyone has ANY questions please post them in the comments, I will answer each questions and make sure the code is clear. While this is far from perfect, This code combines standard LabVIEW architectures in interesting ways to archive a dynamic and responsive systems across 3 separate computing systems, all just to play some NES, hands free.
**This document has been updated to meet the current required format for the NI Code Exchange. For more details visit this discussion thread**
Description-Separate-2Example code from the Example Code Exchange in the NI Community is licensed with the MIT license.
- Mark as Read
- Mark as New
- Bookmark
- Permalink
- Report to a Moderator
The link for "Network Streams" generates a "error 502".
- Mark as Read
- Mark as New
- Bookmark
- Permalink
- Report to a Moderator
This is an awesome job!!!
Admit it, you guys have fun and get payed for it - that's paradise! 
One suggestion: if you 'invert' the eyes movements (e.g., eyes down->move up/jump), the control will be exerted by tilting the head up/dwn/left/right, instead of the eyes. Because tilting the head while keeping the eyes on the subject will have the same effect of moving the eyes in the opposite direction, this type of control seems quite more intuitive and easier to train to me; furthermore, this way one can really keep the eyes always on Mario while tilting the head, as opposed to the current situation where one looses sight of ol' Mario - even if only for a split tenth-of-second - whenever an action is needed.
Actually, in the video it can be seen that the player keeps his head tilt left in order to watch the screen while having Mario run to the right (by looking to the right).
I sure would like to give it a try...
Enjoy!
- Mark as Read
- Mark as New
- Bookmark
- Permalink
- Report to a Moderator
This a spectacular piece of work.
Stemming from an apparently naïve and useless objective - play Super Mario hands free - this is a very powerful demonstration of the fact that we currently have the technology at our finger tips to do really amazing things, with perfectly reasonable costs.
It seems almost unbelievable.
This is truly doing more with less!!!
- Mark as Read
- Mark as New
- Bookmark
- Permalink
- Report to a Moderator
.
- Mark as Read
- Mark as New
- Bookmark
- Permalink
- Report to a Moderator
We actualy did use "head turn mode" for the left right movment. On the Windows User Interface front panel you will see a Flip LR and FLIP UD button, this would toggele between eye movements and the head turn mode. As you pointed out we just need to flip the signals, so that is exactly what we do. Allthough we only show Mario in the video we did try several different games, and found that some worked better with eye movements and others with head movements. Let me know if you have other quesions. And yes.... we had a lot of fun building this project.
Hunter
The Waterloo Labs Team
