- Document History
- Subscribe to RSS Feed
- Mark as New
- Mark as Read
- Bookmark
- Subscribe
- Printer Friendly Page
- Report to a Moderator
- Subscribe to RSS Feed
- Mark as New
- Mark as Read
- Bookmark
- Subscribe
- Printer Friendly Page
- Report to a Moderator
________________________________________
Overview
This tutorial will serve as an introduction to LabVIEW Web Services as well as using Web Services with HTML and JavaScript. While other tutorials will build from a starting point project, in this tutorial you will start from scratch and create the LabVIEW project, web method VI, and HTML and JavaScript files. We will be creating a web page to add two numbers together. The web page will use HTML and JavaScript to send data to LabVIEW. The data processing (adding the numbers) will be done within LabVIEW, and sent back to the web page where it will be displayed.

If you are new to Web Services, HTML, and JavaScript, I recommend first downloading the completed example at the end of this document and reading through this tutorial, then following the tutorial and creating the Web Service from a blank project.
________________________________________
Prerequisites
There are no prerequisites to this tutorial. If you are new to the web, you might want to check out the introduction on the Web Services Getting Started Series.
Software
LabVIEW 2013 or later
Notepad (Notepad++ recommended)
________________________________________
Procedure
Note: If a picture is not clear, you can click on it to view a larger version.
Setting up the Project
Before we even open LabVIEW, let's create a file hierarchy to organize the files we will be creating in this tutorial. In Windows Explorer, create a root directory for the project, such as "Add Two with Submit", and create empty new folders resembling the names below. When building a web page, we separate the files into public and private content. While in this tutorial, we will only be creating public content, it is a good practice to also have a place (Private Content folder) to house the files or code that will be running behind the scenes on our web page. In our public content folder, we also create a folder to keep all of our JavaScript files in.

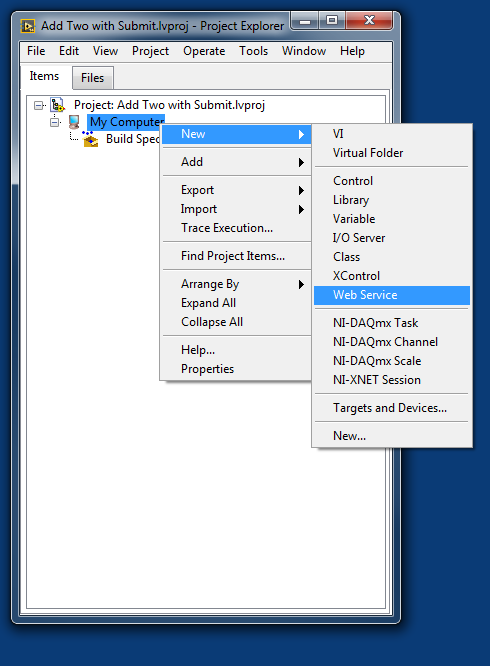
Now let’s open a blank project. In the project, create a new web service by right clicking on My Computer > New > Web Service. Give the web service a name such as "WebService". The name of the web service will be a part of the URL address of any web pages it hosts.
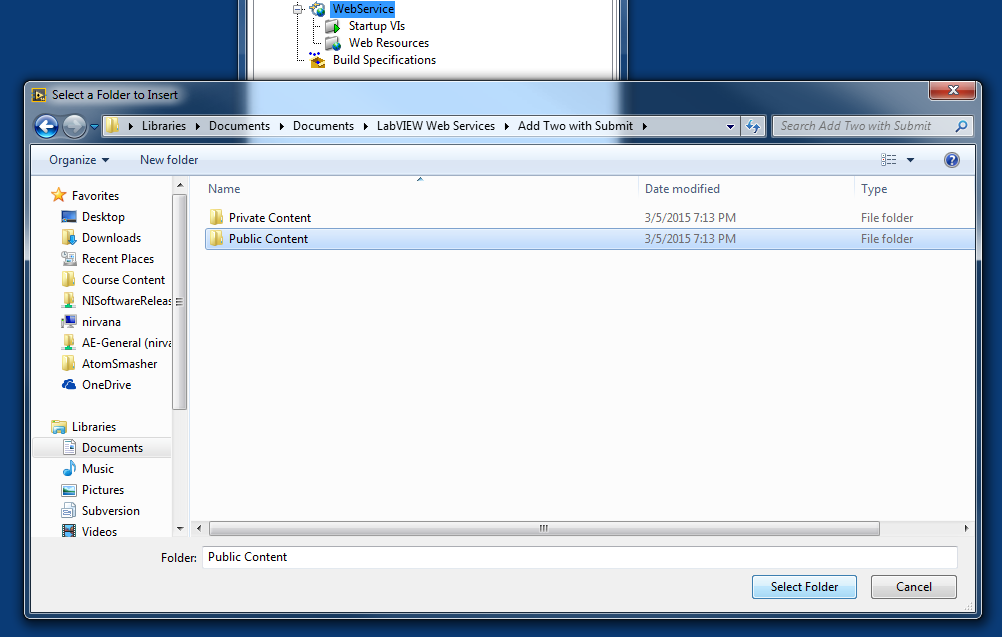
Add the public and private content folders to the project by right clicking on the web service and selecting Add Public/Private content folder. This will open a window where you will then navigate to the folder that we created earlier.
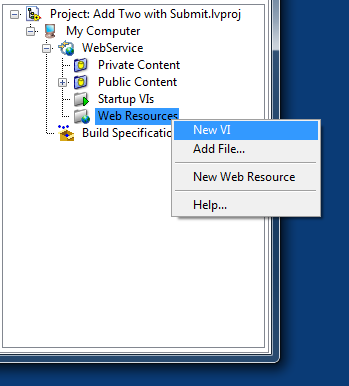
Create an HTTP Method VI by right clicking on the Web Resources folder and selecting New VI. This will create a VI that is designed to take web requests.
Save this VI as “addTwo.vi” and close it.
Now we will create the JavaScript and HTML files for the webpage. Open a text editor, and create a new text document. Leave it blank, and use “Save As...” to save the file. In the file dialogue, name the file “home.html” and select the file type as “All Files”.
This will save the file as an HTML file instead of a text file. Save the file in the Public Content folder we created earlier. Repeat this process to create a “home.js” file, saving it in our JavaScript folder.
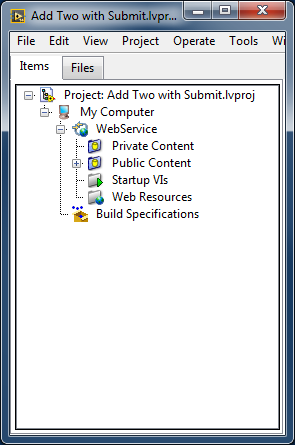
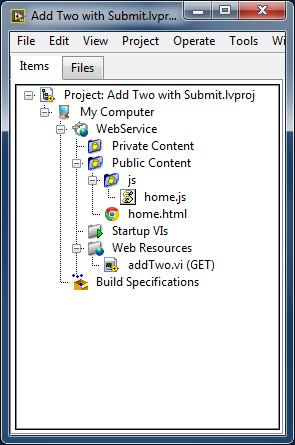
These files should be automatically added to your LabVIEW project. Your project should now look as shown below.
LabVIEW Code
We will now create the LabVIEW code for our web page. Open “addTwo.vi” and go to the block diagram.
The LabVIEW HTTP method VI will receive data from the webpage, perform data processing within LabVIEW, and then return the data. The format that we will send data to the webpage is in URL form data. This is what the URL will look like for sending two numbers.
![]()
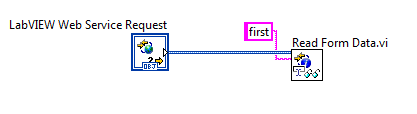
To read this data in LabVIEW we will use the Read Form Data function. This is found in the Connectivity > Web Services palette. Drop this function onto the block diagram and wire the Web Service Request control into the left side of the function. Next, create a constant for the key input of the function. The key is the name of the variable in the URL to read. Type in “first” to read the data from the “first” variable. Your block diagram should look like below.
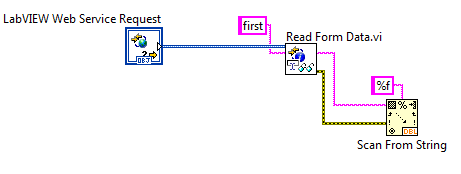
The data is read in as a string, so we will need to convert it into a numeric data type. Use the Scan from String function to scan and convert the string into a double as follows.
Now repeat the last two steps to read the “second” variable from the URL. Then add the two numbers together.

We will need to convert the result of our addition to a format that we can send back to the web page. For this example, we will be sending the data in JSON format.

a JSON object
JSON stands for JavaScript Object Notation. JSON is very similar to LabVIEW clusters. In a JSON object, each piece of data has a key. In a LabVIEW cluster, each element can have a name, so that you can use the unbundle/bundle by name functions to easily modify clusters. We will be using a function that converts LabVIEW clusters into JSON objects. The function will turn each cluster element’s name into a JSON key.
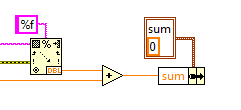
First let’s create the cluster with our named element. Drop a cluster constant onto the block diagram. Then drop a double numeric constant into the cluster. Right click on the double constant, and select Visible > Label. Edit the label to “sum.” This will name the element in the cluster. Now drop a Bundle by Name function and connect the cluster to the input. Wire the result of the addition into the sum. Your code should look like below.
Use the Flatten to JSON function to convert the cluster into a JSON object.

Now that we have converted the data to the correct format, we will send the data back to the web page. Before we send the data, we need to tell our web service what the format of data we are about to send. From the Web Services > Output palette, drop a Set HTTP Response MIME Type function. Connect the web service request into the function. Create a constant for the MIME type input. In the constant, manually type in “text/JSON.”

All that’s left to do is to send our data now. From the same Output palette, drop a Write Response function. Wire the web service request into the function. Finally, wire the output of our Flatten to JSON into the response string input. Your final code should look like this.

Save the VI. Our LabVIEW code is now completed, but there are still some configuration options that we need to change. By default LabVIEW uses the terminals of the HTTP Method VIs to send and receive data, but we are using a different method since we want to use the JSON format.
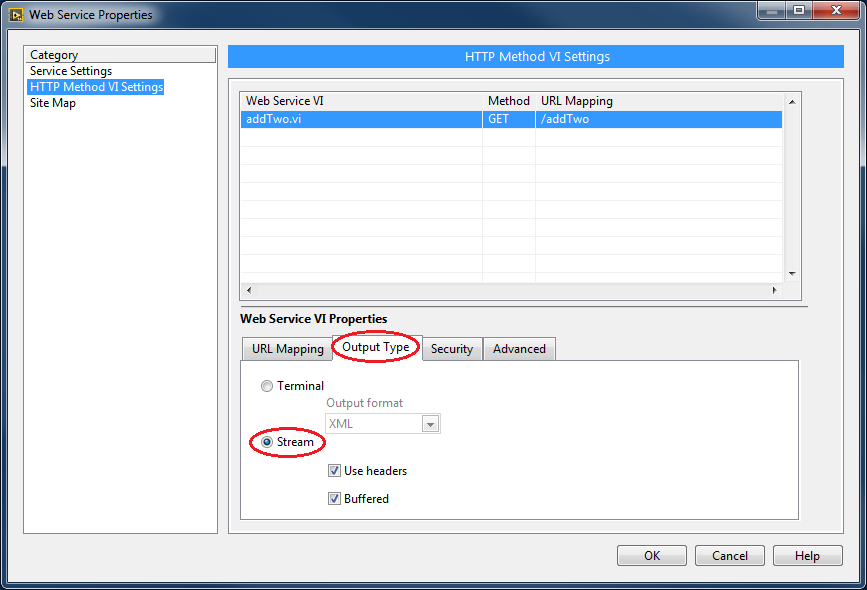
In your LabVIEW project, right click on your web service and select Properties. Go to the HTTP Method VI Settings tab on the left-hand side. You should now see the “addTwo.vi” in the table of web service VIs. Select it and go to the Output Type tab of the properties. Now select the Stream option. Click OK to save the settings.
This is all we will need to do on the LabVIEW side. Now, we will work on building the webpage in HTML.
HTML Code
The HTML code takes care of most of the visual aspects of a web page. It is similar to the front panel of a web page. We will be making some controls to enter numbers, and an indicator to display our results.
Open up the “home.html” file using your preferred text editor. We suggest using Notepad++ because it is simple and will color code the text for both HTML and JavaScript code.
Copy the following code into your HTML file and save the file.
| Line | home.html |
|---|---|
1 2 3 4 5 6 7 8 9 10 11 12 13 14 15 16 17 18 19 20 21 22 23 24 25 26 27 28 29 30 31 32 33 34 35 36 37 38 39 40 41 42 | <!-- File: home.html Author: Tanner Blair - National Instruments Project: Web Services Example 1 - Add Two With Submit Date: 01/15/2015 Description: This file is the HTML file that accompanies home.js. This file is analogous to the view element of a traditional Model, View, Controller application architecture. --> <!DOCTYPE html> <html> <!--Import javasript library--> <script src="https://ajax.googleapis.com/ajax/libs/jquery/2.1.3/jquery.min.js"></script> <!--Add index.js--> <script src="js/home.js"></script> <!--Add the label to the browser tab--> <head> <title>Add Two With Submit</title> </head> <!--the body tag is used to mark the content of the page.--> <body> <!--we're going to use a table to organize the elements on our page--> <table> <!--tr specifies a new row--> <tr> <td>First Number</td> <td><input type=text id='firstNumber' value='0'></td> </tr> <tr> <td>Second Number</td> <td><input type=text id='secondNumber' value='0'></td> </tr> <tr> <td>Result</td> <!--the currentValue id is used to display the current value of the data returned from our URL request--> <td><div id="result">0</div></td> </tr> </table> <button type=button id='submitButton'>Submit</button> </body> </html> |
Now for a quick overview of the code:
- Line 13: We will be using the AJAX library in our JavaScript code, so we will need to load the library here
- Line 15: This links the JavaScript code that we will write with our HTML web page.
- Line 23: A table is used to organize the elements of the web page
- Line 27: We create an input with the id=’firstNumber’. We will be able to access this input using the ID in our JavaScript code
- Line 31: We create a second input. It has id=’secondNumber’
- Line 37: We create an indicator to show the result. It has id=’result’
- Line 40: We create a submit button. It has id=’submitButton’
If you are interested in learning more about the HTML code used in this tutorial, the following resources are a good place to start.
w3schools Introduction to HTML
This completes our HTML code. We will now move onto the JavaScript Code
JavaScript Code
If the HTML code is the front panel of a web page, then the JavaScript is the block diagram. In this JavaScript code, we will handle the submit button press, get data from our HTML inputs, send the data to our LabVIEW VI, receive the result from LabVIEW, and then write the data to our HTML indicator.
Open up the “home.js” file using your preferred text editor. Again, we suggest using Notepad++.
Copy the following code into your JavaScript file and save the file.
| Line | home.js |
|---|---|
1 2 3 4 5 6 7 8 9 10 11 12 13 14 15 16 17 18 19 20 21 22 23 24 25 26 27 28 29 30 | /** File: addTwoWithSubmit.html Author: Tanner Blair - National Instruments Project: Web Services Example 1 - Add Two With Submit Date: 01/15/2015 Description: This file is the JavaScript file that accompanies addTwoWithSubmit.js. This file is analogous to the controller element of a traditional Model, View, Controller application architecture. */ //Disable async to allow for sequential behavior async: false; //Execute the following code once page is fully loaded $(document).ready(function() { $( "#submitButton" ).click(update); } ) //update gets the data from the URL function update() { URL = document.URL; URL = URL.replace("home.html", "") + "addTwo"; URL = URL + "?first=" + $('#firstNumber').val() + "&second=" + $('#secondNumber').val(); $.getJSON(URL, function(data) { //We use JQuery to update the text inside of the field with id=result with the sum. $('#result').text(data.sum); } ); } |
Now for a quick overview of the code:
- Line 15: This tells the code to run the update function when the button with id submitButton is clicked
- Line 19: This is the start of the update function.
- Line 21 & 22: This gets the URL of our web method VI
- Line 23: This reads the data from our HTML inputs firstNumber and secondNumber, and adds them into the URL as form data.
- Line 24: Now we use the URL to send the data to LabVIEW and receive a JSON response
- Line 27: When the JSON response is received, this code takes the JSON object and reads the data from the sum key. Then it writes that data into our result indicator.
If you are interested in learning more about the JavaScript code used in this tutorial, the following resources are a good place to start.
w3schools Introduction to JavaScript
That concludes the coding portion of this tutorial. Now let’s publish the web service and test it out!
Running the Example
Now that all our code is done, all that’s left to do is to run the web service.
In your LabVIEW Project, right click your web service and select Application Web Server > Publish.

A deployment window will pop up. This window will automatically close when the web service is published successfully.
We will need to get the URL of our web page. In the LabVIEW Project, right click on the file “home.html” and select Show Public URL.

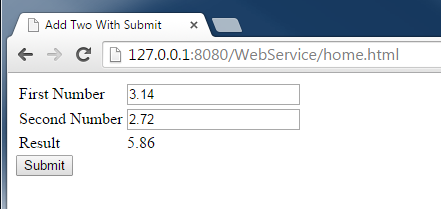
This will show address of our webpage. Copy this address and enter it into your web browser. You should now see your webpage! Type numbers into the inputs and click submit to see the result.
Now you have a working LabVIEW Web Service web page. Congratulations on making it through this tutorial!
One more thing: What if we want to view the web page on another device?
First make sure that your second device is connected to the same network as the computer running the web service. We will need to slightly change the URL of the webpage that we used earlier.
Notice that in the URL we copied into our browser before, it used the IP address 127.0.0.1
This is the IP address that represents the current device. This worked earlier since the web browser and the web service was running on the same machine. However, if you tried to use the same URL on another device, you would get an error, because the web service is running on a different machine that the web browser. We will need to change the IP address of the URL to the IP address of the computer the web service is running on.
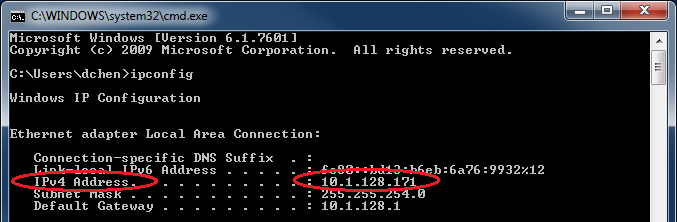
On the computer running the web service, open a command prompt window. Type ipconfig and press enter. Write down the IPv4 Address of the computer.
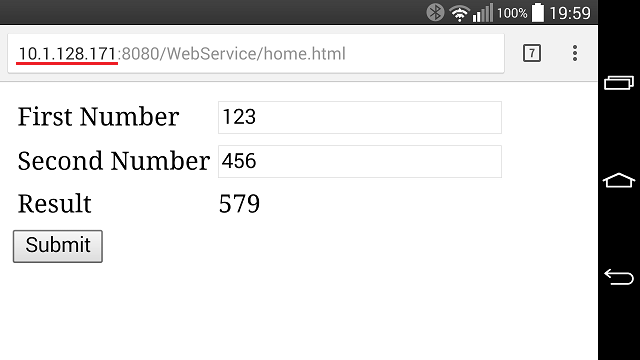
On your second device, type in the same IP address of the web page we used earlier, but replace 127.0.0.1 with the IP address that we wrote down. Now you have multiple devices connected to your LabVIEW Web Service web page!
________________________________________
Next Steps
Learn how to make the result auto update using JavaScript
Learn to publish an image of your application's front panel to the web
Applications Engineer
National Instruments
- Mark as Read
- Mark as New
- Bookmark
- Permalink
- Report to a Moderator
Hi Daniel,
I love this tutorial! I just went through it step by step, and I appreciate the way it builds the entire project from scratch. Good linking to other content too.
I just modified it a little bit to make it clear from the very beginning that we are building a tutorial from scratch (overview section). I also was a bit confused about the file directory bit, so I reworded that paragraph too.
Thanks again for creating this helpful tutorial.
Senior Product Manager, Software
National Instruments
- Mark as Read
- Mark as New
- Bookmark
- Permalink
- Report to a Moderator
Hi Daniel, Great tutorial for the labview users. I tried the example but i cant calculate them. can you guide me where i got missed. Thanking you, Regards, Krish
- Mark as Read
- Mark as New
- Bookmark
- Permalink
- Report to a Moderator
Hi Krish! Did you follow the tutorial or are you using the zip file example?
Try entering this url. You should get the result for 2+4. You may need to change the name of the WebService and addTwo if you named them differently (you would also need to change this in the JavaScript code):
127.0.0.1:8080/WebService/addTwo?first=2&second=4
Applications Engineer
National Instruments
- Mark as Read
- Mark as New
- Bookmark
- Permalink
- Report to a Moderator
Hi dnchen I followed the steps, But i didn't changed the web service name. Do i need to change the name? Regards, Krish.
- Mark as Read
- Mark as New
- Bookmark
- Permalink
- Report to a Moderator
Hi Krish,
If you download the zip file and try running the web service does it work? The URL just needs to match up with the name of the web service, method, and connector pane items.
Senior Product Manager, Software
National Instruments
- Mark as Read
- Mark as New
- Bookmark
- Permalink
- Report to a Moderator
Hi Joey, I followed the steps and created again i got it, Thanks For the help Regards, Krish.
- Mark as Read
- Mark as New
- Bookmark
- Permalink
- Report to a Moderator
This tutorial is absolutely brilliant. I want to emphasize how much I appreciate the tutorial's clarity and step by step procedure - I loved it! Thank you very much for this outstanding piece of work.
- Mark as Read
- Mark as New
- Bookmark
- Permalink
- Report to a Moderator
Quick question...whenever I add a notifier to my web service (let's say to recieve a randomly generated number which I would like to transfer back to my website), and I run a seperate VI from source code to feed the notifier, I can no longer see the number in my HTML website. It only works when I build an application and run the VI as an application that I can see the number on the website. Does anyone know why, or if I'm doing something wrong? If I diagram disable the notifier and just replace it with a constant, it starts working from source code
- Mark as Read
- Mark as New
- Bookmark
- Permalink
- Report to a Moderator
whoops, if we press Start it will run it debug mode.
- Mark as Read
- Mark as New
- Bookmark
- Permalink
- Report to a Moderator
Hi, it is a very nice and helpful tutorial. I have a few questions:
1. Can I access the web page from a device which isn't on the same network as the PC with the page is, if I have a public IP address on the PC where the page is located?
2. What should I do if I want to access a cRIO controller at this way? Where to place the web page? Just download it to the controller with the LabView code, or?
3. If I can do that, do I just need to set the public IP in the cRIO and connect it to the network?
4. Or, I need a server PC on which is placed the web page and the cRIO connected to this PC (via RS232)?
I would like to develop a system which is controlled by cRIO but users would access the system via web browsers. I have some experience with HTML/JavaScript and controllers but I am completely new with LabView and cRIO.
It can be done at that way with an Arduino microcontroller, I have made a few applications that way. In that case the page is on a MicroSd card and the Arduino has the public IP, so I was wondering could I do this with cRIO.
- Mark as Read
- Mark as New
- Bookmark
- Permalink
- Report to a Moderator
Brian,
Yes it's possible to access the page over the internet, though you may want to consider security before doing so. You would run the code on the cRIO, and the cRIO would host the webpage (no need for a PC). Here's another tutorial on deploying web services to a cRIO:
https://decibel.ni.com/content/docs/DOC-42821
Applications Engineer
National Instruments
- Mark as Read
- Mark as New
- Bookmark
- Permalink
- Report to a Moderator
Thank you for yuor help!
- Mark as Read
- Mark as New
- Bookmark
- Permalink
- Report to a Moderator
The links to the completed examples don't work anymore.
- Mark as Read
- Mark as New
- Bookmark
- Permalink
- Report to a Moderator
@Aaron_G The "completed example" link inside the tutorial is broken but the "Add Two with Submit.zip" link at the end of the post appears to work for me
Milan
- Mark as Read
- Mark as New
- Bookmark
- Permalink
- Report to a Moderator
This example is great. I'm able to get it running from my host computer and another computer on the network.
But I can't seem to get it to run on iOS. Does it work for anybody else in iOS? I've tried both Safari and Chrome on my iPhone and it is timing out.
- Mark as Read
- Mark as New
- Bookmark
- Permalink
- Report to a Moderator
Hi Daniel,
Thank you for this tutorial. I followed step by step and it did work. I will be on a project to write a js and LabView vi to communicate with a machine through webservice. As the machine can only be accessed with webservice. Hope I could finish it soon. Again, thanks for your work on teaching people how to do things like this project.
- Mark as Read
- Mark as New
- Bookmark
- Permalink
- Report to a Moderator
Great example.
Is it possible to open the page in the LabVIEW ActiveX WebBrowser?
I tried but I failed. The service is not responsive.


CLA, CTA, CPI
- Did someone devote their time to help solve your problem? Appreciate it and give kudos.
- Problem solved? Accept as a solution so that others can find it faster in the future.
- Contribute to the development of TestStand by voting on the TestStand Idea Exchange.
- Mark as Read
- Mark as New
- Bookmark
- Permalink
- Report to a Moderator
Would have been nice if you indicated in the prerequisites section that LabVIEW web services is Windows only.
