- Document History
- Subscribe to RSS Feed
- Mark as New
- Mark as Read
- Bookmark
- Subscribe
- Printer Friendly Page
- Report to a Moderator
- Subscribe to RSS Feed
- Mark as New
- Mark as Read
- Bookmark
- Subscribe
- Printer Friendly Page
- Report to a Moderator
Description:
AllDIO_FPGA_FromCustomPersonality.vi is an FPGA Personality that uses all DIO lines as strictly DIO. If you do not need PWM or SPI lines and you need more DIO lines, you can use this personality. A good starting point for creating a new FPGA personality is to modify the existing shipping personality.
Instructions on how to use Code:
NI FPGA Module installed:
The original FPGA personality was the myRIO-1900 Customized FPGA.vi which ships on the NI myRIO. If you have the LabVIEW FPGA Module, you can view the NI myRIO FPGA shipping personality as well as make customizations to this FPGA personality.
To access the myRIO-1900 Customized FPGA.vi:
1. Left click Create Project from the Getting Started Screen
2. Under Templates, left click on myRIO and select myRIO Custom FPGA Project
3. This project template shows the myRIO-1900 Customized FPGA.vi under the FPGA Target as seen in the picture below.
4. You can see the original DIO portion of code in the myRIO-1900 Customized FPGA.vi shipping personality below.
For AllDIO_FPGA_FromCustomPersonality.vi, modifications were made to myRIO-1900 Customized FPGA.vi.
Here we can see the modifications made to the DIO portion of the shipping personality to make it into the modified personality, AllDIO_FPGA_FromCustomPersonality.vi.
Note: To correct the broken wires in the AllDIO_FPGA_FromCustomPersonality.vi:
1. Open DIO 8-bit Bank.vi.
2. Right click on the DIO 7:0 Refnum control on the front panel.
3. Select Configure I/O type
4. Select the correct channel from the I/O items list (ConnectorA/DIO7:0).
5. Click the Replace All button between the I/O Item Type and I/O Name Control Type boxes
6. Click OK.
Repeat above steps for DIO 16-bit Bank.vi.
To download this code to the NI myRIO, you can use the attached pre-compiled bitfile (.lvbitx) . To do this, right click the FPGA Target, RIO Device Setup, and use the attached (.lvbitx). Then click Download Bitfile. You can also use the Open FPGA VI Reference from RT Main.vi to point to the attached AllDIO_FPGA_FromCustomPersonality bitfile.
If you make changes to the the AllDIO_FPGA_FromCustomPersonality.vi, you will need to compile the code again. Right click AllDIO_FPGA_FromCustomPersonality.vi, Create Build Specification. Then right click the Build Specification and choose Build. Choose Use the local compile server, if this is greyed out you need to install Compilation Tools for FPGA Devices other than Virtex-II from the DVD or go to ni.com/downloads and search for 'Xilinx Tools'. You will need Xilinx Tools 14.4 and higher for NI myRIO.
Once the code is compiled, you can download the bitfile created by the build specification using the RIO Device Setup or point to the bitfile from the Open FPGA VI Reference from the RT Main.vi. The bitfile will be located in the Destination directory which can be found in the Properties of the Build Specification.
Do not have NI FPGA Module installed:
If you do not have the LabVIEW FPGA Module, you can download the pre-compiled bitfile using the RIO Device Setup or point to the bitfile with the FPGA Interface palette from RT Main.vi. The RIO Device Setup tool and FPGA Interface palette are both installed with the LabVIEW 2013 for myRIO Module. The myRIO Module can be installed from the DVD or from ni.com/downloads and search for 'myRIO Module'.
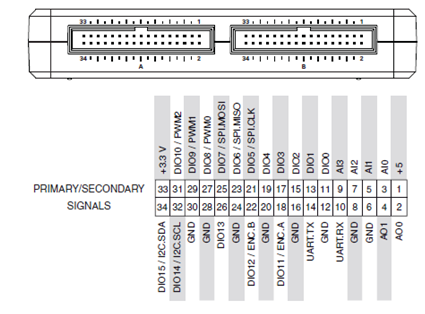
Modified Pin-out:
Connector A/DIO10:0 - Only DIO
Connector B/DIO10:0 - Only DIO
Connector C/DIO7:0 - remains unchanged
Product Marketing Manager for CompactRIO & TSN
Making the intangible, tangible
- Mark as Read
- Mark as New
- Bookmark
- Permalink
- Report to a Moderator
hello SunainaK
it's great work ! i have a myrio and i need to increase the DIO's number
but is it the DIO's number increases with this customization ?? i think that only delete PWM, SPI.....
thanks
