- Document History
- Subscribe to RSS Feed
- Mark as New
- Mark as Read
- Bookmark
- Subscribe
- Printer Friendly Page
- Report to a Moderator
- Subscribe to RSS Feed
- Mark as New
- Mark as Read
- Bookmark
- Subscribe
- Printer Friendly Page
- Report to a Moderator
Contact Information
University: Cardiff University
Team Members: Chris Corkill, Chris Powell, Marcus Yap, Stuart Sheath, Faizan Masood, Peter Jackson, David Iddles, Ismail Al-Jeffery Graduating year for all members: 2015
Project Supervisor: Steve Watts, Carlton Byrne , Alastair Clarke
Email Address: masoodf3@gmail.com
Project Information
Title: UAV Submarine
Description: The aim was to develop an existing submersible ROV for deployment within the Cardiff bay area. The ROV was required to collect soil samples from the sea floor and deploy microsensors to measure oxygen concentration and PH levels.
Products: Hardware
NI MyRIO-1900
Pololu High-Power Motor Controller 18v15
Edimax Wireless Router
Phidget Stepper Unipolar 4 Motor Controller
Electric Stepper Motor with leadscrew,
Hitec Servo HS7954 G2
Seabotix BTD150 thrusters
CMPS03 Magnetic Compass
Logitech USB webcam
Products: Software
NI Labview 2013
Labview for MyRIO module
Labview Real-time module
Labview Vision Acquisition module
The Challenge: The ROV is to be used by Cardiff University’s Earth and Ocean Sciences Department (EOSD) for exploration and data collection in Cardiff Bay. After discussions with the EOSD at the beginning of the 2014/15 academic year, the following ROV specifications were agreed upon:
- A manageable size and weight for the ROV
- A mission duration of 15-45 minutes
- A mission radius of 50-200 metres
- An operating depth of up to 20 metres and temperature 4-25 degrees Celsius
- Ability to acquire a sediment sample from the seabed.
- Ability to deploy a Unisense Microsensor into the seabed.
Based upon the specification outlined above, it was necessary for the ROV’s control system to provide the following functionality:
- Enable all ROV actions to be controlled wirelessly by the user from a PC.
- Facilitate the deployment of the micro-sensor mechanism.
- Facilitate the deployment of the sediment sampling mechanism.
- Enable the motion of the ROV to be controlled easily and intuitively.
- Real-time streaming of video from the ROV to the user PC.
- Ability to record video and capture photos.
- Sufficient battery capacity for a 45 minute mission duration.
- Enable the ROV power supply to be easily connected and disconnected.
- Enable the ROV power supply to be easily recharged.
The Solution: An extensive Labview program was written, along with necessary hardware modifications to tackle the aforementioned challenges faced during the development of the project. Each of these will be discussed in turn briefly:
1. An Edimax Wireless Router was used to facilitate wireless communication. An Ethernet cable 25 m in length connects the router to the USB-Ethernet adaptor connected to the myRIO. IP addresses and other settings were set to maximise connection speeds and stability as well as network security.
2. The micro-sensor deployment mechanism utilises a stepper motor and a Stepper Motor Controller is used to power the stepper motors whilst also acting as an interface between the stepper motor and the myRIO.
3. Two servo motors are used consecutively for the sediment sampling mechanism. This utlises the PWM ports on the myRIO and the I2C VI's within Labview. A state machine structure was utlitised where both servos simultaneously ran through a number of steps to collect a soil sample. Led's were used on the front panel of the Host VI to indicate when a sample was being collected as well as following the process. The LED states were transmitted from target to host by use of variables. The state machine structure and front panel indicators are shown below. The variables employed follow.

Target side VI block diagram (left) and host side front panel display (right)
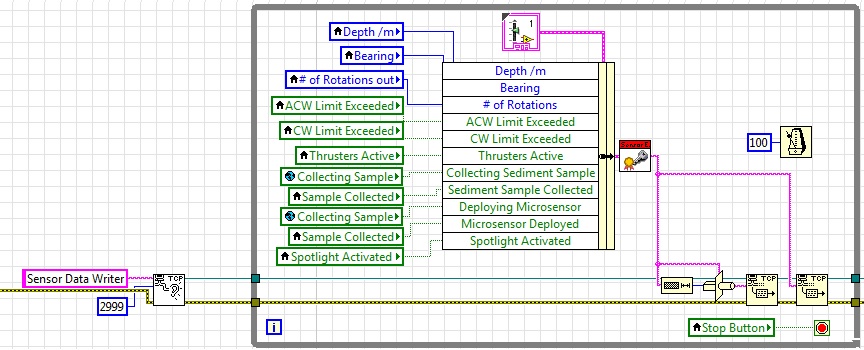
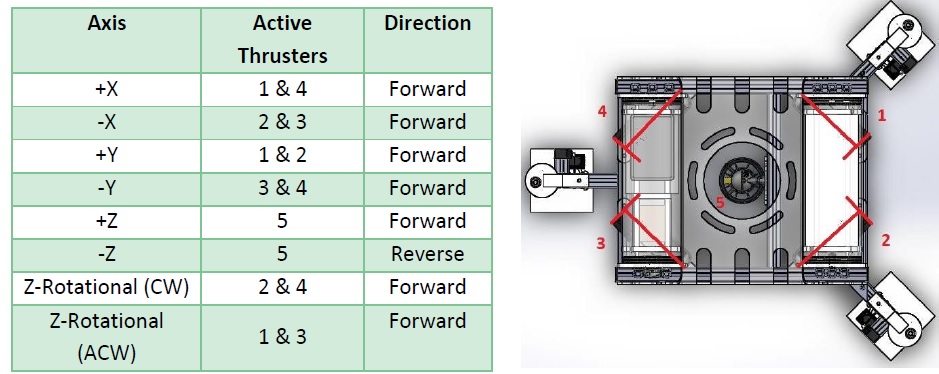
4. The control program allows the user to control the motion of the ROV in all three linear axis, as well as the z-rotational axis. Motion in each axis was achieved by activating specific combinations of thrusters. The code allowed control of the ROV using the keyboard or a joystick attached to the Host PC. A simple toggle allowed switching between the two input devices. String commands were generated for the keyboard/joystick inputs and used within loops to control various hardware on the ROV. Using string commands allowed maximising throughput for the TCP connections whilst minimising latency. On the target side, the specific combination of thrusters were activated within the appropriate loop. A simultaneous loop monitored rotation of the submarine in the XY plane by use of a compass.
The table below details which of the five thrusters need to be activated in order to achieve motion in each axis. Also, a snippet of the control code is attached.
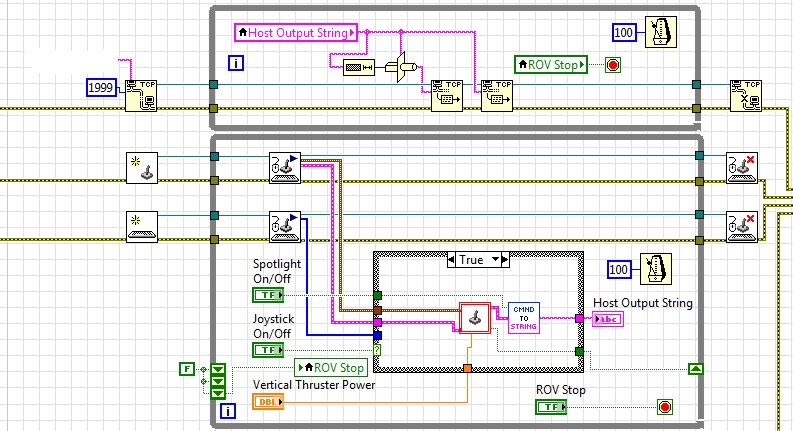
Host side VI
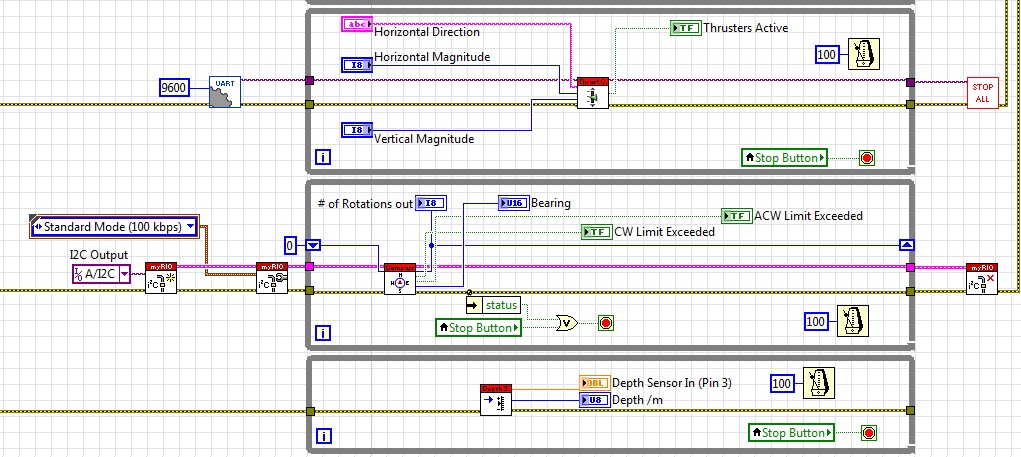
Target side VI
5/6. Functionality was added to send an image stream to the host. Using the vision acquisiton module for labview, the ability to record video and screenshots was added to the program. Code snippets to perform these functions are shown below. The media was saved to a "media" folder in the main program directory. Photos were saved as jpeg's and video as AVI using the codecs available within labview. An LED spotlight was added for greater visibility underwater and a simple front panel toggle allowed easily changing states. This was made possible by fabricating a transistor circuit to make the connection with the myRIO.
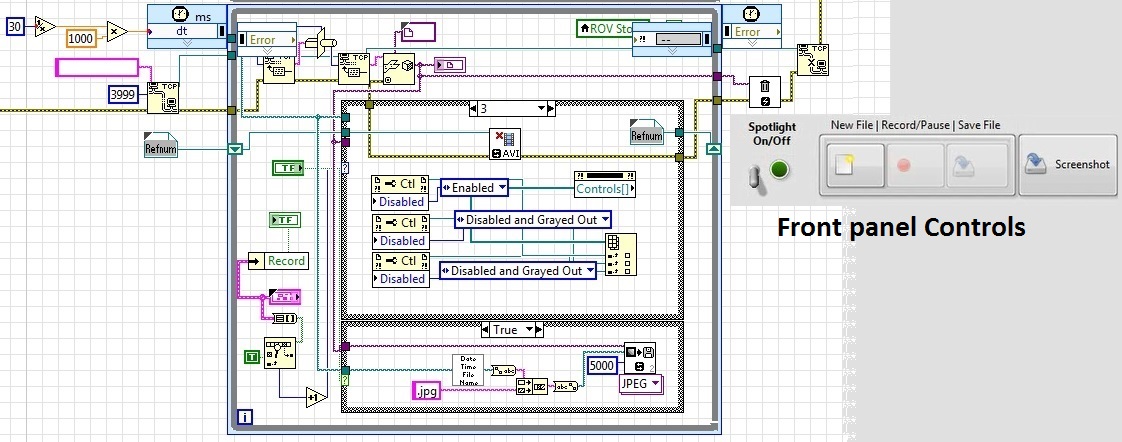
save images as jpegs or compile to produce video
8/9. Waterproof connectors were used to allow connecting of the myRIO to the battery from outside the watertight hulls. This significantly reduced setup required before a mission. Furthermore, a custom connector was fabricated that allowed charging the battery, inside the hull, from the outside. This meant that once assembled, the hull did not need disassembly unless the battery needed replacing or a hardware change was required.
Attach Poster
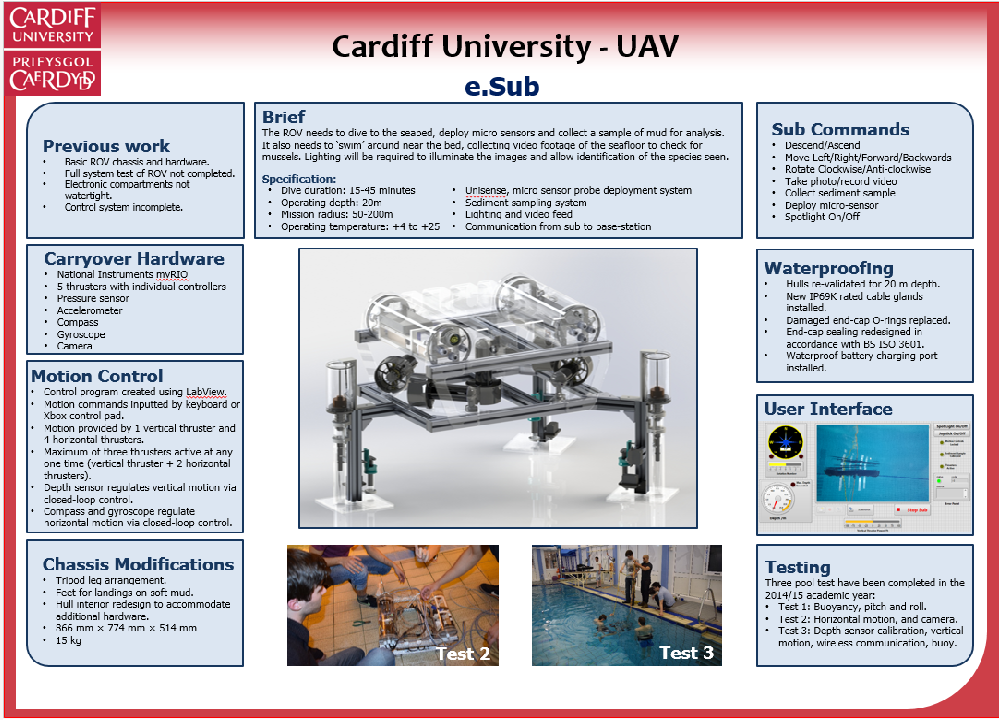
UAV Submarine Poster 1
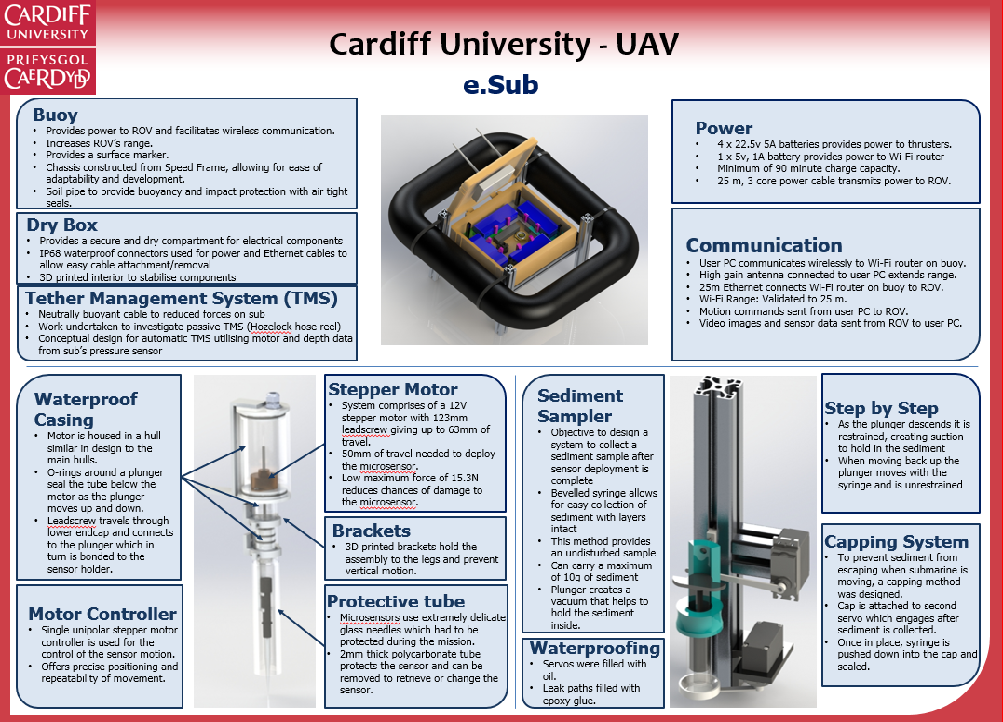
UAV Submarine Poster 2
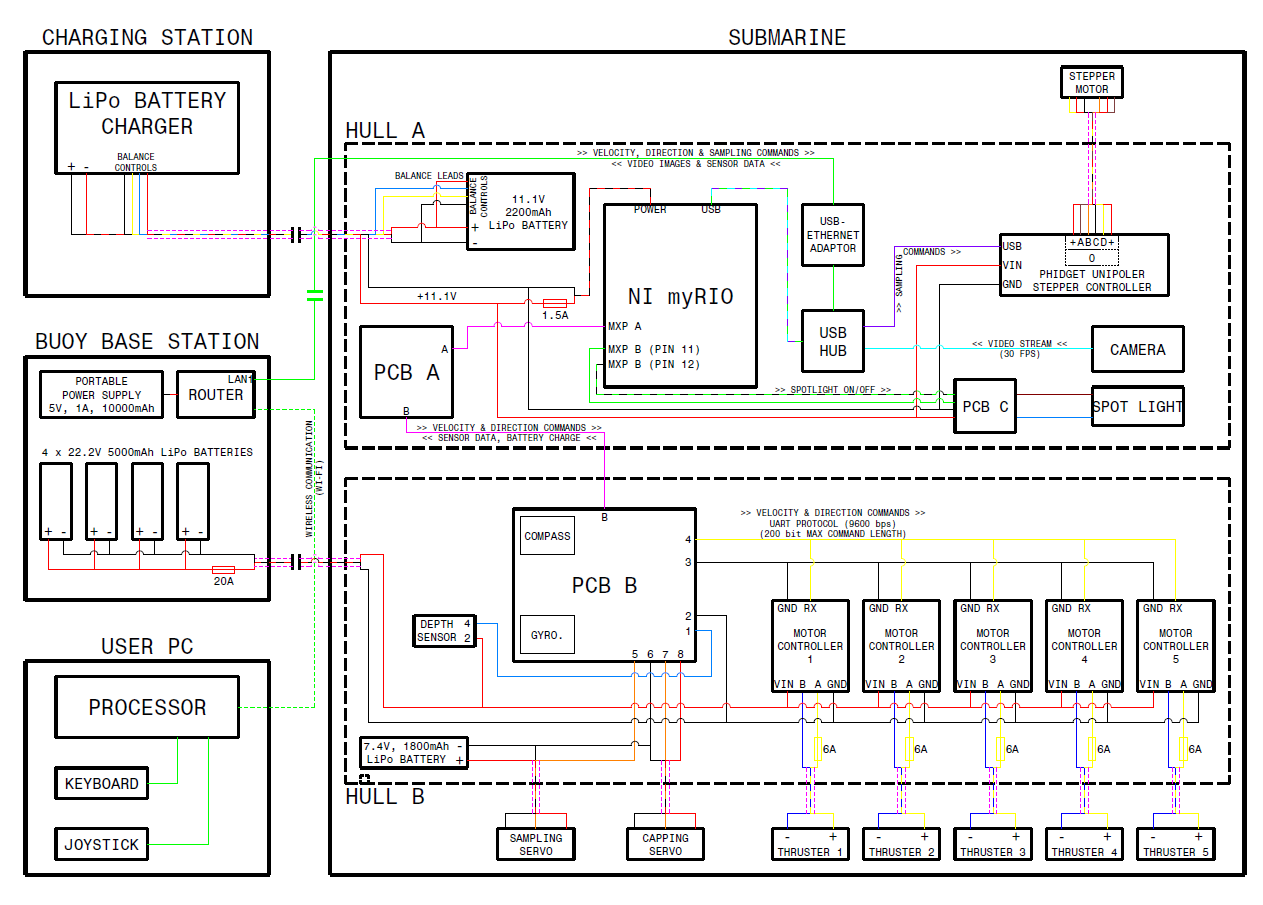
Submarine System Diagram
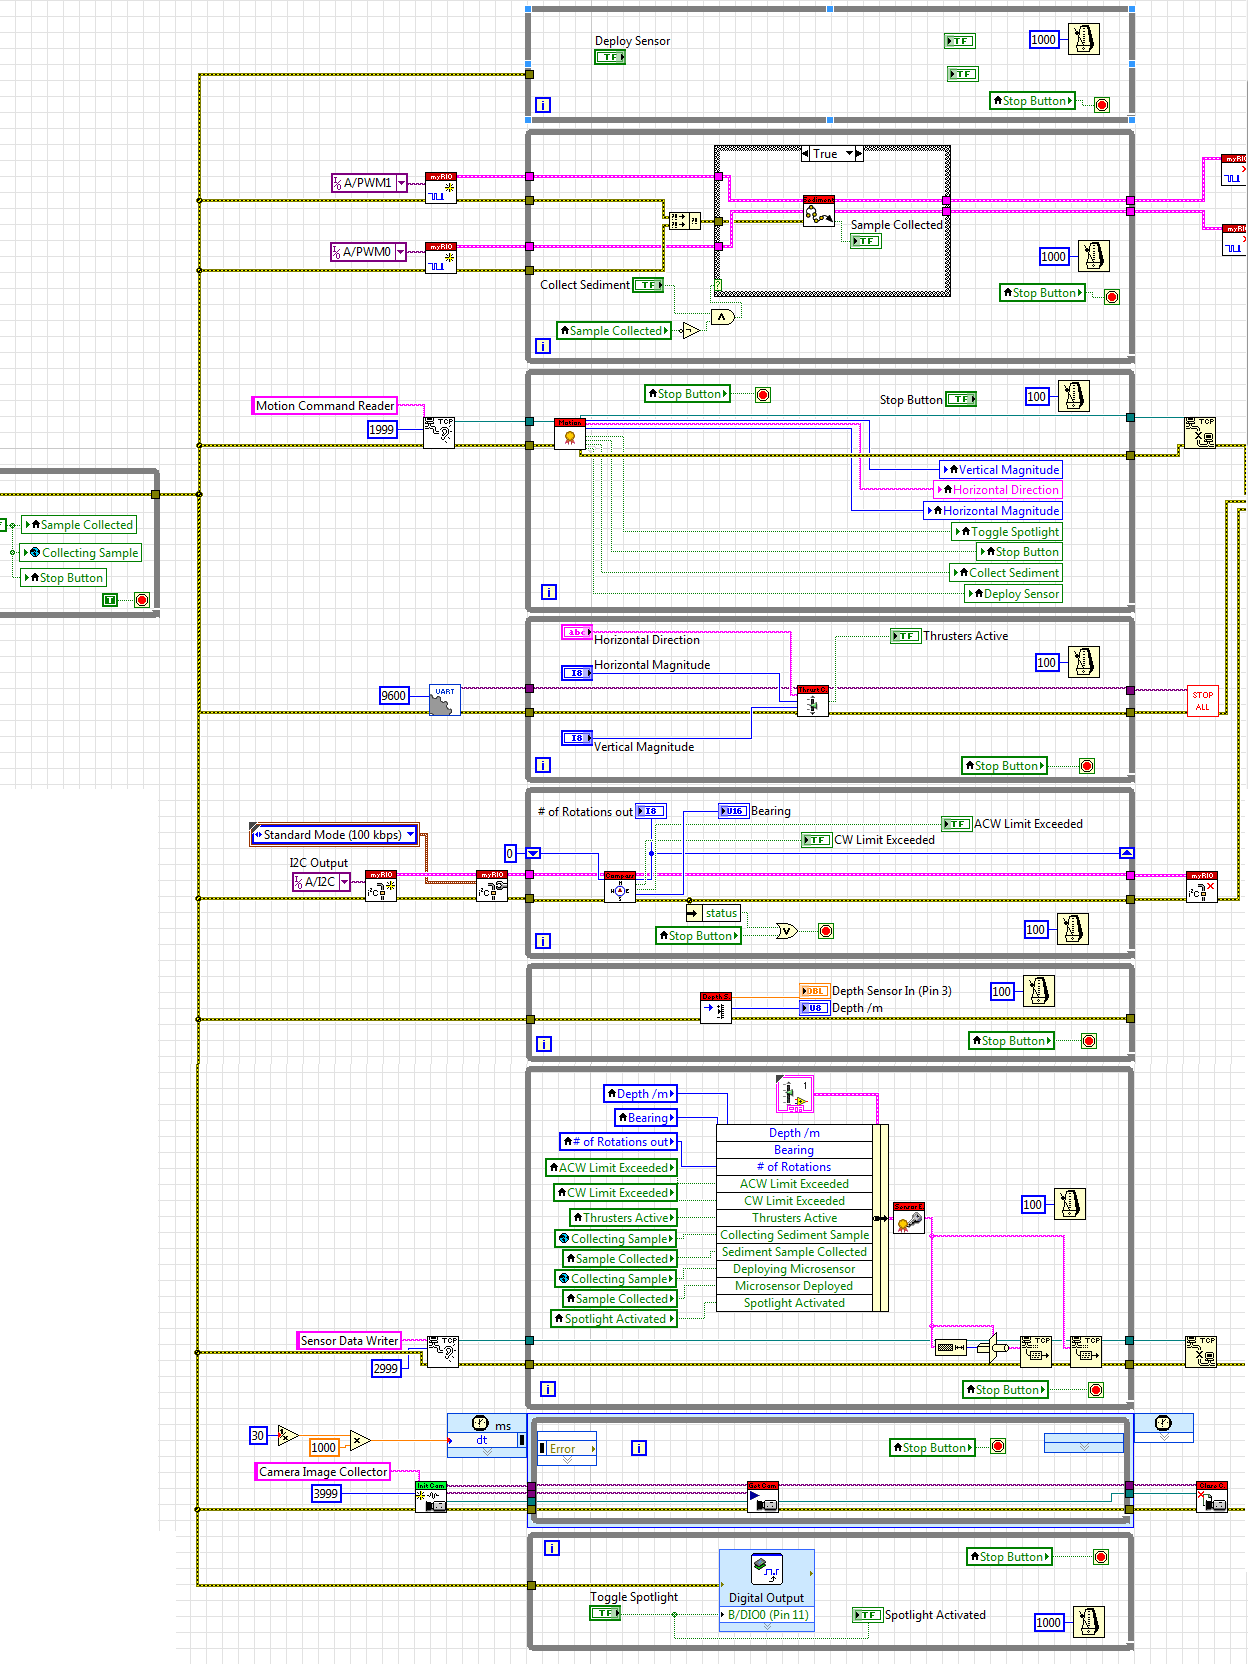
Block diagram for the main Target VI
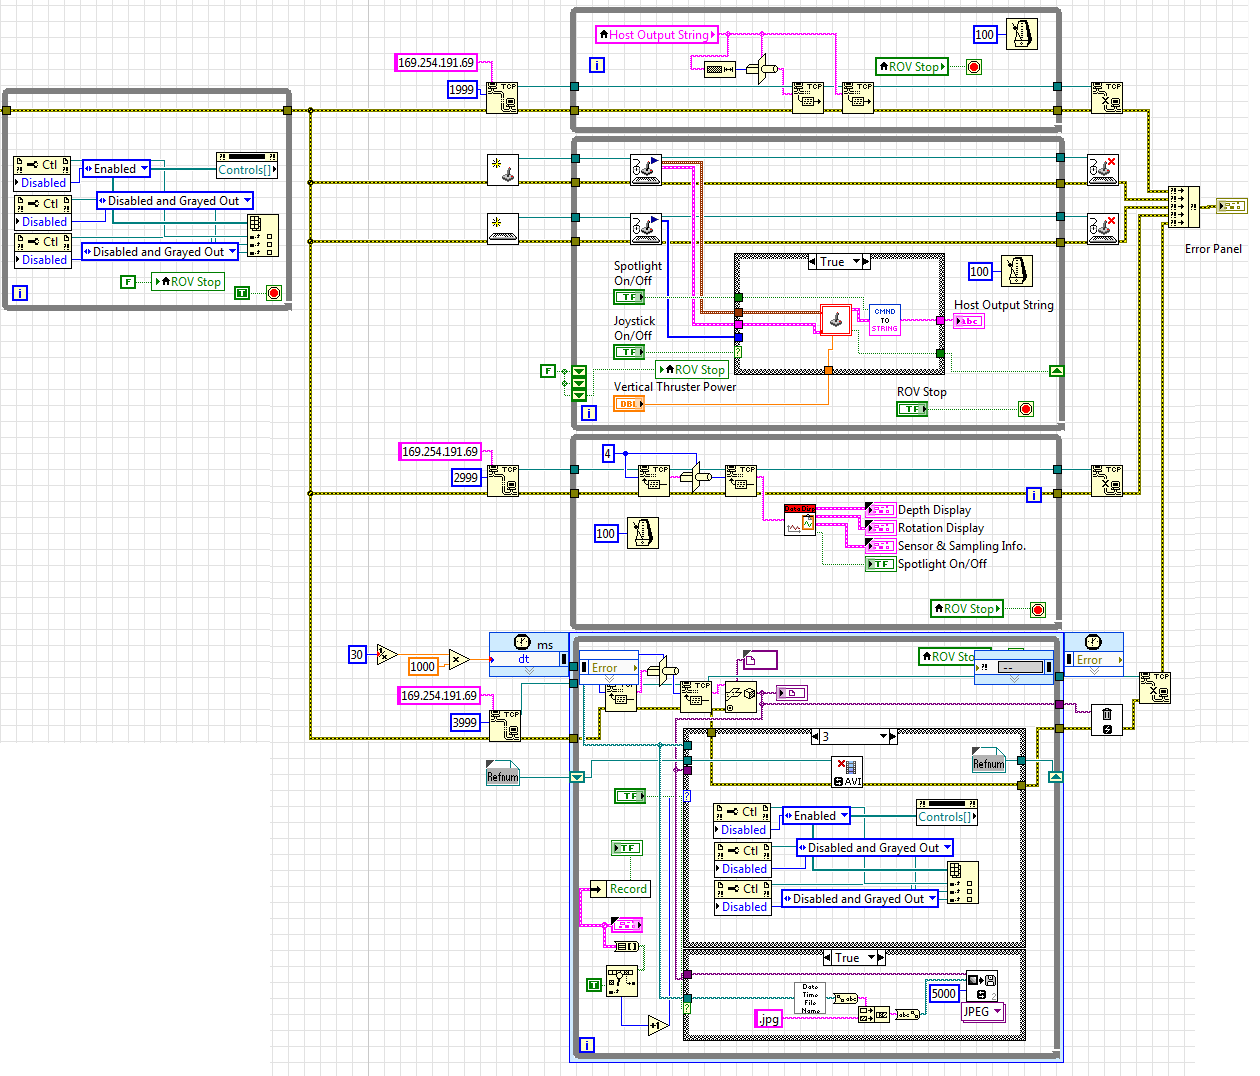
Block diagram for the main Host VI
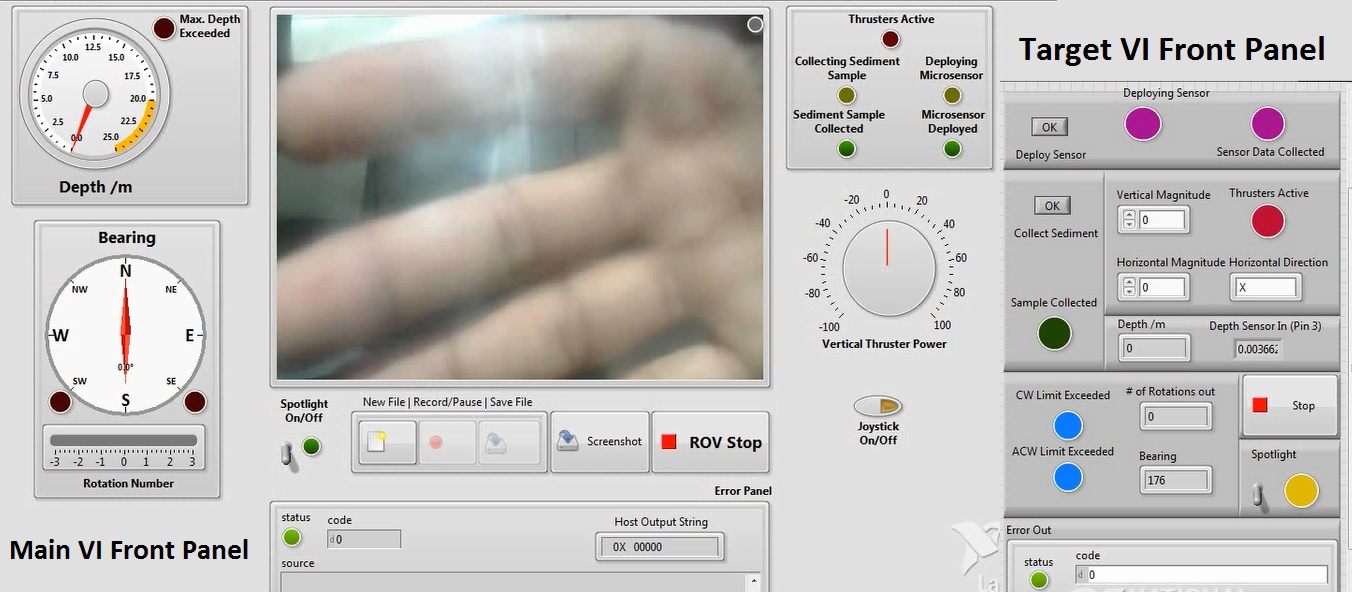
Combined Front Panel for Host plus Target VI's
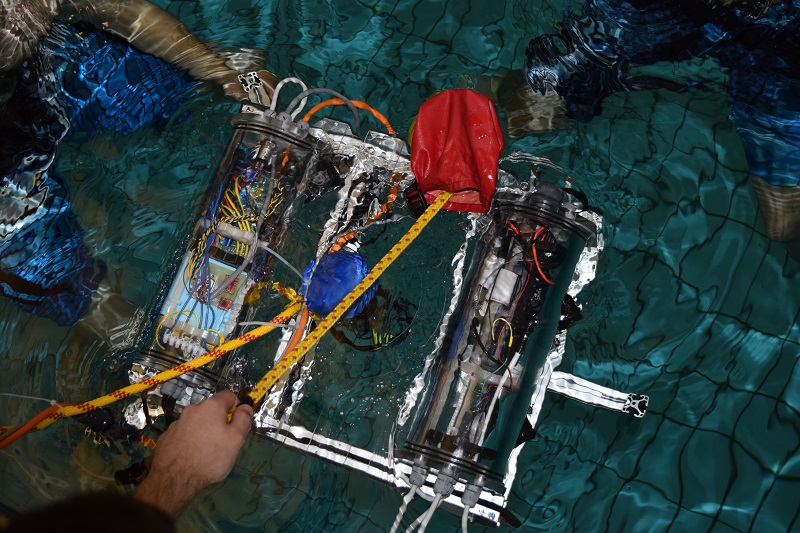
Final test for the submarine
Nominate Your Professor
I would like to nominate Steve Watts, who is the Deputy Head for the Electrical & Electronic department at Cardiff School of Engineering. To facilitate the use of Labview within this project and similar ones, Steve arranged for students to undergo 4 weeks training and achieve CLAD certification. Steve realised that Labview is a useful tool for engineering students and is working hard for Labview to form part of the curriculum for 3rd Year students. This is so that students have a good working knowledge of Labview before proceeding to their 4th Year or starting a graduate position. I think this a great first step in integrating Labview skills with instrumentation work within universities and I believe Steve's effort in this regard, should be recognised.
- Mark as Read
- Mark as New
- Bookmark
- Permalink
- Report to a Moderator
waiting for final control program
- Mark as Read
- Mark as New
- Bookmark
- Permalink
- Report to a Moderator
Great work, congratulations!
Mikrobi (Zbigniew St. Sobków)____________________________________________________________
"You can lead a horse to water, but if you can get him to float on his back you've got something."
- Mark as Read
- Mark as New
- Bookmark
- Permalink
- Report to a Moderator
Good job.
- Mark as Read
- Mark as New
- Bookmark
- Permalink
- Report to a Moderator
Hey Welly94,
You can't connect the myrio to a router via usb. You use a usb ethernet connector with the myrio and then use an ethernet wire between the connector and the router. At this point you can also connect to computer directly. You have to set up the router to forward the connection though.
Kind regards,
Faizan Masood
https://uk.linkedin.com/in/masoodf
