- Subscribe to RSS Feed
- Mark Topic as New
- Mark Topic as Read
- Float this Topic for Current User
- Bookmark
- Subscribe
- Mute
- Printer Friendly Page
How to apply bilateral filter over a 2d matrix image
Solved!01-19-2021 05:06 AM
- Mark as New
- Bookmark
- Subscribe
- Mute
- Subscribe to RSS Feed
- Permalink
- Report to a Moderator
I have got ans(just image) for this bilateral filter but confused with Call Library Function Node
How to attempt a bilateral filter over a 2d Matrix image
Solved! Go to Solution.
01-19-2021 10:18 AM
- Mark as New
- Bookmark
- Subscribe
- Mute
- Subscribe to RSS Feed
- Permalink
- Report to a Moderator
I want to apply bilateral filter to this image
I have code for matlab how to convert it in labview
Img=360x360
patchVar = std2(img)^2;
DoS = 2*patchVar;
J = imbilatfilt(I,DoS);
imshow(J)
01-19-2021 12:19 PM
- Mark as New
- Bookmark
- Subscribe
- Mute
- Subscribe to RSS Feed
- Permalink
- Report to a Moderator
01-19-2021 03:57 PM
- Mark as New
- Bookmark
- Subscribe
- Mute
- Subscribe to RSS Feed
- Permalink
- Report to a Moderator
I have a python code also for this without any builtin function
But unable to convert this for Labview
import numpy as np
import cv2
import sys
import math


def distance(x, y, i, j):
    return np.sqrt((x-i)**2 + (y-j)**2)


def gaussian(x, sigma):
    return (1.0 / (2 * math.pi * (sigma ** 2))) * math.exp(- (x ** 2) / (2 * sigma ** 2))


def apply_bilateral_filter(source, filtered_image, x, y, diameter, sigma_i, sigma_s):
    hl = diameter/2
    i_filtered = 0
    Wp = 0
    i = 0
    while i < diameter:
        j = 0
        while j < diameter:
            neighbour_x = x - (hl - i)
            neighbour_y = y - (hl - j)
            if neighbour_x >= len(source):
                neighbour_x -= len(source)
            if neighbour_y >= len(source[0]):
                neighbour_y -= len(source[0])
            gi = gaussian(source[neighbour_x][neighbour_y] - source[x][y], sigma_i)
            gs = gaussian(distance(neighbour_x, neighbour_y, x, y), sigma_s)
            w = gi * gs
            i_filtered += source[neighbour_x][neighbour_y] * w
            Wp += w
            j += 1
        i += 1
    i_filtered = i_filtered / Wp
    filtered_image[x][y] = int(round(i_filtered))


def bilateral_filter_own(source, filter_diameter, sigma_i, sigma_s):
    filtered_image = np.zeros(source.shape)

    i = 0
    while i < len(source):
        j = 0
        while j < len(source[0]):
            apply_bilateral_filter(source, filtered_image, i, j, filter_diameter, sigma_i, sigma_s)
            j += 1
        i += 1
    return filtered_image


if __name__ == "__main__":
    src=cv2.imread(str(sys.argv[1]), 0)
    filtered_image_own = bilateral_filter_own(src, 5, 12.0, 16.0)
    cv2.imwrite("filtered_image_own.png", filtered_image_own)
- Tags:
- ossibl
01-22-2021 02:28 AM - edited 01-22-2021 02:35 AM
- Mark as New
- Bookmark
- Subscribe
- Mute
- Subscribe to RSS Feed
- Permalink
- Report to a Moderator
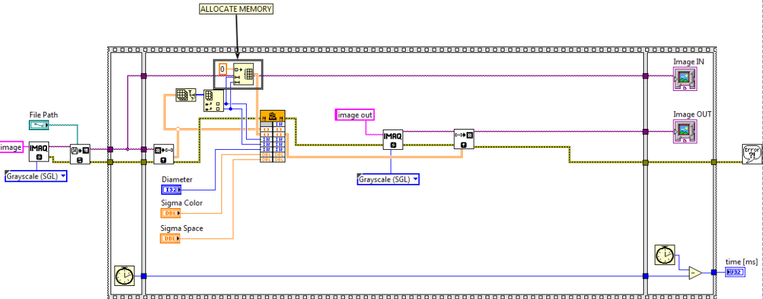
finally solved this
Thank you @Raven, @GerdW, and all community members
many times I was unclear with my posts coz I was breaking parts of this in a simpler form, I failed in some attempts to explain clearly, after learning from various other docs and with community help! Successfully got this!
Thank You!
will improve me! 😇
01-22-2021 02:44 AM
- Mark as New
- Bookmark
- Subscribe
- Mute
- Subscribe to RSS Feed
- Permalink
- Report to a Moderator
Hi gpt,
@gptshubham595 wrote:
finally solved this
Successfully got this!
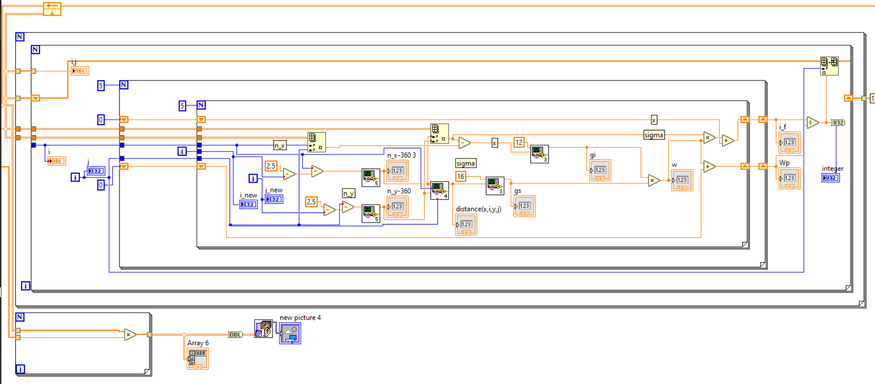
Well, are you sure you need those two innermost loops?
Why are there so many coercion dots, especially on your own subVIs?
Still need to cleanup the block diagram! (Like the hidden wire from outermost loop "i" terminal to tunnel of next loop…)
Use better labels for controls/indicators. Using "integer" for an U32 indicator seems senseless…
01-22-2021 01:50 PM
- Mark as New
- Bookmark
- Subscribe
- Mute
- Subscribe to RSS Feed
- Permalink
- Report to a Moderator
There are a total of 4 loops in python so yes
I am using double+int so I think it is showing red coercion dots
Sure, will try to clean up and make it look better in term of displaying some hidden wires
For labels it was a test for some reason so text not mattered much as of now renamed it btw!
Thank You!
01-23-2021 04:00 AM
- Mark as New
- Bookmark
- Subscribe
- Mute
- Subscribe to RSS Feed
- Permalink
- Report to a Moderator
02-03-2021 01:25 PM - edited 02-03-2021 01:27 PM
- Mark as New
- Bookmark
- Subscribe
- Mute
- Subscribe to RSS Feed
- Permalink
- Report to a Moderator
...
02-04-2021 03:21 PM
- Mark as New
- Bookmark
- Subscribe
- Mute
- Subscribe to RSS Feed
- Permalink
- Report to a Moderator
Hey Rahul you can use this directly to do this using above python code and python integration toolbox via Enthought


