From 04:00 PM CDT – 08:00 PM CDT (09:00 PM UTC – 01:00 AM UTC) Tuesday, April 16, ni.com will undergo system upgrades that may result in temporary service interruption.
We appreciate your patience as we improve our online experience.
From 04:00 PM CDT – 08:00 PM CDT (09:00 PM UTC – 01:00 AM UTC) Tuesday, April 16, ni.com will undergo system upgrades that may result in temporary service interruption.
We appreciate your patience as we improve our online experience.
myMadFX: Internet-Enabled Guitar Effects Pedal
The Internet of Things just got Funky!
Led Zeppelin, Aerosmith, AC/DC. What do all of these guys have in common? They have completely awesome guitar effects pedals! I wanted to find a way to integrate my three passions:
With this in mind, my goal was to use NI myRIO to create a wireless, infinitely-customizable, web-connected guitar effects pedal – complete with pre-programmed, popular effects such as distortion, tremolo, and delay. However, I also wanted to keep the device open, to enable users to quickly program their own, unique sounds using LabVIEW.
The myRIO embedded controller is small enough that it can fit neatly into the back pocket of a lead-guitarist’s (ripped) jeans. And, because the myRIO integrates its own WiFi channel, the guitar-effects can be conveniently controlled by a web-browser on any smart phone, tablet or laptop. This wireless interface means that the guitar-effects could be controlled by a sound-engineer in a mixing-desk at the back of a gig. Heck… the sound could even be controlled by a fan in the mosh-pit!
About the Developer.
My name is Hashim Shamsi, and I am an Electronic Engineering student at the University of Surrey. As part of my third year, I was given the option of pursuing an industrial placement. This project was part of my work undertaken as an Applications Engineering Intern at National Instruments.
Video Demonstration.
In this video, you can see the distortion effect in action. The combination of the real-time processor and the high-throughput FPGA in the myRIO allows me to process the guitar signal as it’s played, creating a truly accurate, low-latency distortion pedal.
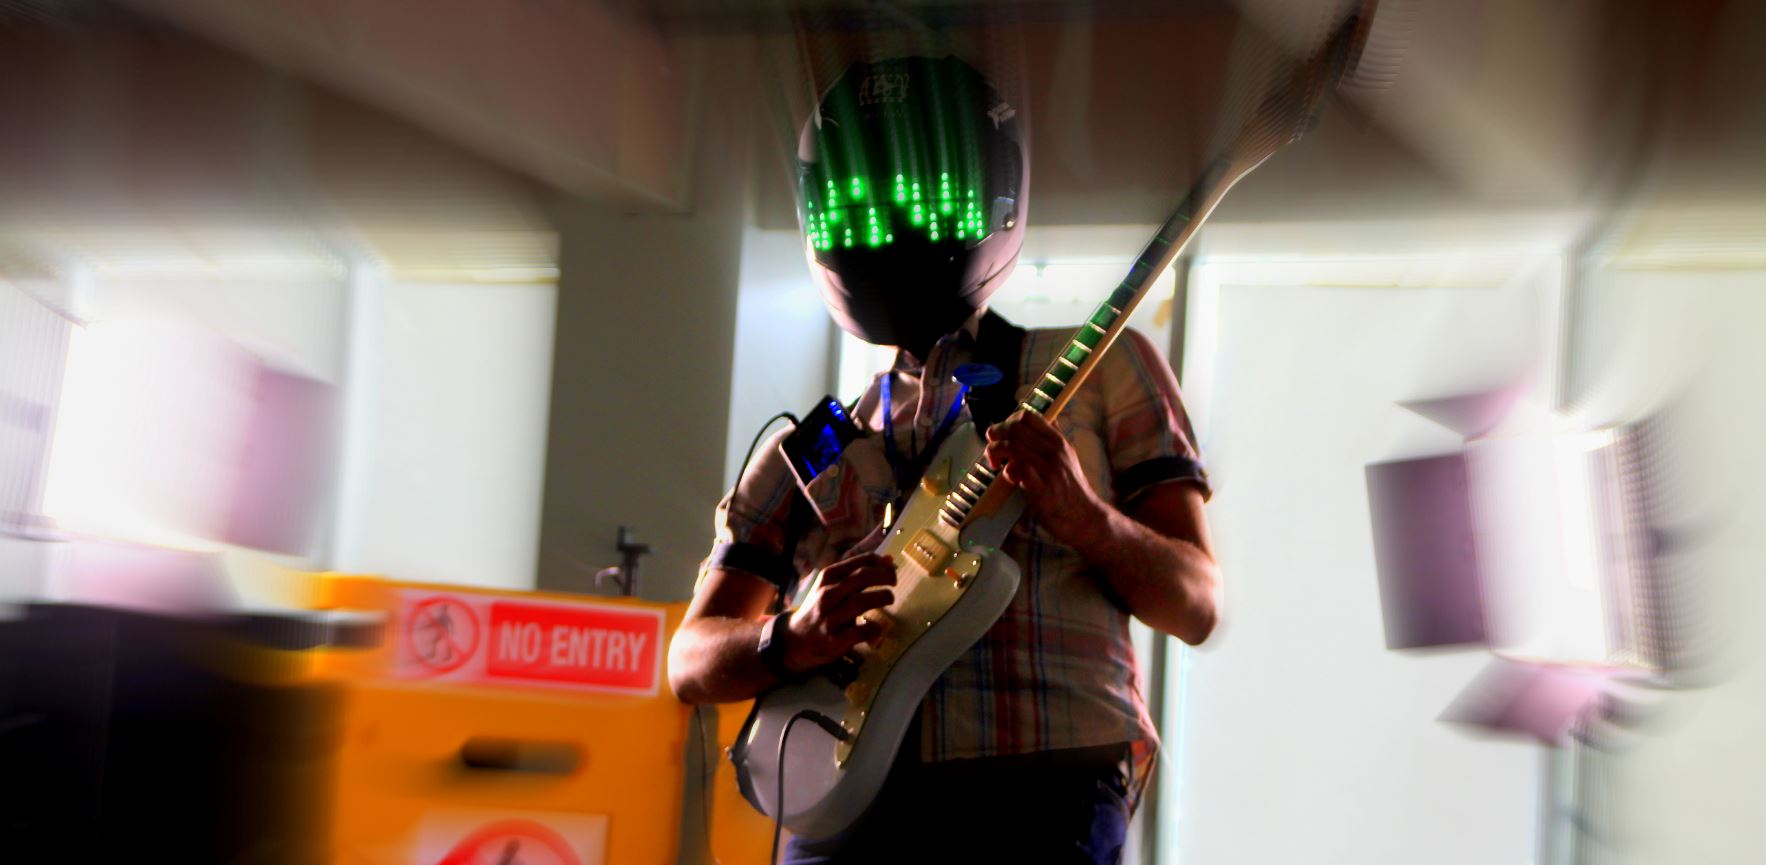
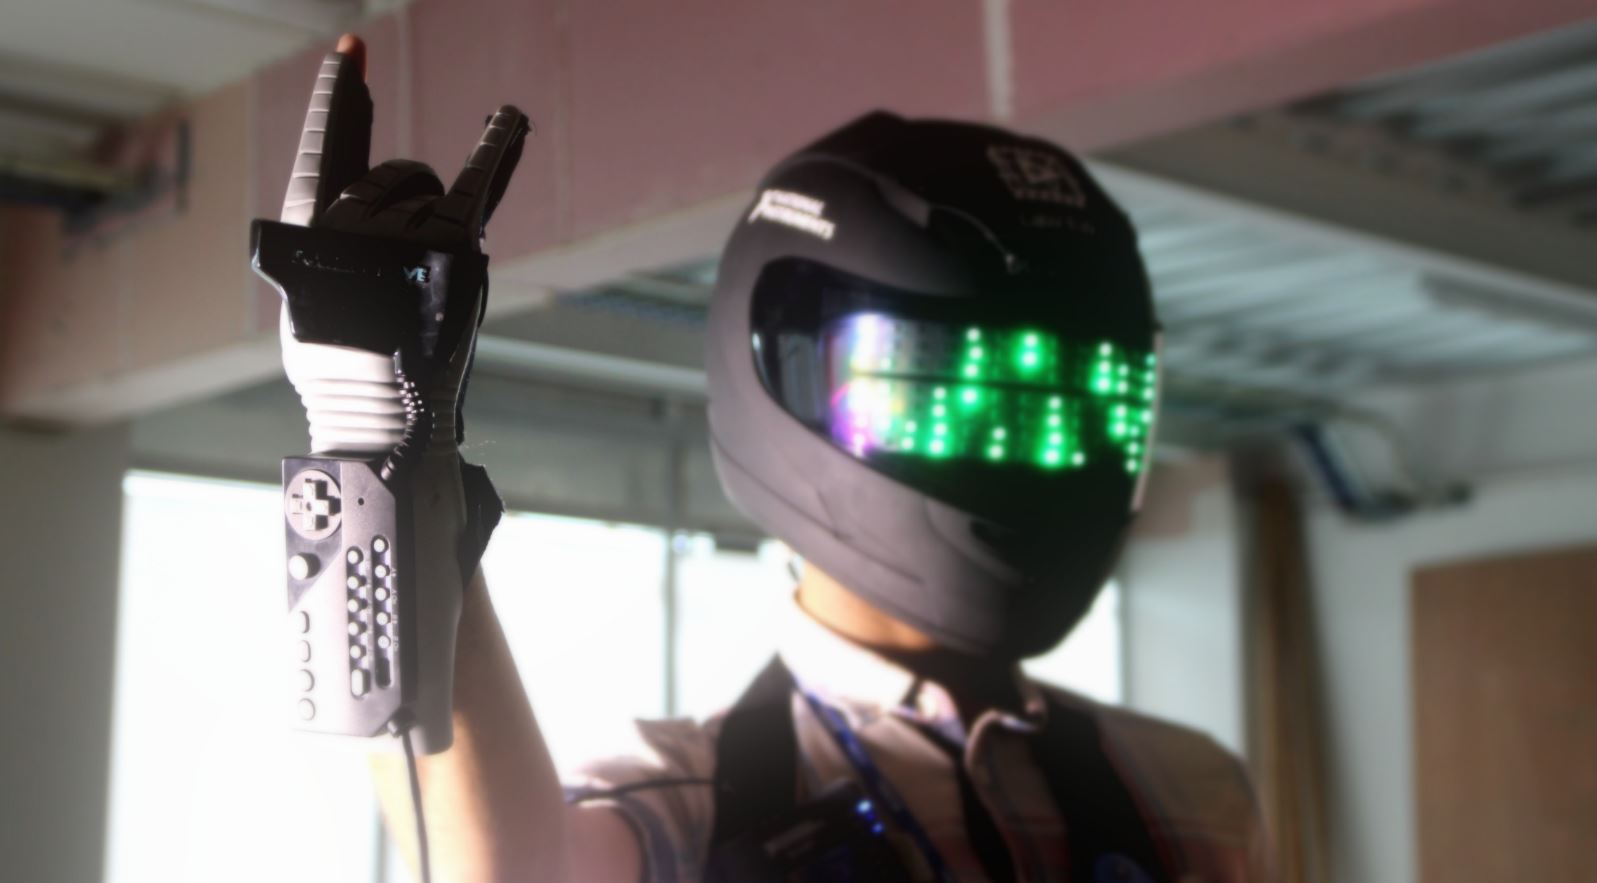
Also featured in the video is a previous intern project - myPowerHelmet. This is a Daft-Punk style electronic headset, which creates different animations based on how a user interacts with a Nintendo power glove.
In summary, we have one myRIO controlling the guitar signal processing, and a myRIO controlling the helmet's LED array.

myMadFX: System Overview.
The project can be split up into several discrete parts as shown in the following diagram.

Currently I have powered the myRIO using a mains supply. However, it could be easily powered using X6 standard AA batteries for increased portability. The myMadFX software was deployed to the myRIO, such that the application runs as soon as the myRIO is powered-up!
![]() All components used in this project are detailed within the parts list below.
All components used in this project are detailed within the parts list below.
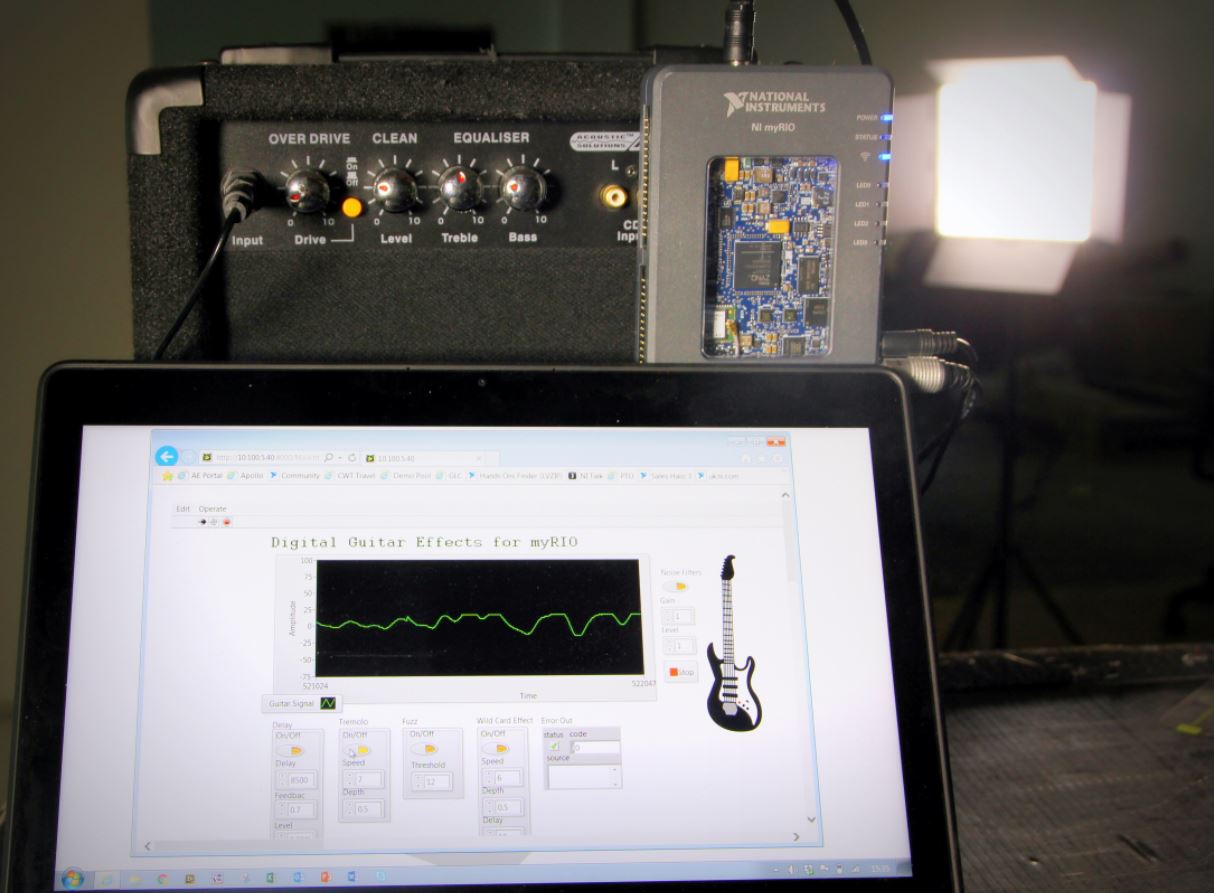
The guitar signal is passed to the Audio In port of the myRIO, using a standard guitar cable with a 3.5mm jack converter. The code on the myRIO then performs some digital signal processing to produce the desired effects. These effects are sent to the Audio Out port of the myRIO, which is connected to an amp or set of speakers.
To configure the effects, a GUI was created in LabVIEW, which allows users to toggle active effects, and edit the associated parameters. As the myRIO has the ability to connect to a WiFi network, I utilised the web-publishing services inherent in LabVIEW, to view this front panel remotely on a web browser. This means guitar effects can be changed wirelessly, over the web.
This “Internet of Things” inspired effects pedal could have applications at music gigs, where the guitar player’s effect is remotely configured by sound-engineers in a mixing-desk on the other side of the venue or stadium.
Effects and Processing.
So far, I have implemented three main guitar effects, as well as some noise filters. This part of the documentation, will take you through how each of these effects function
Due to the high-throughput nature of myRIO's onboard FPGA, the majority of the processing was implimented on the FPGA fabric. However, I did implement the “Fuzz Distortion” effect on the myRIO's real-time processor, which demonstrates the incredible flexibility of digital signal processing that the myRIO has to offer.
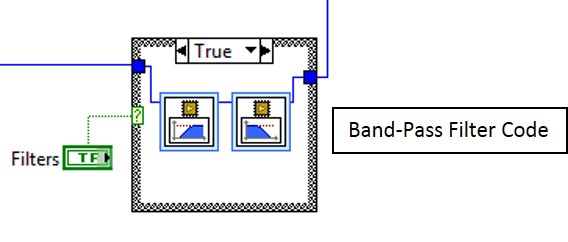
Noise Filters
As with any audio processing application, it is important to account for noise. For my particular application, I decided to use a high and low pass filter in series to create a bandpass filter within LabVIEW. This allows us to only pass signals between 100 and 2.5 kHz through after processing. This reduces the hissing noise sound created by some effects.
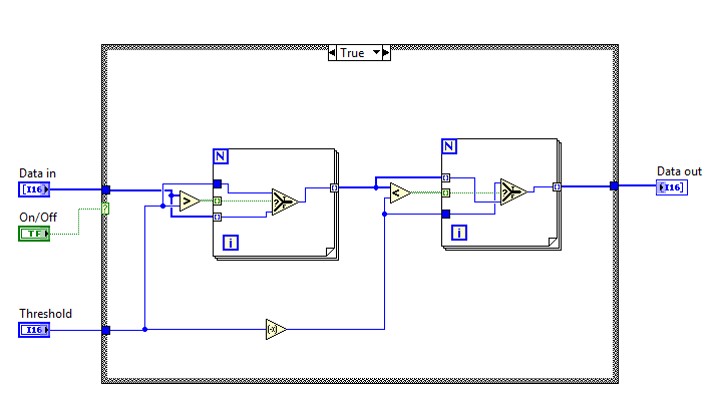
Fuzz Distortion
This effect has been implemented to emulate the crunchy sounds of most rock bands. This works by programmatically saturating the signal at a specified threshold to produce a crunchy tone. A threshold can be specified by the user, and depending on this value, the distortion level will change. The code below simply forces the signal to the threshold value.
Delay
This effect works by playing the guitar signal over delayed samples. This creates an echo effect which simulates playing music in a large hall. The implementation of this effect is included in the final code, attached to this page.
Tremolo
This effect simulates a varying change of amplitude. It is similar to fading the guitar sound in and out at a varying speed. Within this project, we can vary both the speed of this amplitude change, and the depth at which this occurs. This depth either makes the amplitude change soft or sudden depending on the value the user sets. The full implementation of this effect can be seen in the code attached to this page.
Requirements.
Steps to execute project.
To use the wireless functionality of this project, you will need to connect the myRIO to a local WiFi network. Once the project has been deployed as a start-up application to the myRIO, another device connected to the same WiFi network can host the remote front panel. To access this, the web address is:
http://xxx.xxx.xxx.xxx:8000/Main.html. This is where xxx.xxx.xxx.xxx is the IPv4 address of the myRIO.
Future Changes
A project like this could be taken in a number of different directions. Here are a few interesting features I would like to impliment in the future:
Useful Resources
Project Attachments
Amazing project! Was trying to do something similar with the myRIO with my limited knowledge of guitar pedals.. Would be really interesting to try it out and hook up the myRIO to my guitar, but I am currently running LV 2014, so I can't open the project.
Could you possibly save the project for an older version of LabVIEW, such as, 2012 (think that's the furthest you can go back in LV2015)? I think that would make your code accessible to a much larger range of people.
Hey MariusUm! Sorry for the delay, but I have now uploaded a 2013 revision. (I wasn't too sure if there was a myRIO 2012 toolkit). I haven't tested this out, so let me know if you run into any problems, and I'll try and help out!
