From Friday, April 19th (11:00 PM CDT) through Saturday, April 20th (2:00 PM CDT), 2024, ni.com will undergo system upgrades that may result in temporary service interruption.

We appreciate your patience as we improve our online experience.

Developer Center Blog

Community Browser
cancel
Showing results for 
Search instead for 
Did you mean: 
PatJamSim
4911 Views
0 Comments

Calling all LabVIEW developers!

myRIO is an NI embedded hardware device that enables students to learn about and design real, complex engineering systems more quickly and affordably than ever before.  If you are experienced in creating software for embedded devices or for educational purposes, we need your help. The myRIO app ecosystem is growing, and the potential market is expanding rapidly. Creating a myRIO app is an excellent opportunity to establish your company’s name as a premier go-to in the educational software space.

These apps run right out of the box, transforming the myRIO into an Oscilloscope and Function Generator, Lock-in Amplifier, Audio Equalizer, and more.  To download and run any of these apps, visit ni.com/myrio/apps.

Interested in creating an app?  Visit and join the myRIO App Development Community, where you can find numerous valuable resources, including an example myRIO app, developer’s tutorial, detailed requirements, and a discussion board to assist with the process.

Your software, developed for myRIO and available on the LabVIEW Tools Network, can educate and enable students in diverse application areas like never before. Help us empower the next generation of engineers and scientists.

RDR
5251 Views
0 Comments

The best way to differentiate products on the LabVIEW Tools Network is based upon feedback from customers.  To capture this information, partner product listings contain a tab for Ratings & Reviews as shown below:

Tools network listing.png

What we've not seen in a Tools Network product to date is any direction from the product to submit a review.  This is something many of you are probably familiar with when using third-party applications on your computers, mobile phones, or even following an Amazon.com purchase.  Why not have a similar experience for the Tools Network?  Now you can. 

To facilitate linking your product to a Ratings and Reviews entry on the LabVIEW Tools Network we've created a subVI (saved for LabVIEW 2010) you can drop into any existing LabVIEW code (attached below):

Rate Product Front Panel.png

The default behavior is to prompt the user with a pop-up dialog after executing 10 times to ask the user to review your product.

Rate Product Pop-up.png

  • Selecting 'Rate now' will direct the customer to the Ratings and Reviews tab of the configured product page and never prompt the customer again.
  • Clicking 'Ask me later' will wait another 10 executions (configurable using the 'Number of Times to Wait' input) and prompt the customer again
  • The 'No, thanks' option will never prompt the customer again

This example can be dropped into your toolkits and applications as-is, customized to modify the text, etc.  It is up to you!

David_L
5215 Views
0 Comments

We would like to announce the latest version of the LabVIEW Third Party Licensing & Activation Toolkit.  Along with various bug fixes and improvements, Third Party Licensing & Activation Toolkit 2014 now includes support for deactivation, which allows you to move licenses between computers and reactivate add-ons.  Details on the new release can be found in the Readme and the new version can be downloaded from the LabVIEW Tools Network.  Help and support is available on theThird Party Licensing & Activation Toolkit community group.

deactivate.png

Note:  The new deactivation features are only supported in LabVIEW 2014 and later.  You may still enable deactivation in your product built in older versions of LabVIEW, but only customers using LabVIEW 2014 or later will be able to deactivate their license.

Also, Third Party Licensing & Activation Toolkit 2014 supports LabVIEW 2011 through LabVIEW 2014.  If your product requires support for LabVIEW 2010, you may use Third Party Licensing & Activation Toolkit 2013 to license your product.

David_L
5903 Views
0 Comments

We would like to announce the latest version of the LabVIEW Third Party Licensing & Activation Toolkit.  Along with various bug fixes and improvements, Third Party Licensing & Activation Toolkit 2014 now includes support for deactivation, which allows you to move licenses between computers and reactivate add-ons.  Details on the new release can be found in the Readme and the new version can be downloaded from theLabVIEW Tools Network.  Help and support is available on the Third Party Licensing & Activation Toolkit community group.

deactivate.png

Note:  The new deactivation features are only supported in LabVIEW 2014 and later.  You may still enable deactivation in your product built in older versions of LabVIEW, but only customers using LabVIEW 2014 or later will be able to deactivate their license. 

Also, Third Party Licensing & Activation Toolkit 2014 supports LabVIEW 2011 through LabVIEW 2014.  If your product requires support for LabVIEW2010, you may use Third Party Licensing & Activation Toolkit 2013 to license your product. 

penrenpo
8114 Views
0 Comments

by Penny Wright – MarCom Manager, LabVIEW Tools Network


28 new products launched on the LabVIEW Tools Network at NIWeek 2014, as well as 5 products were honored with top awards.  Download one for free today ni.com/labviewtools


Product of the Year Award Winners


Software Apps for myRIO – ni.com/myrio/apps

Our community of expert LabVIEW developers helped to jump start a new library of apps for myRIO. With these products now available the LabVIEW Tools Network, we are opening doors and inspiring students and educators to take their myRIO to the next level. If you are interested in submitting your myRIO add-on application for certification, visit ni.com/labview-tools-network/contribute.


Some of the new apps include:


Additional product launches include:


Symmetric and Asymmetric Encryption API

        New Add-ons:

    • cRIO Driver for iDAQ
    • iDaq - XNET-CAN for iDAQ
    • Easy Datalogger for iDAQ


Industrial Protocols Educational Software

Improved Yield, Quality, and Decision Making


Enhance your projects with these and more on the LabVIEW Tools Network, the NI app store for engineers and scientists.

penrenpo
5101 Views
0 Comments

Today, the NI Alliance Partner Network welcomed hundreds of integrators, consultants, and product developers to Alliance Day 2014. Kicking off the annual NIWeek  conference, the day offers the opportunity for partner training, sales collaboration, and recognition of achievements.


Each Alliance Partner company is sponsored by NI sales to ensure collaboration on key regional opportunities. Four partner companies differentiated themselves in their regions, winning the coveted Partner of the Year award:

Miklos_Lorant_DSC_4495.JPG


Avionics Interface Technologies received the award for Product Partner of the Year for their outstanding work. Additionally, this year marks the tenth anniversary of NI CompactRIO. Ten companies are recognized for highest achievement in CompactRIO based-solutions, with Lime Instruments winning the award for NI CompactRIO Partner of the Decade.

Each year, we also acknowledge our Alliance Partners' commitment to proficiency by honoring the most certified partners for each partner level with the outstanding technical resource award. This year's Outstanding Technical Resource Award Winners include:

IMG_3623.JPG


The LabVIEW Tools Network, the app store for engineers and scientists, recognizes software add-ons and applications which create value for customers based on NI technology and graphical system design. For outstanding achievement in expanding the NI ecosystem of products, the following were recognized:

  • Test Product of the Year – skyWATS.com by Virinco
  • Embedded Product of the Year –LocalGrid PQA by LocalGrid Technologies
  • DAQ Product of the Year – XLR8 by DATA AHEAD
  • LabVIEW Innovation Product of the Year – LabSocket System by Bergmans Mechatronics LLC
  • Community Product of the Year – Scout TDMS Editor by Signal.X

Once again, we would like to congratulate all of our Alliance Partners, Product Partners, and LabVIEW Tools Network developers for their outstanding work!


>> Learn more about the NI Alliance Partner Network program by visiting ni.com/alliance or download apps on the LabVIEW Tools Network at ni.com/labviewtools.

David_L
5265 Views
0 Comments

It's getting close to that time of year again!  NIWeek is a time when most of NI R&D, Marketing and Sales are all in the same place at the same time as many of our customers and partners.  It's a great opportunity to have face-to-face meetings with groups that you don't usually get to talk with outside of an email or phone call. 

The LabVIEW Tools Network team is preparing for NIWeek by clearing our schedule and setting up times to talk with our developers and partners about their existing and upcoming LabVIEW add-ons.  If you will be in town and are interested in setting up some time with us during that week, please let us know.  Send us an email at labviewtoolsnetwork@ni.com with the following information:

  • Name
  • Company
  • Agenda topics you would like to discuss
  • Times when you will be available to meet

Of course, due to busy schedules, we can't promise to meet with everyone, but we'll do our best to fit you in.  Hopefully we can get you in touch with the right people for moving forward with creating/publishing/selling your product.

Also, don't forget to stop by our NEW LabVIEW Tools Network pavilion on the NIWeek Expo floor to see how we're elevating awareness of tools to NI customers. There will be opportunites before the week is over to sign up your product for a kiosk at NIWeek 2015.

We look forward to seeing you all there!

The LabVIEW Tools Network Team

penrenpo
7454 Views
5 Comments

Stop by Booth #705 at NIWeek 2014 - Near the Expo Floor Main Entrance

We are excited to host our very first NIWeek pavilion! Come by to explore these product demos and meet the developers. For more information, contact labviewtoolsnetwork@ni.com.

Featured Products


Build Licence Track (BLT) by Studio Bods

LabVIEW Deployments Made Easier With Automatic Updates, Licensing, Remote Tracking & Debugging

daqloud by DATA AHEAD

Manage Your Measurement Data Online

GTT LTE RBS Toolkit by Gefle Testteknik

Complete toolkit for RBS testing covering all common 3GPP measurements.

INERTIA Add-on for NI VeriStand by Wineman Technology

Test Cell Control and Automation

LabSocket System by Bergmans Mechatronics LLC

Access LabVIEW VIs Over the Web or a LAN From Any Browser

LabVIEW Localization Toolkit by S.E.A. GmbH

Create and Distribute Multi Language LabVIEW Applications

MajX-DSA by Signal.X Technologies LLC

Sound and Vibration Analyzer

Robotics Libraries by DigiMetrix

Directly Control Denso, KUKA, Epson, Kawasaki, Mitsubishi, Motoman, and Toshiba Robots

RTI DDS Toolkit  by Real-Time Innovations (RTI)

Fast, Scalable and Secure Data Sharing Between LabVIEW VIs and Other Applications

Scout TDMS Editor by Signal.X Technologies LLC

Free TDMS File Viewer/Editor

SigmaDAQ by Aledyne Engineering, Inc.

Configurable Data Acquisition and Reporting Suite

Spreadsheet Express by Aledyne Engineering, Inc.

Automate Excel Data Processing and Charting From NI LabVIEW

Universal Pointer Touchscreen Interface by Aledyne Engineering, Inc.

LabVIEW Touchscreen Interface for Multi-touch Applications

XLR8 by DATA AHEAD

Read and Write Microsoft Excel Files From NI LabVIEW


penrenpo
7155 Views
2 Comments

The 2014 Alliance Partner and LabVIEW Tools Network Awards ceremony will recognize companies and products which create value for customers based on NI technology and graphical system design. Finalists and winners will be celebrated on Alliance Day during the awards luncheon hosted by the Alliance Partner Network team and attended by NI global sales and executive leadership.

Congratulations to all the LabVIEW Tools Network - 2014 Product of the Year finalists in the following catagories:

Innovation

Embedded Control and Monitoring

Automated Test

Data Acquisition (DAQ)

Community

Thank you to all the companies who submitted products this year, and we look forward to celebrating these finalists and announcing the winners on Alliance Day 2014!

Penny Wright

MarCom Manager

LabVIEW Tools Network


penrenpo
5531 Views
0 Comments

So you've registered for NIWeek, what's next? Maybe you have a new product ready to show off and have even booked booth space on the expo floor. Or maybe you are presenting in a technical session or forum. A booth is great, but do you have a datasheet or company overview to hand out?  Your new product may be awesome, but are you planning a press release and social media push to announce it? What else should you be thinking about so that NIWeek customers see you, know what your company provides, and how to contact you after the conference?

One of our preferred agencies, JH&A Advertising, provides full marketing solutions and is offering discounted promotion packages to help get your company ready for NIWeek and beyond. The good news is that creating assets now can help support future activities such as events, customer visits, website updates, etc.

Marketing doesn't have to be a dirty word or ugly process. Consider that you are one in a sea of many and you should trust an expert to take your awareness and visibility to the next level.

Take a moment to review the discounted packages and a la carte options attached below, and email Crystal Bristow, call the JH&A office at (512) 444-0716, or let me know if you would like more information.

As always, we are looking forward to hosting you in Austin for Alliance Day and NIWeek 2014!

Regards,

Penny Wright

Marketing Communications Manager

LabVIEW Tools Network

RDR
5433 Views
0 Comments

As the LabVIEW Tools Network continues to evolve, we would like to announce some exciting updates to the Compatible With LabVIEW program.

NI continues to build a consistent and cohesive global brand to grow our market share and strengthens the appeal of our products and services. Products on the LabVIEW Tools Network play a key role in this effort, however, our research has found that customers may be confused and unable to differentiate the Compatible With LabVIEW levels. Additionally, with the exponential growth of products, we have determined that our certification process needs to be revisited to create efficiencies for scalability.

To improve the Tools Network experience, we will no longer have a breakdown of compatibilty levels and products will instead differentiate based upon customer ratings and reviews.  We encourage you to follow-up with your customers in order to populate your product ratings.

On the Compatible With LabVIEW front, we have consolidated the requirements into a single level, divided them into product types, and performed an audit to remove ambiguity. The long-term goal is to have the highest quality products available, reduce the level of effort required for the certification process, and provide a concise experience for customers. The new requirements are already in use for products currently under review and we will roll them out in our annual recertification audit of existing products later this year. Web updates to ni.com/labviewtools will be phased over the next 2-4 months.

We welcome your feedback and invite you to review the new requirements document and let us know what you think.

Compatible With LabVIEW

Thank you,

-The LabVIEW Tools Network Team

penrenpo
6037 Views
0 Comments

Greetings from Austin! We're already preparing for Alliance Day and NIWeek 2014, and May 30th is an important date you might be interested in. If you have any questions, feel free to contact the LabVIEW Tools Network team.

Developing a New Software Add-on?

If you are working on a new product and are interested in offering it on the LabVIEW Tools Network, the product must be reviewed and certified Compatible with LabVIEW. In order to have a new product considered for certification prior to NIWeek, we must receive your submission by May 30th.

Apply Now for the 2014 LabVIEW Tools Network Awards

Each year, NI executive leadership selects outstanding software apps for achievements in innovation. These awards are presented on Alliance Day and finalists receive one (1) Full Conference Pass to attend Alliance Day and NIWeek. Don't miss this opportunity to win a Product of the Year award - apply today! Deadline to apply is May 30th.  Finalists will be notified by June 27th.


All finalists receive:

Product exposure to the global conference attendees and NI sales and leadership

One (1) Alliance Day and NIWeek 2014 Full Conference Pass

Your datasheet/company overview included in NIWeek 2014 official press editor kit

Article highlight in NINews and NI Social Media outlets

Personalized achievement award


David_L
18517 Views
2 Comments

It's that time of the year again.  The LabVIEW 2014 beta 1 has officially been released and it's time to sign up.   We are working on a few new features that will directly benefit LabVIEW Tools Network products which you should especially test out:

(Note: links below will not work until you have been accepted to the LabVIEW 2014 beta program)

Even if you don’t plan to use these new features right away, it is important to test your products with the 2014 beta to ensure their compatibility with the new version and make sure no unexpected issues are introduced into your product (we don't usually do this on purpose, but mistakes happen!).  The sooner you do your testing, the better chance we can fix any bugs before 2014 is officially released.

You can sign up for the new LabVIEW 2014 beta at ni.com/beta.  Please sign up, test your products and give feedback via the beta forum. 


penrenpo
12658 Views
0 Comments

toys.jpg

Let’s face it, the holidays are for kids - sons, daughters, nieces, nephews, and grandkids, all wide-eyed and squealing with laughter on Christmas Eve or morning about the gifts that Santa delivered. But what about the big kid on our shopping list?  As a mom and marketer, I’m inundated with the flashy, full-colored print ads in the mailbox, and online ads in my inbox for every retailer on the planet. However being married to a gadget geek, I still struggle with finding that cool gift for my tech savvy husband and not ending up with the traditional shirt/tie box set, new video game, or favorite collegiate or pro football clothing or gear. We’re really all just big kids living vicariously through our younger generation and the evolution of technology they can access.  And who needs another pair of Darth Vader lounge pants?

Get the big kid on your list what they really want – new software “toys” from the LabVIEW Tools Network!  These cool tools will give you hours of LabVIEW playtime and hopefully an excuse to escape the “assembly-required” part of kid’s holiday gifts.  Grab some hot cocoa, sneak off to your computer hide-out, download from the list below, and get started.

Electronics Prototyping - LabVIEW Interface for Arduino Toolkit

Interface Your Microsoft Kinect with LabVIEW - Kinesthesia Toolkit for Microsoft Kinect

Control Your Synthesizers, Musical Instruments and other Multimedia Devices - Open Sound Control for LabVIEW

Build VIs for Drones - AR Drone Toolkit for LabVIEW

Create a Robot with Your Roomba Vacuum - iRobot Create for LabVIEW

LabVIEW Hacker, creators of the AR Drone Toolkit and iRobot Create, have some exciting software toys designed to interface with a variety of cool devices:

Use the Leap Motion Controller to Capture Gestures with LabVIEW - LabVIEW Leap Interface

Send and Receive Tweets Without Leaving LabVIEW - i3 Twitter Toolkit for LabVIEW

Utilize the Sensors of an Android Device Directly in LabVIEW - LabVIEW Android Interface

Pull Motion Data and Button Actions from a Nintendo Wiimote into LabVIEW - LabVIEW Wiimote Interface

Have fun and Happy Holidays!

Penny Wright

Marketing Communications Manager

LabVIEW Tools Network

David_L
14158 Views
1 Comment

The holiday season is the time of the year when people are traveling, spending time with family, and using up last minute accrued vacation hours before they expire in the new year.  Because of this, you may have a lot of down time in which you are hankering for some juicy LabVIEW nuggets to keep your expertise fresh and continuously growing.  The good news is that TONS of developers out there love LabVIEW so much that they spend time each week writing their thoughts down about their favorite graphical programming language.  In the spirit of holiday sharing, I wanted to let you all in on some of the blogs I personally follow so you can all be as informed as can be.  Here's a few of my favorites:

LabVIEW News

https://decibel.ni.com/content/blogs/labview-news-english

LabVIEW News.png

As the official LabVIEW News blog, Laura Arnold and her team gather LabVIEW content from around the web in all topic areas (as long as it's about LabVIEW).  This is the same news feed that shows up in your LabVIEW Gettering Started Window each day.

Eyes on VIs

http://blog.eyesonvis.com/

Eyes on VIs.png

Christina Rogers is a developer in LabVIEW R&D and active member of the LabVIEW community.  Her blog tends to focus on hidden LabVIEW tips and tricks and new features of LabVIEW that she is excited about.

VIShots

http://vishots.com/

VIShots.png

VI Shots is a podcast by LabVIEW Champion Michael Aivaliotis.  Each post, Michael will interview someone from the LabVIEW community and talk about advanced LabVIEW development as well as new and exciting LabVIEW tools.

Software Engineering for LabVIEW

http://ekerry.wordpress.com/

ekerry.png

Eli Kerry is the Senior Product Manager for LabVIEW at National Instruments as well as a CLA and LabVIEW enthusiast.  His blog focuses on Large application development tips and best practices using LVOOP, Actor Framework, and many other advanced frameworks and technologies.

Random Ramblings on LabVIEW Design

https://decibel.ni.com/content/blogs/labviewramblings

swatts.png

Steve Watts is a LabVIEW developer from the UK who quite literally wrote the book on LabVIEW.  In his blog, he writes about anything from UI design to software development best practices and how they can be applied to LabVIEW.

LabVIEW Field Journal

http://labviewjournal.com/

LabVIEWfieldjournal.png

The National Instruments Field Architects are a small, elite group of LabVIEW experts.  In their blog, Nancy Hollenback, Charlie Knapp and Brian Powell cover advanced topics to help guide software architecture and encourage good software engineering practices in LabVIEW. 

ExpressionFlow

http://expressionflow.com/

expressionflow.png

Returning to the blog scene after a multiple year hiatus, LabVIEW champion Tomi Maila writes his blog about flow-based programming.  While LabVIEW is one of the two main languages he discusses (the other being NoFlo), the blog discusses broader concepts and provides a different perspective on programming in a graphical world.

LabVIEW Tools Network Developer Center Blog

https://decibel.ni.com/content/groups/labview-add-on-dev-center?view=blog

lvtn -small.png

Yes, yes, I know.  I'm promoting our own blog on the blog of blogs, but I want to make sure that whose who stumble across this article by accident know who we are.  The LabVIEW Tools Network Developer Center blog is a collaborative blog by the LabVIEW Tools Network team (currently Matthew Friedman, Will Schoettler, Robert Des Rosier,Patrick Simmons and Penny Wright).  Here we discuss technical and marketing topics aimed at helping developer create quality toolkits, applications and add-ons for LabVIEW.

Others

There are TONS of other LabVIEW blogs out there, and this post only scratches the surface.  What are the favorite blogs you follow (shameless plugs graciously accepted)?

Will_S.
12226 Views
0 Comments

Your website is an important vehicle to help generate leads for your business and to create awareness for your products and solutions. This section covers the following:

  1. Things to Consider When Creating Your Website
  2. Making Your Website Search Engine-Friendly
  3. Linking to ni.com from Your Website

1. Things to Consider When Creating Your Website

  • Clearly define the strategy for your site and decide on the primary goals and objectives.
    It is important to establish what you are trying to accomplish in each area of your site. Having clearly identified objectives (i.e.collecting leads, driving e-commerce, generating inbound calls, educating users) helps you prioritize which content to include on your pages. When adding content to an area of your web site, always ask yourself, "Does this content match my objective?"

  • Create compelling content and present it clearly on your site.
    When writing content for your website, keep your users in mind. Address their needs, pain points, and concerns and explain how your products and solutions alleviate those problems. They care about how your system benefits them. Having useful content is crucial, but it doesn’t help anyone if users cannot find it on your site. Think about how to most logically group your content and organize it on your site. Clearly label sections of information and pieces of content so that users can skim the page and find what they’re looking for. Based on your experience with your customers, highlight their most typical key points of interest.

  • Check to make sure you have a clear user experience and friendly interface.
    Make sure that your site is easy to use and to navigate for your users. If it’s hard for them to find what they’re looking for, they might give up and leave. It is tempting to try to cram a bunch of content and calls to action on one page, but that often clutters the experience and potentially confuses the user. If in doubt, keep things simple, and refer to your primary objectives to decide what to prioritize and present on the page. When you are working with customers, feel free to request their feedback on your website, and what they would like to add or change.

2. Make Your Website Search Engine-Friendly

Search engine optimization (SEO) helps increase traffic, and therefore leads, to your website. This section covers the following: understanding how search works, understanding the user, optimizing content on the page, and promoting content off the page. This is intended as a basic introduction. There is much more you can learn about SEO. It is recommended that you continue pursuing this topic as it can directly impact the performance of your website.

Understanding How Search Works

Search engines feature four main functions:

  1. Finding content: Search engines use software (bots) that move from page to page through links to find your content.
  2. Indexing content: This is the process of bots parsing through the HTML on a page and storing it in a file for the search engine to reference when a user searches for a term.
  3. Returning results to the user based on relevancy: The main way that search engines determine relevancy to a page is through something called anchor text or link text. Anchor text is the visible, clickable text in a hyperlink. You want this anchor text to match as closely as possible to the keyword you are trying to optimize.
  4. Ranking those results based on importance: Search engines determine importance based on popularity and the quality of your popularity (for example, who is deeming your content popular). Search engines are trying to reward good content, so it assumes that popular content is deemed good by users.

Understanding the User

The way the user interacts with a search engine is by inputting keywords. It’s important to understand the language users use to describe their applications and your products and services. That way, you can get the right people to your site. By using these keywords in your web site content, search engines will associate your web site with these keywords and direct users to it.

Brainstorming Keywords

  • Ask yourself/sales team
  • Search the keyword
  • Use your web analytics tool
  • Look it up on the Google keyword tool
  • Test it with Google AdWords

Selecting Keywords

  • Narrow your list of keywords down to 1-3 per page
  • Think about long tail SEO. That is the distribution of search terms from broad to niche. Which 20% of keywords gives you 80% of the correct traffic?
  • Broad terms: A very broad word such as “daq” is going to get a lot of search traffic, have a lot of competition, and have a lower probability of converting.
  • More niche terms: These phrases have less competition and less search volume, meaning you could potentially get less traffic to your site. But these terms also convert better, meaning the customers that get to your site are more likely to continue shopping and browsing because your site applies to them well.
  • When selecting a particular keyword for one page, think about your goals. Are you trying to build awareness that you are a DAQ vendor but are less concerned with converting people to leads or sales? Then a broad term might be a good decision.

Optimizing Content on the Page

Search engines view certain content on the page as more important based on where you place it. The items with a higher weight are page title, headings, and URL, so you want to make sure that your keywords are included at this level.

  • HTML tag: This is a code surrounded by brackets (<>) that denotes format, hyperlinks, or information for the bot.
  • Page title: The page title or title tag shows up in a few places. It is visible at the top of the browser. It is also the clickable link in the search engine results.
  • Meta tag: This is a type of HTML tag that gives information about the page. The bot can see this information in the HTML, but the user can’t see it on the page. Users can see it on the search engine results page below the clickable link. It is not a factor in determining your rankings, but it can help persuade users to click on your link versus another one on the first page.
  • Heading: This is recognized by the HTML tag “H” and then the number, such as H1 or H2 as the heading tag.
  • Keyword at the page level: Sprinkle the keyword throughout the body content, with a few variations to allow for user variations in the query and for natural writing in the content. At the page level, it’s really important to remember your users. If they type in a search term, get to a page, and find out it’s not about that keyword, they’re going to leave.

Promoting Content off the Page

Of all the things you can do to optimize your content for search, this is the most important. The search engine determines your popularity and relevence at the top of the results page largely based on which external sites link to yours.

  • Get links from trusted, relevant sites. Examples include:
    • Credible institutions: .edu, .gov
    • User-generated: blogs, forums
  • Focus more on external links than internal
  • Get links from multiple unique domains

Build links to your site by

  1. Creating exciting content: If people are really excited about what you do as a company, they are naturally going to talk about you and link back to your site.
  2. Building relationships: Build relationships with editors to get them to write articles for you; build relationships with bloggers in your industry to get them to write posts about you.
  3. Taking advantage of social media: Post comments on blogs and forums related to your industry. Social media is a great way to get links back to your site.
  4. Participating: Make sure you are participating in the forums, conferences, and communities that contain your target audience. This helps you spread the word, forge relationships, build credibility, and much more.

3. Linking to ni.com from Your Website

Cross-linking between relevant and content-rich sites is important for driving traffic. Your company can greatly benefit from linking to our site. For example, by linking between sites, you improve your ranking in web search engines, as we just discussed above. Higher rankings mean better chances that customers will come to both ni.com and your websites looking for your services and solutions.

As a contributor to the LabVIEW Tools Network, take advantage of the Related Links section of your model page to link back to important documentation and demos on your own website. Link back to your model page on ni.com and the LabVIEW Tools Network to strengthen the link connection.

As always, feel free to post your own ideas below.

Will Schoettler

LabVIEW Tools Network Product Manager

PatJamSim
15055 Views
3 Comments

Design and Implementation


In Tools For Developing Tools, Part 1 we looked at a variety of tools that improve the process of creating detailed documentation that meets the Compatible with LabVIEW standard.  In order to utilize tools for documentation, you must have code worth documenting.  Fortunately, there are a wide array of different tools available on the LabVIEW Tools Network that assist in the the actual design and implementation of a large application.  Many of the tools on the LabVIEW Tools Network are extremely useful for specific applications, such as the set of VIs used to program KUKA Robots.  The focus of this post will be on more generic tools that are useful in a wider variety of applications.


General Purpose Toolkits

openg_libraries_l.jpg


OpenG Libraries


The OpenG community has built and shared hundreds of open-source VIs that cover a wide variety of different functions.  There are additional palettes with advanced functions for working with arrays, strings, application control, file handling, and more.  If you aren't already using OpenG, you probably should be.


GPower Toolsets


Another set of useful functions, the GPower Toolsets include functionality for advanced error handling, timing functions, overflow arithmetic, dynamic VIs, and more.  They also introduce the concept of VI Registers, which are extremely useful for global access throughout your application.


MGI Library - Moore Good Ideas


Moore Good Ideas employees consolidated a free set of VIs created by MGI over time.  This toolkit includes functions for most of the categories in the default LabVIEW Programming palette, expanding on built-in functionality with advanced re-usable VIs.


NI Labs: LabVIEW VI Scripting


VI scripting allows you to programmatically generate, run, inspect, and modify LabVIEW code.  These tools are indispensable when working with large sets of code, and can significantly decrease the amount of time needed to generate large libraries.


EasyGIO Tools


EasyGIO Tools is an add-on that addresses a wide variety of new functionality.  It includes VIs to create HTML help files automatically, set help options programmatically, modify VI descriptions, update front panel tip strips, and more.  In fact, this tool addresses much more than just documentation.  It includes functions that manipulate controls on your front panel, easily create FGVs, rename and save VIs without conflicts, and create a top-level VI with project.  The EasyGIO Tools are exceptionaly useful utility VIs that assist in many phases of development.


Third-Party Licensing and Activation Toolkit


Properly licensing code for distribution to customers presents a number of challenges, such as managing activations and preventing fraud.  Implementing custom licensing can be very time consuming, especially when maintaining a positive end-user experience.  The Third-Party Licensing and Activation Toolkit is an out-of-the-box solution that takes care of licensing, activation, evaluation, and more.  It supports development and deployment licensing and is highly recommended for use with any code that needs to be licensed.


Source Code Control


tsvntoolbar_l.jpgTSVN Toolkit


Source code control allows teams of developers to ensure easy access to shared code while mitigating conflicting changes, allowing check outs of code, merging versions, and more.  Tortoise SVN is a very popular free set of code that performs source code control from a file browser.  Viewpoint Systems' TSVN Toolkit integrates the functionality of source code control programs directly into LabVIEW, extending the native source code control of LabVIEW with an intuitive interface that overlays directly on a LabVIEW project.


TortoiseSVN Tool for LabVIEW


Similar to TSVN, this toolkit incorporates source code control into the LabVIEW Tools menu.  Created by JKI, this full-featured toolkit saves time for developers, accessing common TortoiseSVN operations without leaving LabVIEW, allowing them to focus on their work rather than source code control.


Clusters and OOP


Cluster_Toolkit_l.jpg


Cluster Toolkit


Clusters are an extremely powerful way to manage elements in LabVIEW.  This set of VIs simplifies a number of different operations related to working with clusters.  You can easily obtain individual or sets of elements, manipulate elements, split or index cluster subsets, convert clusters to other data structures, and sort clusters programmatically.  The Cluster Toolkit also works with clusters in the form of variant data, further increasing the flexibility of this powerful toolkit.


Cluster Tools 


Cluster Tools by IMS builds on the native LabVIEW cluster functions by allowing programmatic indexing, register reference, recursive operations, and more.  Allowing direct access to cluster element references means you can perform manipulation of those elements without bundling values with references.  Overall, Cluster Tools is extremely useful when working with code that is heavily dependent on clusters as a data structure.


GOOP Development Suite


Object oriented programming in LabVIEW has grown by leaps and bounds in recent years.  Object data is stored in wires that are accessed via cluster tools.  There also exists a series of tools designed to extend LabVIEW's OOP feature set.  The GOOP Development Suite simplifies management of classes, allows automatic code generation, and incorporates Unified Modeling Language support into LabVIEW. 


G# Framework


This toolkit adds reference-based object oriented support, includes a debugger for tracing object instantiation, and adds automated garbage collection to remove the need to manually destroy objects.  The toolkit's object oriented support makes LabVIEW as powerful as any object oriented language.


UI Customization


ProgressBar_screenshot_l.jpg


WF ProgressBar


The WireFlow WF ProgressBar module is a simple, easy way to add progress bars into your application.  It allows full customization of the appearance, giving you control over the user interface and allowing the end user to potentially cancel longer operations.  For more progress bar functionality, check out the LabVIEW Taskbar Progress Bar API, which allows you to use the progress bar embedded in Windows 7 by leveraging very simple VIs.


VI Box XControls


One of my personal favorites, this XControl allows you to create a tab control on your LabVIEW front panel that performs similarly to a browser.  You can create additional tabs, manipulate their locations, pop them into separate windows, and more - all during run-time.  The ability to provide users an intuitive tabbed experience similar to what they are used to from internet browsers increases the usability of a wide variety of applications.


UI Control Suite


The UI Control Suite adds controls and indicators that differ aesthetically from the built-in LabVIEW UI objects.  Available in Metallic Theme, NI Theme, and System Controls, the UI Control Suites offer the ability to make engaging, coherently styled UIs for a variety of desired looks.


UI Tools


The UI Tools palette, created by LAVA, allows the LabVIEW front panel to fade in or out, smoothly move objects programmatically, override generic dialog boxes, and more.  This powerful toolset also incorporates functionality to improve the usability of front panels of LabVIEW OOP VIs.


There are many more tools available on the LabVIEW Tools Network that facilitate productivity, expand built-in functionality, and incorporate specific applications to save you and your developers time and effort during the Design and Implementation phase of your project.  In Part 3 of this series, we will take a look at a number of tools that simplify the Deployment process in a variety of different ways.


Patrick Simmons

LabVIEW Tools Network Engineer

RDR
12166 Views
0 Comments

We are making a change to the re-certification process of the Compatible with LabVIEW Program in order to scale with the popularity of the LabVIEW Tools Network and the number of products we are certifying each year.  This blog post will describe the process for re-certifying your products and these changes go into effect immediately.

Expectations

  1. LabVIEW Tools Network Partners  be responsible for verifying that their products continue to meet the requirements of their current level of Compatible with LabVIEW certification for the latest versions of NI software.
  2. All partner products must maintain compatibility with the latest versions of NI software before 12/31 or the associated product listings will be pulled from the LabVIEW Tools Network [1]
  3. Once product testing has been completed by the partner, each partner is expected to submit the  Compatible with LabVIEW Re-Certification Form

You can download the latest software releases for LabVIEW, VeriStand, TestStand, and device drivers through ni.com/downloads.

Accountability

We will continue to test all new products for the Compatible with LabVIEW Program certification.  We will hold an audit of the existing product re-certifications each year to ensure our expectations listed above our met.

Get Ahead of the Game

The LabVIEW Beta program is made public in Q1 of each year and provides the opportunity to test your products prior to release to ensure compatibility is met in the new version.  This allows you to re-certify or achieve a higher Compatible with LabVIEW level before NIWeek each year.  We deliver announcements when the beta opens for registration at ni.com/beta.

Please let us know if you have any questions about this change to our program.

-LabVIEW Tools Network Team

[1] - Note: Stand-alone or compiled executables do not need to be recompiled in the latest LabVIEW version unless updates to NI software require associated product updates to partner applications in order to maintain compatibility for features.

David_L
13333 Views
0 Comments

We have added a new technical document to the LabVIEW Tools Network Developer Center entitled "Creating a Custom Bookmark Manager for LabVIEW".  This guide introduces VI Bookmarks, one of the exciting new features of LabVIEW 2013, and discusses how developers can customize the Bookmark Manager or create their own.  Check it out now, and if you have any questions or information to add, feel free to leave a comment!

Creating a Custom Bookmark Manager for LabVIEW

https://decibel.ni.com/content/docs/DOC-31854

--David

PatJamSim
12944 Views
0 Comments

Developing code to share via the LabVIEW Tools Network presents a unique set of challenges and requirements. Transforming an idea into a finished product can prove to be a time consuming process, even for experienced LabVIEW programmers interested in sharing their VIs or built executables. The Tools For Developing Tools series will address a variety of methods that can help decrease the time necessary to complete this process.  In Part 1, we will take a look at improving the process of creating detailed documentation that lives up to the Compatible with LabVIEW Certification. 


Understanding the Requirements


The requirements for documentation are similar for the different levels of Compatible with LabVIEW Certification. Documentation starts and ends with the end user of the software in mind.  Including getting started instructions, well-explained examples, and detailed help information will allow your customers to get the most they can from your tools right out of the box. Start with general Product Documentation, then expand into Professionalize Your Add-On or App With Icons and Documentation Best Practices.  Once you understand just how much documentation can be included, it becomes clear that manually entering all of the necessary information can be time consuming.  Let’s dive in to the tools available to assist in this process.


VIPE+edit+items.jpg


VI Properties Editor


The VI Properties Editor is a free tool that allows you to edit a VI’s Description, Help Tag, Help Path, and Name/Description/Tip in a single window. It also allows you to quickly scroll through multiple VIs on disk, decreasing the amount of time necessary to populate the Context Help for each VI.


VI+to+XML+5.jpg


VI To XML Documentation Tool


Use the VI To XML Documentation Tool to generate a set of XML documents describing your VIs.  You can also convert that XML into HTML, then use an HTML Editor and CHM tool to create CHM files from this HTML source.  If you plan on using XML extensively, then you can also check out the EasyXML Toolkit for LabVIEW, which makes XML editing as easy as working with a cluster.


helper_logo_l.jpg


HELPer: Help Editor for LabVIEW Programs


HELPer is an easy to use documentation tool that you can use to create and edit VI documents like those found in the “Detailed VI Help” links from the context help.  This tool takes care of the formatting and style, automatically matching current LabVIEW design while allowing you to focus on content.  It does allow you to customize formatting as you see fit, and generates ready-to-use HTML documents, allowing you to avoid programming directly in HTML.


vi_helpeks_l.jpg


VI Helpeks


Similar to HELPer, VI Helpeks simplifies the generation of completed HTML format documentation files and provides support for creating CHM files.  This tool automatically takes information from your VIs and compiles that information into the help files.  The more VIs you have to create documentation for, the more useful this tool becomes.


easygio_tools_l.jpg


EasyGIO Tools


EasyGIO Tools is an add-on that addresses a wide variety of new functionality.  It includes VIs to create HTML help files automatically, set help options programmatically, modify VI descriptions, update front panel tip strips, and more.  In fact, this tool addresses much more than just documentation.  It includes functions that manipulate controls on your front panel, easily create FGVs, rename and save VIs without conflicts, and create a top-level VI with project.  The EasyGIO Tools are exceptionaly useful utility VIs that assist in many phases of development.


icon_library_update_tool_l.jpg


Icon Library Update Tool


As mentioned in the Professionalize Your Add-On or App With Icons and Documentation Best Practices, icons play a large part in how your code is perceived by customers.  The icon will be seen each time a customer drops one of your functions on the block diagram.  In order to simplify this process, you can use the Icon Library Update Tool to enhance the built-in capabilities of LabVIEW.  With this toolkit, you’ll be able to apply glyphs to controls or indicators, make your UI more user friendly, and incorporate improved icon conventions.


localize_fifi_l.jpg


LabVIEW Localization Toolkit


Creating code for multilanguage applications can present a unique challenge.  Use the LabVIEW Localization Toolkit to simplify the process.  This toolkit allows you to create multilangue applications, change languages on the fly, and create language-dependent formatting rules.  This tool greatly reduces the effort needed to create and incorporate help documentation in multiple languages.


Stay tuned for Part 2!

(Edit: Check out Tools For Developing Tools, Part 2: Design and Implementation)


Patrick Simmons

LabVIEW Tools Network Engineer

Will_S.
15928 Views
0 Comments

Case studies document how our customers use our products and services to develop innovative solutions, optimize existing applications, or perform cutting-edge research. They are excellent tools for demonstrating the capabilities of your products and building credibility in industry. This post will cover how to write an effective case study. We will cover:

  1. Type of content you want to include
  2. How to structure your case study
  3. Important details

Type of Content you Want to Include

Case studies are inherently about projects that your customers have created. So typically you will work directly with your customers to obtain content and review the messaging that is used. When obtaining content for your case study, be sure to cover the following points:

  • Demonstrate how your application met the customer’s challenges better than any other company and include examples of other options the customer may have chosen.
  • Communicate the challenge clearly and include the “pain points” the customer was trying to alleviate.
  • Highlight all of the software, hardware, and services used to develop the solution.
  • Quantify the results. Include phrases such as, “We helped the customer increase efficiency by X percent, decrease costs by X dollars, and decrease test time by X minutes/hours.” The more specific you can be, the better.

How to Structure Your Case Study

Now that you have your content, how do you present it to the reader? You want to make it as easy as possible for your reader to get a snapshot of the solution. You should also have more detailed supporting content so they can learn more if they are interested.

  1. Provide a conside but descriptive Title. 60 characters maximum.

  2. Start by crediting the Author(s), including the company name that created the solution. This helps you gain credibility in the eyes of the reader. A recognized name that uses your products will have the most weight in the eyes of the reader.

  3. State your Products used in this case study. Simply state them - description will come later.

  4. Next, mention the Industry and Application Area that the solution pertains to. This allows readers to self-select by their interest area.

  5. Now it's time to describe the Challenge your customer needed to overcome. This is the reason they needed your product. Make this 25-50 words.

  6. Follow the Challege by the Solution. Describe how your customer solved the problem using your products. This should also be 25-50 words.

This completes your snapshot of the solution. You have given the reader enough information to decide if this fits their interests and if they want to learn more. The next step is to provide more details on the customer, the solution, and reasoning why your product was chosen for the solution. This is the main Body of the case study. It should be 800-1200 words.

  1. First paragraphs should be a Brief Description of the Customer. Specifically who they are, what they do, and who they serve. Elaborate on the engineering problem they were trying to solve and why it was important.

  2. The next few paragraphs should describe the Project itself that was used to solve the challenge. This is a high-level description of how the system works. Be sure to describe:
    • Other options besides your own, that could have solved the problem.
    • Why the customer chose your product over the other options.
    • The specific features of your product that were most utilitized and why they were important for the success of the solution.
    • Mention any additional services you provided that were helpful for the project.

  3. Now explain the Benefits of the Solution. Provide detail, and give quantifiable measures of the benefits. Specifically:
    • Practical benefits (Increased efficiency, ability to reuse or scale, etc)
    • Business benefits (Cost savings, time savings, meeting more customer needs)
    • Any benefits your or your customer did not expect

  4. The Final Paragraph should discuss how this solution and specifically your products met the customer's objective for their project.

  5. Follow the body with Contact Information to learn more about your products and the solution as well as any Additional Materials you may want to include like code or supplemental technical documents.

Once complete, your case study should have the following structure:

Case Study Title

Author(s):

Products Used:

Industry:

Application Area:

The Challenge (25-50 words)

The Solution (25-50 words)

Body (800-1200 words)

    • Brief Description of the Customer
    • Project Itself
    • Benefits of the Solution
    • Final Paragraph

Contact Information

Additional Information

Important Details

There are a few details that help to make a case study particularly engaging and effective. Always do the following:

  1. Include links or methods for readers to learn more about your product and get in contact with you. They should always have a next step.

  2. Choose a solution that is either attention grabbing or solves a very common problem in the industry you serve. This will help get people interested and give the case study more mileage.

  3. When possible, include pictures. Graphics and photographs immediately add a new element and sense of reality to your case study. People will be able to understand the case study more effectively. It also adds additional credibility.

  4. When possible, include video of the solution or concepts applied in the solution. Videos are one of the most effective methods to gain attention and get important messages across to the viewer.

Final Thoughts

Case studies can be a very effective addition to your overall marketing strategy. They give you the opportunity to demonstrate your technical aptitude while quickly showing others how people are effectively using your products. One of the best ways to gain exposure and increase sales is by demonstrating that respected organizations in your industry are happily using your product.

For example case studies, take a look at ni.com/casestudies. As always, free to post questions or your own examples below.

Have a great weekend!

Will Schoettler

LabVIEW Tools Network Product Manager

RDR
13121 Views
0 Comments

What is a session-based API?

Many LabVIEW toolkits can be defined as session-based APIs where there is always a beginning and an end to an interaction with some object.  This could be an instrument driver like the DAQmx driver where the API is used to configure and control the DAQ board, an API for reading and writing to configuration (.INI) files, or even an API for communicating over TCP.   Session-based API is characterized by the definition "a period of time devoted to a specific activity".  We often see these session-based APIs with an initialization/configuration or 'open connection' operation, a series of operations to manipulate & control the session, and an ending or closing of the session.  This is a common model used for APIs in LabVIEW, let's take a look at DAQmx and the Configuration File palettes:

  • A Configure HW - Read/Write Data - Clear Task session-based API model used in DAQmx for data acquisition
    daqmx.png


  • A similar Create/Open File - Read/Write Data - Close File session-based API model is used with Configuration File I/O
    config file.png


Great, how does this relate to me?

As you can see in the images above and by browsing the palettes in LabVIEW, most LabVIEW APIs created by NI R&D have a unique reference data type (Instrument IO References, File I/O References, etc.), access to property & method nodes, and an associated wire color for the different reference types in these APIs.  To date, creating a new custom reference type has not been exposed to third-parties, which often results in third-party developers using a cluster to pass their session data between their API VIs.  However, LabVIEW classes provide some very useful features like defining custom wire appearances & property nodes.  Lets take a look at how LabVIEW classes can be used in our APIs.

In the image below, I have created a session-based API by defining my own ZIP File.lvclass.  Using a LabVIEW class lets me as the developer define my own custom wire appearance, which will set my API apart from other LabVIEW .ZIP toolkits and prevents my customers from attempting to accidentally misuse my API by combining it with other file I/O operations.  I also created a custom property for this API where, when called, behind the scenes it executes a VI to read the File Size for my .ZIP file.  The advantage of using a property node instead of a VI to read this property is you can combine multiple property operations into a single Property Node and avoid stringing together additional VIs on the block diagram.  This makes my API much easier for my customers to use.

2013-08-29_13-17-09.png

This image displays a session-based API for working with .ZIP files that uses a LabVIEW class - notice the custom property node for reading the file size & the custom wire type.  I've attached the code below.

You mentioned LVOOP, where does it come into play?

In order to create the ZIP file API shown above, I used a tool created by Systems Engineering called the Extensible Session Framework (ESF) to generate the starter code & framework used in my session-based API.  This tool makes use of scripting, LVOOP and LabVIEW Classes to generate a template project and LabVIEW class framework with an architecture optimized for use in a session-based API.  Here are some of the features:

  1. Multiple instances - You can instantiate multiple unique copies of your session, each with a unique string name to identify it. So if you have a session named "Serial Waveform" and want to generate multiple different serial messages in your program, you can do so by simply creating multiple wires and naming them uniquely.
  2. Multiple accessors - Because the sessions are uniquely named, you can obtain a reference to any session that already exists from anywhere in your application space. This is analogous to the behavior provided by LV Notifiers and Queues.
  3. LV Class features - Your session is implemented as a class in LabVIEW, so you get all the nice features of classes: encapsulation and inheritance, password protection of private methods, and (in LV 2010) native property nodes
  4. Simple interface to C and TestStand - The session handle is a DVR to your class. This means that your methods, when called from TS or C/C++, only have to pass an integer (the DVR) to the caller. This is much much nicer than passing a cluster.

Please review the attached slide deck for an overview of the Extensible Session Framework and I encourage you to head over to the to view the accompanying example code & download their VI Package containing the tool used to generate ESF template classes as I have done:

Framework for creating Session-based APIs

Download All
David_L
14075 Views
0 Comments

NIWeek 2013 has finally, but sadly come to an end.  Every year, it's a great experience for Alliance Partners and the LabVIEW Tools Network, but 2013 has been by far the best.  In case you weren't able to join us (or if you did join us and just want to relive the memories) here are a few of the highlights:


LabVIEW Tools Network Awards


This year the LabVIEW Tools Network Awards were bigger and more successful than all of the others.  Combined with the Alliance Partner Network awards, we completely filled the keynote room to showcase this year's top new LabVIEW Tools Network products.  Congratulations to the finalists and winners in all 5 categories:


Test Product of the Year

Winner:  Tool Qualification Kit for NI TestStand by CertTech, L.L.C.

Toolkit to Qualify NI TestStand as a Verification Tool

http://sine.ni.com/images/products/us/interface_handout_l.jpg

Runner Up: Digital Video Signal Generation Toolkits by MaxEye Technologies

Create Test Signals for DVB, DTMB, CMMB, DAB, ISDB, and ATSC Digital Video Standards


Embedded Product of the Year

Winner: Raima Database API for LabVIEW by Raima, Inc.

Database solution for NI CompactRIO, Single-Board RIO and Windows

http://sine.ni.com/images/products/us/raima_database_api_l.jpg


Runner Up: modeFRONTIER for LabVIEW by ESTECO

Integration platform for multi-objective and multi-disciplinary Hardware-in-the-loop optimization.

DAQ Product of the Year

Winner:  Chameleon for NI CompactDAQ by PVI Systems

Configurable DAQ Software for Structural Test and Monitoring


http://sine.ni.com/images/products/us/06190807_1217_l.jpg

Runner Up: iDaq by Tools for Smart Minds (T4SM)

Data Logger, Fully Programmable With LabVIEW

Community Product of the Year

Winner: TSVN Toolkit by Viewpoint Systems Inc.

Subversion Version Control for NI LabVIEW


http://sine.ni.com/images/products/us/tsvntoolbar_l.jpg

Runner Up: VI Box XControls by SAPHIR

Advanced front panel controls for a more dynamic user experience

LabVIEW Innovation Product of the Year

Winner: Wirebird Labs: Deploy by Wirebird Labs LLC

Setup Authoring and Application Distribution for NI LabVIEW

http://sine.ni.com/images/products/us/wirebirdlabs_l.jpg

Runner Up: BLT for LabVIEW by Studio Bods

Building, Licensing, and Tracking for LabVIEW Executables

Runner Up: VI Helpeks by Konstantin Shifershteyn

Provide Your VIs With Help That Looks Like LabVIEW Help


Double the Products, Double the Downloads, Double the Fun!

Since this time last year, the LabVIEW Tools Network has almost doubled the number of products available (Currently 177 and growing) and doubled the number of downloads (Over 2 Million downloads).  This only happened thanks to the time and effort from our great developers and their awesome products. 


LabVIEW Tools Network Products in the Day 1 Keynote

This year the LabVIEW Tools Network took over the Day 1 Keynote stage.  Not only were the 5 LabVIEW Tools Network awards winners congratulated on the big screen, but Jack Dunaway from Wirebird Labs demoed Deploy, Raima Database API for LabVIEW and RTI DDS Toolkit for LabVIEW were showcased in a case study from LocalGrid, and Viewpoint Systems TSVN Toolkit was mentioned as a key Software Engineering Tool for LabVIEW.  Kudos to everyone involved!


Alliance Day Session: Selling Tools on the LabVIEW Tools Network

LabVIEW Tools Network Program Manager, Matthew Friedman, and LabVIEW Tools Network Engineer, Robert Des Rosier gave a very well received session on the process of selling a product on the LabVIEW Tools Network.  Slides from this session are attached below.


LabVIEW 2013 Release

LabVIEW 2013 was released and is better and more stable than ever.  The most notable new feature is that the LabVIEW Tools Network and VI Package Manager is actually installed by default when you install LabVIEW 2013.  This means that customers have an even easier opportunity to download and try out third party tools from directly within the LabVIEW environment without any additional steps needed.  A more detailed review of notable features of LabVIEW 2013 to come soon..


Much more

This is just a small bit of the excitement that we had for NIWeek this year. Hopefully we'll see everyone out here next year!

RDR
12199 Views
0 Comments

I thought some of you may want to know where we will be during NIWeek next week so here is a post containing recommended sessions & events taking place during NIWeek 2013!

Alliance Day

  • 8:30am - The day begins with breakfast and a morning Keynote to kick off Alliance Day in Expo Hall #4
  • Noon - Following two rounds of sessions the Alliance Partner and Tools Network Awards luncheon kicks off in Expo Hall #4
  • 1:30pm - After lunch, we are delivering a session: Selling Tools on the LabVIEW Tools Network in room 17A
  • 2:30pm - We will have open consulting time from 2:30-5pm in room 13B
  • 5:30pm - Join us at the NIWeek Kickoff Happy Hour in the main Exhibition Hall

Link to the Session Schedule: http://www.ni.com/pdf/niweek/us/2013/AllianceDay_Abstracts.pdf  (Subject to updates, they usually have these printed out for you at registration and at the information desks)

NIWeek

We will be all over the place from Tuesday through Thursday, but please let us know if you would like to squeeze in a short meeting!  Fire off an email to labviewpartnerprogram@ni.com with the dates/times that work for you.

Tools Network Recommended Sessions

  • SW PROD - Selling Tools on the LabVIEW Tools Network
    Room - 17A | Date - Mon, 5 Aug - 1:30PM
  • SW PROD - Creating a Single User Interface for Multiple Screen Sizes
    Room - 17A | Date - Mon, 5 Aug - 4:30PM
  • Bookmark API in LabVIEW 2013
    Room - 16A | Date - Wed, 7 Aug - 1:00PM
  • SW TECH - Everything You Always Wanted to Know About Programming Events in LabVIEW *But Were Afraid to Ask
    Room - 17B | Date - Mon, 5 Aug - 4:30PM
  • Managing Large-Scale Application Development
    Room - 19A | Date - Tue, 6 Aug - 2:15PM
  • LabVIEW Application Builder: Tips and Tricks for Deploying Desktop Applications
    Room - 19A | Date - Tue, 6 Aug - 3:30PM
  • Tips and Tricks to Speed LabVIEW Development
    Room - Ballroom E | Date - Thu, 8 Aug - 2:15PM
  • Hands-On: Source Code Control and Software Engineering
    Room - 18D | Dates - Tue, 6 Aug - 1:00PM & Wed, 7 Aug - 1:00PM
  • UI Design Best Practices
    Room - 16B | Date - Wed, 7 Aug - 2:15PM
  • GUI Design: Moving Beyond the Palettes, Bloomy Controls
    Room - 16B | Date - Tue, 6 Aug - 1:00PM

Tools Network Sessions

  • Building a Next Generation Data-Logging System, PVI
    Room - 13A/B | Date - Tue, 6 Aug - 1:00PM
  • Copy Protection of LabVIEW Applications, Wireflow
    Room - Technology Theater | Date - Tue, 6 Aug - 3:30PM
  • Deployment Automation and Release Engineering for LabVIEW, Wirebird Labs
    Room - 16A | Date - Wed, 7 Aug - 10:30AM
  • User Events, Tips, Tricks, and Sundry, Wirebird Labs
    Room - 19B | Date - Wed, 7 Aug - 3:30PM
  • Making the Most of the New User Event Features in LabVIEW 2013, JKI
    Room - 16A | Date - Wed, 7 Aug - 4:45PM
  • Database Solutions for CompactRIO, Raima and Saphir
    Room - 14 | Date - Wed, 7 Aug - 4:45PM
  • At Your Fingertips: Creating a Touchscreen UI for Embedded LabVIEW Apps, JKI
    Room - 17A | Date - Thu, 8 Aug - 10:30AM
  • Where the Blacktop Ends: Logging Vibration Data on Logging Trucks With CompactRIO, Signal.X
    Room - Ballroom E | Date - Wed, 7 Aug - 5:15PM
  • Qualifying COTS Tools for ISO 26262 Verification, CertTech
    Room - Ballroom E | Date - Wed, 7 Aug - 1:30PM
  • Micron-Range Color 3D Image Acquisition and Processing in LabVIEW, ImagingLab
    Room - 17B | Date - Wed, 7 Aug - 5:15PM
  • A Flexible Control Architecture for Lawrence Berkeley National Labs, Cal-Bay
    Room - Ballroom G | Date - Tue, 6 Aug - 10:30AM
  • Developing System and Subsystem Integration Test Rigs for Aerospace Applications, Wineman Technology
    Room - 17A | Date - Wed, 7 Aug - 10:30AM
  • Challenges and Best Practices for Implementing a Test Cell Control System, Wineman Technology
    Room - Ballroom E | Date - Wed, 7 Aug - 2:45PM
  • Standardizing Manufacturing Test Stations With NI TestStand, Averna
    Room - 12A | Date - Wed, 7 Aug - 1:00PM
  • Academic Forum Keynote: Do Engineering: Unleashing the Next Generation of System Designers, Quanser
    Room - Ballroom A | Date - Mon, 5 Aug - 11:00AM
  • NI Technology in the European Transonic Wind Tunnel Facility, S.E.A.
    Room - 17A | Date - Wed, 7 Aug - 2:15PM
  • Graphical Programming for Advanced Robotics: From Digital Reality to Factory Floor, DigiMetrix
    Room - 19A | Date - Tue, 6 Aug - 4:45PM
  • Accelerating Design Validation for Home and Industrial Products, Averna
    Room - 11A/B | Date - Wed, 7 Aug - 10:30AM
  • Communicate More in Less Time, Tools 4 Smart Minds
    Room - 18A | Date - Thu, 8 Aug - 2:15PM
  • Enhancing the Classroom Through Modeling and Simulation, Maplesoft
    Room - Technology Theater | Date - Tue, 6 Aug - 12:00PM

The complete NIWeek brochure can be viewed by clicking here.

Keynotes!

These are always fantastic and this year the keynotes will be streaming live!  If you aren't able to join us or have colleagues back in the office, you can use this link for remote viewing of the keynotes:

http://www.ni.com/niweek/livestream/

The future is now!

LAVA BBQ

Check out http://www.lavag.org/bbq for more information!

What are you looking forward to the most at NIWeek 2013?  Let us know!

Will_S.
12217 Views
0 Comments

NI Week is coming up fast, and it's an understatement to say there's going to be a lot going on. The LabVIEW Tools Network team and other groups at NI are going to be actively sharing cool and interesting information throughout the whole conference. So be sure to follow us to get all the best info!

LabVIEW Tools Network Team on Twitter

@LV_ToolsNetwork - Tweets on the latest product releases and other exciting information

@David_LVTN - David Ladolcetta, CLA, LabVIEW Tools Network guru

@MattATX - Our new LabVIEW Tools Network program manager and enthusiast

Alliance Partner Team

@shellybenjamin - Alliance Partner news and occasional Austin info

National Instruments on Twitter

@NIWeek - Information and live updates from the conference

@NIGlobal - News and updates on Graphical System Design

@labview - LabVIEW news and updates

National Instruments on Facebook

https://www.facebook.com/NIWeek

https://www.facebook.com/NationalInstruments

https://www.facebook.com/labview

LabVIEW on Google+

+LabVIEW

Don't Forget! During NI Week you can meet with LabVIEW Tools Network engineers and marketing one-on-one to discuss anything from technical implementations in LabVIEW to marketings strategies. This is a free opportunity. Click here to sign up!

Will Schoettler

LabVIEW Tools Network Product Manager

email signature image.png

ni.com/niweek

ni.com/allianceday

Matt_F
11948 Views
0 Comments

Creating and listing your products on the LabVIEW Tools Network is just the first step.  Just like any other product, marketing is crucial in getting your product known and achieving commericial success.

Are you in need of some marketing help, but do not have the time or staff to support it? On Alliance Day of NI Week, we will have four marketing communication agencies exhibiting and available to meet with you to discuss your marketing needs. Whether your product is large or small, these agencies can help with simply creating a data sheet, implementing website improvements, or designing a complete integrated marketing communications strategy. If you are interested in a free consultation with any of these agencies on Alliance Day, please email michelle.morgan@ni.com. We will connect you with an agency that fits your company’s expertise.

David_L
12341 Views
6 Comments

VI Package Manager is a very powerful tool for distributing and installing LabVIEW toolkits and add-ons.  There are tons of features for customizing your palettes, install destinations, licensing, etc in almost every way that is needed.  However as a developer,you may occasionally find yourself needing a little more control of your package that may not be directly supported in VIPM.  In these situations, you may use custom actions to unlock the full potential of your product.

custom action 2.png

Custom Actions

For those unaware of this powerful feature, custom actions are VIs that execute during the build or installation process of a VI Package.  They are standard LabVIEW VIs that run in the LabVIEW development environment, so anything that you can do in LabVIEW can be added to your build or install process.  There are three main types of custom Actions: 

  • Install Actions run before or after an end user installs your package
  • Uninstall Actions which run before or after a user uninstalls your package
  • Build Actions run before or after VIPM builds the .vip file (note that Build Actions are only available in VIPM Pro)

Parameters

One feature of Custom Actions that really makes them powerful is their use of Parameters that are passed from VIPM.  Parameters are passed via Variant Attributes into each Custom Action VI and can be used to make decisions based on information from the users (or developers) system.  Not every parameter applies to every Action type, but below are some parameters you may find useful:

  • Package Display Name
  • Package Name
  • LabVIEW Target Version
  • VIPM Version
  • Quite Mode
  • Mass Compile On
  • Files Installed
  • Folders Created
  • Files Uninstalled
  • Files Not Uninstalled
  • Refresh Palettes On
  • Output Package File Path
  • Package Member Source Files
  • Passwords
  • Product Name
  • Package Version
  • Package LabVIEW Version
  • Package Source Folder
  • Package Name
  • Build Failure

custom action 1.png

Error Output

All custom Action VIs have an error output which passes an error back to VIPM.  If an error occurs in the custom action VI, then installation/uninstallation/building is aborted and an error is displayed to the user.

Common Uses

As I mentioned, you can use custom actions to do almost anything that is possible in LabVIEW.  However a few ways custom actions can be useful are:

  • Zip/unzip files that you don't want mass compiled during install time.  Use a pre-build VI to zip the files and, install the zip file to a temporary location and then use a post-install VI to extract them into the appropriate folder.
  • Prevent a package from installing on newer versions of LabVIEW.  Use a pre-install step to check the LabVIEW version and return an error if the package should not install on the system.
  • Restart LabVIEW after installation.
  • Rename or make changes to components created during installation such as palettes, source files/folders, VIP files, etc.
  • Read or write from the registry

Getting Started

Creating your own custom actions is easy.  In your VIPM build specification, simply click the Custom Actions tab and then click Generate VI for the desired action.  This will create a VI in your build directory with the appropriate connector pane.  The Parameters variant is also added to the block diagram with code that breaks out the parameters that are useful in the specific type of custom action.  Simply use data extracted from the variant to start programming your custom action. 

Do you have any other interesting uses for Custom Actions or advice to other developers?  If so leave a comment below.


Roso
12853 Views
0 Comments

For those who have not heard (or been reminded via alert), JKI recently released the 2013 version of VI Package Manager.  There are quite a few new features as well as bug fixes, but I wanted to highlight a handful that would be of interest to LabVIEW developers:

  • The package creation window now has a separate dedicated page for the product description that gives more room for editing.  JKI has also added a legend on that page to show users what formatting tags are available.
  • VIPM now supports packaging code that calls VIs from the RT or FPGA palette using a conditional disable structure (see their documentation for more details).
  • For developers using custom license binding, license files (*.lf) are visible in the Package Builder source files tree and can be managed just like other support files.
  • VIPM automatically refreshes the LabVIEW menus when installing packages. (LabVIEW 2013+)
  • Mac features added:
    • Full OS X support
    • Package building
    • VI package configuration (VIPC) file creation
    • Repository management

For a complete list of changes, check out the official announcement.  You can download the latest version on the Tools Network or upgrade from the VIPM Help menu.

-Stephen

Will_S.
11615 Views
0 Comments

After spending all the time and effort to create a top-notch product in LabVIEW, it's extremely important to accompany that product with high-quality marketing material. Although a high quality product can speak for itself once it is in a user's hands, the marketing material will put it there and show off the best parts to the user. One key part of your marketing material is your Model Page on the LabVIEW Tools Network.

Step 1: Identify Your Target Audience

You designed your product to satisfy a need in industry. That need was created by a specific user base that you are familiar with. The features you implemented keep that user base in mind so that it is intuitive and effective for them to use. By keeping this user base, or target audience, in mind when you create your model page you can simultaneously demonstrate your industry expertise and relate to your potential customers. This is done by using technical language understood by your target audience and by highlighting the features that fulfill their needs most effectively. If you have correctly interpreted their needs and speak to them in their industry language you will build credibility and interest in your product.

Avoid This Pitfall:

Many developers encounter this issue: "My product has many great features that fulfill the needs of many different target audiences. I should market to all of these audiences."  Unfortunately, in reality, this approach typically results in marketing material that is confusing due to mixed industry terminology and does not effectively engage the customer's interest. It makes it difficult to speak to the product's strengths and can result in a loss of company focus as there is no clear definition of which type of customer should be prioritized.

For example, assume your product, T1D, is a table with a drawer.  It has good features like strength, stability, a high-quality smooth hard surface, and the drawer can be used to keep commonly-used items on hand. The T1D can also be used as a chair. Its features of strength and stability to support objects makes it an effective solution. However, key features you developed like the smooth hard surface and convenient drawer are not good selling points for a comfortable chair. In addition, a chair has a backrest which immediately makes it better suited for longterm sitting. Therefore, although the T1D has the functionality that could allow it to be marketed and sold to the Chair Buyer audience, you would find much more success by targeting the Table Buyer audience.

By selecting one primary target audience you can focus your energy and resources to reach your customers most effectively. Once you have established success with one audience you can consider reaching out to additional audiences. With your target audience in mind, you can begin crafting the model page content.

Step 2: Product Subtitle

Your product subtitle is the 1-sentence description all customers will see. It shows up on the product tile when browsing the LabVIEW Tools Network, and appears directly beneath the product name on the Model Page. The product subtitle is used to grab attention and describe your product at the same time. A good subtitle brings in potential customers. A poor one can cause them to pass your product by. Click the images below for examples.

Chameleon Tile.jpgChameleon Model page.jpg

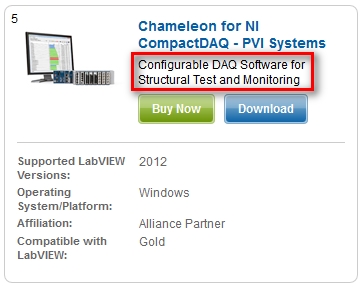
The example above include three main components:

  1. Key Differentiating Product Feature ("Configurable")
  2. Primary Product Function ("DAQ Software")
  3. Target Audience ("Structural Test and Monitoring")

By including these three components in the Product Subtitle, you can make your initial pitch to your potential customers. You tell the potential customer if they are the right type of user, what the product does, and what makes it stand out.

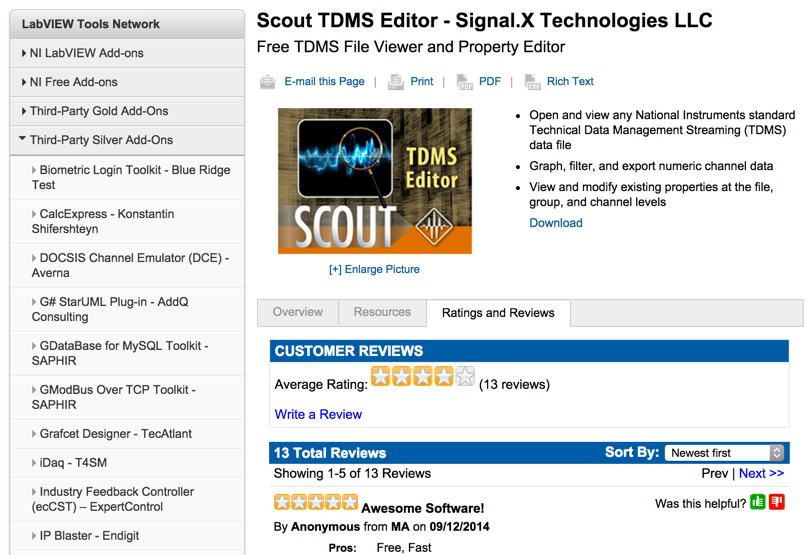
Step 3: Product Feature Bullets

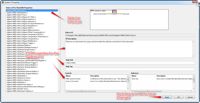
When a potential customer clicks through to your model page, the first thing they will see is the Feature Bullets at the top of the page. Click the image below for an example.

CertTech Bullets.jpg

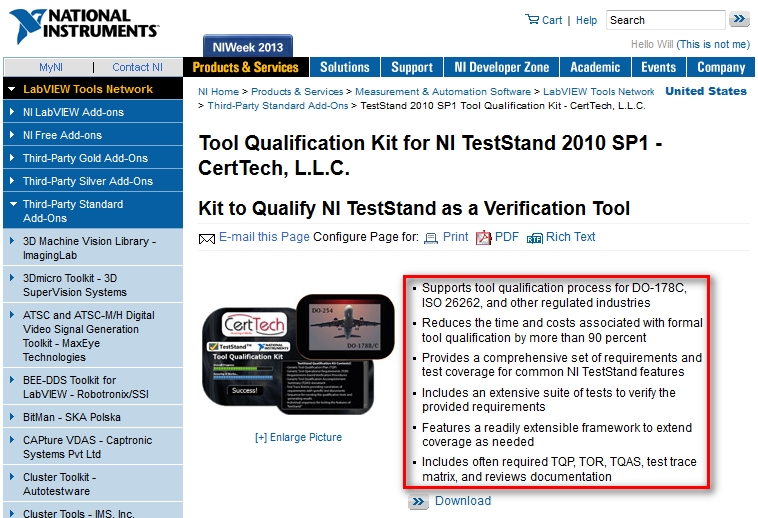
In general, feature bullets should provide the following:

  1. Brief description of what the product will do for the user
  2. Key differentiating features that make it stand out over other similar products
  3. Benefits of those features

When selecting your bullets, always keep your target audience in mind. Choose features and benefits that best apply to them.

Step 4: Product Overview

The product overview section is where you can provide an in-depth description of your product. Click the image below for an exmaple.

SCCT Overview Small.jpg

A good product overview will describe the functionality of the product using terminology and features that are pertinent to the target audience. It will also include key decision information such as supported hardware and system requirements, if applicable.  Additional features and a description of package contents can also provide helpful insight into what your product offers.

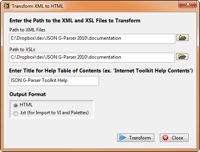
Step 5: Related Links

Often overlooked, the Related Links section is the perfect location to send your customer to additional information like case studies, video demos, documentation, and more. All of this supporting marketing material can be used to gain credibility with customers and help them make the decision to evaluate your product. Click the image below for an example of Related Links.

NeuralID Related Links.jpg

At a minimum, you should provide a pathway for your customers to learn more about the product. It is highly recommended to include demos and case studies. If you do, create them such that they cover topics applicable to your target audience.

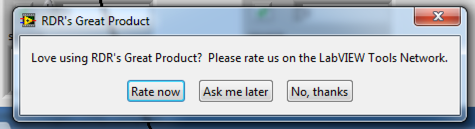
Step 6: Ratings & Reviews

Ratings & Reviews are a highly beneficial mechanism for both gaining credibility in the eyes of potential customers and for gathering feedback from your existing users. Click the image below for an example of Ratings & Reviews.

ltk reviews.jpg
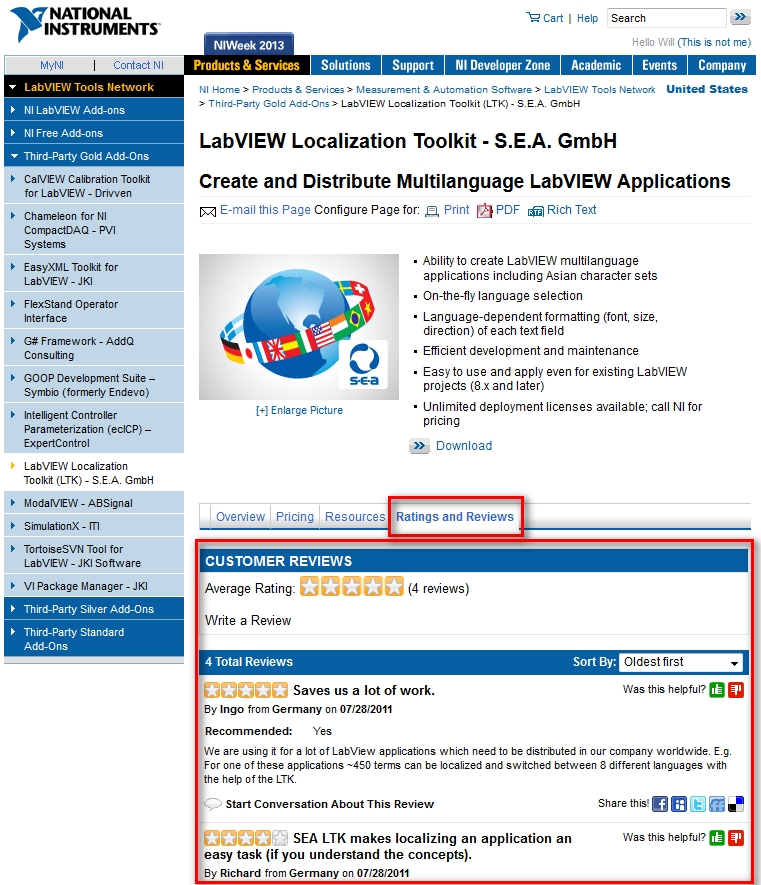
By encouraging your user-base to return to the model page and contribute ratings and reviews you can find some invaluable feedback. Potential customers are also typically more likely to evaluate or purchase a product that they can verify others have had success with.

Step 7: Spread the Word

A model page is a great first step to getting your product into the market. However, it is just a small part of the entire marketing effort. The most success comes from a combination of marketing efforts including case studies, press wires, participation in interest groups, and any other sort of communication you can have with your target audience. Always include a call to action to evaluate or purchase the product. Use your model page as the link point. By reaching out to your target audience and establishing yourself as a credible source of expertise in their industry you can develop a reputation for quality products that could translate in good sales.

Best of luck with your marketing efforts and feel free to comment below.

Will Schoettler

LabVIEW Tools Network Product Manager

RDR
11498 Views
0 Comments

We have added a new technical guide, sharing some of the guidelines used internally by NI developers as new palettes are created for LabVIEW!  You can find it here:

LabVIEW Palette Guidelines

Of course, if you would rather rely on the friendly folks at JKI to work the palette magic for you, you can pretty much disregard the guidelines above and follow the document describing VI Package Manager here:

Creating a LabVIEW Palette with VI Package Manager

Either way works!  As always, if you have any questions - fire away!

-RDR