- Document History
- Subscribe to RSS Feed
- Mark as New
- Mark as Read
- Bookmark
- Subscribe
- Printer Friendly Page
- Report to a Moderator
- Subscribe to RSS Feed
- Mark as New
- Mark as Read
- Bookmark
- Subscribe
- Printer Friendly Page
- Report to a Moderator
Getting Started: Git/GitHub Development Workflow
A detailed 3rd-party view of this workflow can be found here: https://www.atlassian.com/git/workflows#!workflow-forking
Git can be a somewhat complicated tool to develop with. While many resources exist on the web for help with specific problems, this aims to give new developers a high-level view of what they are supposed to do. The documentation that follows will broadly follow this flowchart, picking up after the creation of the initial repository (node 3):

This flowchart was developed using https://www.draw.io/ and the source is attached.
Setting Up Your Development Environment
First, follow the Git and GitHub setup guide. Then, Locate the project you wish to contribute to on github. The project may consist of a number of different branches. Consult the project readme to identify the development branch of the project and determine whether or not you have write access to the project. Assuming you don't have write access can't get write access, you'll want to fork the project, as described by the GitHub help.
Now, we have at least 3 copies of the project in three separate locations:
- The main repo on GitHub
- The development repo of the owner of the main repo on GitHub (ie the copy on their local machine)
- The fork of the main repo, under your account, on GitHub
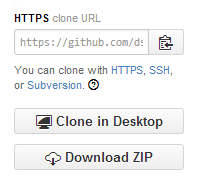
Lets make a fourth copy! You'll want to clone your fork onto your local machine so you can work from it. To do this, follow the instructions in the GitHub help linked above. If using Visual Studio, microsoft has a good guide. If you are using SourceTree, load sourcetree and press the "clone" button at the top left of the UI. Then press the "browse hosted projects" button (a globe) and you should see your repository. If you don't, or if you did not fork the core repo, you may copy the URL directly from GitHub. This can be found here, generally on the right hand side of the GitHub page:
If you forked the project earlier, you'll need to make sure you are still linked to the "main" repository on GitHub. If you are using the command line, follow this GitHub guide or the GitHub help. If you are using SourceTree, follow these steps:
- Open your repository in SourceTree and select its tab
- Navigate to Repository >> Add Remote...
- Press Add
- Select a name/alias which makes sense, like "upstream"
- Enter the url of the repository you forked, not your fork
- Confirm that it worked by locating this new Remote in your repository view, right clicking on it, and selecting "Fetch from <alias>"
That's it! Now you have a local development environment to work from.
Developing with Git and Keeping Up To Date
As shown in the flowchart, our workflow allows for a lot of activities from here. For now, lets focus on development of changes. We'll get to committing our changes in a little bit.
First off, you can simply develop code normally. If you're using LabVIEW, the experience will be improved by setting your LabVIEW environment to be completely source-separate.
Lets imagine that you are working with a co-worker on your own fork of the project (by giving them direct access to your fork in GitHub), or that you are developing from two machines. In this case, you'll want to make sure your code is always up-to-date with your fork.
Alternatively, lets imagine that someone else has been developing on the mainline repository and has just submitted some new changes. It is a best practice to keep up-to-date with the mainline repository, as this will make merging your changes easier.
In either of these cases, you will want to take your local working copy and update it to the latest and greatest version of the code. To do this, first fetch updates from your remotes. If using the command line, that is described in this basic guide, or in GitHub's help. If using SourceTree, this is performed for you automatically. Once you've fetched the changes from either your fork ("origin", usually) or the mainline repository ("upstream" is recommended, but this depends on your selection), you can pull these changes into your current branch. This is outlined in the basic guide above, for the command line. For SourceTree, press the "pull" button, select the remote (origin or upstream) and configure any other desired options.
This process is fairly similar for handling pull requests, although GitHub can do a lot of the work for you if there is no need for a manual merge (ie, no two people changed the same files). GitHub help outlines this process. If manual work is needed, you'll need to pull the branch from the remote fork into your current branch, evaluate the changes, and then apply the changes to your repo.
As an aside, Git has the concept of merging and the concept of rebase. In general, rebase is more valuable when you have not yet pushed changes up to a server. A detailed discussion is available from here or here or here.
Committing Changes with Git
The right column of the flowchart is all about committing your changes and getting them accepted in the main repository.
When it comes to committing, git is also a bit strange. It is even more strange than Mercurial, the other big DVCS. Basically, in order to commit changes you first have to add them to the index. From the command line, follow the basic guide. For SourceTree, the visual nature really helps here:
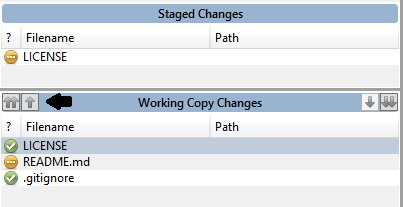
The bottom half of the image is everything going on in your working copy. It shows new things, unversioned things, modified things, etc., with filters for each type. The top half of the image is the set of files staged to be comitted. You can stage changes and keep working, or you can stage changes and immediately commit those changes. To stage changes, just press the up arrow (being pointed at in the image). To unstage changes, press the down arrow. Simple. Kind of.
To commit these changes from the command line, you'll still want to follow the guide. Sourcetree is easy to handle -- just press the commit button and add your notes. If you forgot to stage a few changes before you pressed the button, you can still stage them from this window without hassle. Its a much simpler experience.
For visual studio users, this entire process is described in a guide.
Even pushing changes to a remote repository you have access to (generally "remote/origin") is pretty easy in sourcetree. After committing your changes, the "push" button in the toolbar will show an overlay with the number of local changes which are not on the server. If you want to push these changes, just push the "push" button. As before, command line users should follow the basic guide linked above. In Visual Studio, a different tutorial follows this process.
If you have access to the main repo, thats it, you're done. You've successfully made changes to the code and added them to the central server where everyone can find them.
If you're working off a fork, there is still work to do. You'll have to generate a pull request before your changes will show up in the main repo. The hard work is now the responsibility of the person maintaining that branch -- they have to grab your changes, validate them, and merge them with the mainline repo.
To help keep them happy, and increase the chances of them accepting your changes, follow these simple guidelines:
- Limit the scope of your change as much as possible. Smaller changes are easier to process. Any major changes should be discussed beforehand with the managers of the repository to ensure that it fits within the goals and vision of the project.
- Explain the reason for your change with as much detail as possible. If it is a bugfix, link it to an issue in the issues tracker. If it is an enhancement, consider making an issue in the issue tracker to discuss the enhancement before making it. This ensures that the enhancement will provide value to other users.
- Run through the style guidelines and any available VI analyzer tests to ensure compliance with the general style of the project. Don't go crazy trying to make the code perfect. Do make sure there are no glaring issues.
-
Before committing a change, be sure to re-base or merge your code off of the most up-to-date source in the master. This reduces the risk of merge conflicts and makes it that much easier to merge your pull request and that much more likely that the change will be accepted.
- Ensure that all builds are successful with your change in place, after re-basing.
- Ensure that all tests pass with your change in place, after re-basing.
